
|
Beaches of Wolmi-do Counter Attack #42 |
||
|---|---|---|
| (Defender) North Korea | vs | United States (Attacker) |
| Formations Involved |
|---|

| Total | |
|---|---|
| Side 1 | 1 |
| Draw | 0 |
| Side 2 | 2 |


| Overall Rating, 3 votes |
|---|
|
4.33
|
| Scenario Rank: --- of 913 |
| Parent Game | Counter Attack |
|---|---|
| Historicity | Historical |
| Date | 1950-09-15 |
| Start Time | 06:30 |
| Turn Count | 15 |
| Visibility | Day |
| Counters | 65 |
| Net Morale | 1 |
| Net Initiative | 4 |
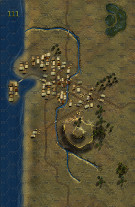
| Maps | 1: 111 |
| Layout Dimensions | 43 x 28 cm 17 x 11 in |
| Play Bounty | 159 |
| AAR Bounty | 165 |
| Total Plays | 3 |
| Total AARs | 2 |
| Battle Types |
|---|
| Amphibious Landing |
| Hill Control |
| Inflict Enemy Casualties |
| Beach Control |
| Entrenchment Control |
| Conditions |
|---|
| Entrenchments |
| Naval Bombardment |
| Off-board Artillery |
| Randomly-drawn Aircraft |
| Smoke |
| Scenario Requirements & Playability | |
|---|---|
| Counter Attack | Base Game |
| Introduction |
|---|
|
The Inch’on invasion began with a reinforced Marine battalion landing on Wolmi-do (Moon Tip Island), a small but hilly island right off the shore of Inch’on’s port and linked to the city by a causeway. Following heavy air strikes and naval bombardment, the Marines hit the beach. |
| Conclusion |
|---|
|
The Central Intelligence Agency’s “Operation Trudy Jackson” had accurately identified all North Korean positions on the island in the weeks before the landing. The Marines swiftly captured Wolmi-do and the tiny connected islet of Sowolmi-do, killing or capturing almost all of the 400-man garrison within 90 minutes at minimal loss to themselves. With the island secure, the Marines now waited for the massive tides to return in the evening so the forces slated to land on other beaches could arrive. |

|
|
|---|
| AFV Rules Pertaining to this Scenario's Order of Battle |
|---|
|
| Chosŏn inmin'gun |
|---|
|


| Marine Corps |
|---|
|


| Navy |
|---|
|


| 1 Errata Item | |
|---|---|

|
The 8-3 Marine Infantry counter appears in most of the Saipan 1944 and Marianas 1944 scenarios, replacing the 10-3 DF valued Marine counters for those scenarios and is currently published in the most recent Saipan printing. (JayTownsend
on 2015 Dec 26)
|
| Korean War: Counter-Attack, scenario #42: Beaches of Wolmi-do | ||||||||||||
|---|---|---|---|---|---|---|---|---|---|---|---|---|
Korean War: Counter-Attack, scenario #42: Beaches of Wolmi-do This was one of the coolest scenarios I have played in a long time, sure a bit one sided but just fun to play. With that said, two clarifications: first from design to development and so on a few units were added so with the LSVs able to transport 4 steps and any number of leaders and the LCVPs and LVT3Cs able to transport 2 steps and any number of leaders you will have three steps too many to transport. Remember the Bazooka Team stacks for free. So two transports after unloading will have to exit the west side of the map and load the extra units and return. I left off the one HMG unit and one 81mm Mortar unit and returned later for them. Second, I have the LSVs and in later scenarios the LSTs with a 6 armor protection factor. Not this this has coming to play. The LCVPs have a -1 like trucks and the LVT types units have a printed Armor values on the counters. Set up took a lot of thought, deciding where to setup the North Koreans, as they are automatically spotted in or adjacent hexes to the shoreline and I want to setup the two entrenchments and one Bunker counter kind of spread-out to buy time and spread the Marines thin. The biggest challenge for the Americans will be the first couple of turns, exposed to all the Anti-Tank and Bombardment fire and getting over that sea wall and lastly the 15 turns to achieve all the victory conditions. I wasn’t sure what to do with the NKPA Ba64 unit, so I set it up as kind of a mobile reserve hidden deep in the city, as I know it won’t last long. The 122mm and 76.2mm guns are both entrenched with the 40mm AA Gun dug-in somewhere between them to give AA support against the American air-power. The Bunkers has a NKPA: HMG, INF and higher valued leader in it. The rest are setup to the best of my ability including Wolmi-do Island. The Marines enter but avoid landing units adjacent to North Korean units to begin! So for the major highlight; The first round the Marines were pretty lucky with AT dice rolls against them and managed to get over the sea-wall in the first couple of turns with most units. The Air-power and naval bombardments were ok but only two or three times really helped out. I used mostly Naval/Marines planes in this scenario. Also I may have use my air-power one turn too many but oh well! Early on the biggest setbacks for the Americans were a NKPA combine mortar attack, of one 120mm and one 82mm plus one leader with a one combat factor, for a total of 21 Bombardment fire rolling a two with the dice, thus causing the Marines to lose two steps of Infantry, a shocker for sure! The nest turn I blasted the North Korean mortars with all my off-board artillery for revenge. Also the Americans lost one LVT3C unit to NKPA Anti-gun fire from the 122mm gun, as those LVT3Cs are very vulnerable. Lastly the American lost on step of M4Flam after blasting apart a hex, the adjacent NKPA 40mm AA gun fired a short into it. The attack on the Bunker was another highlight! After disrupting both a North Korean INF and HMG units the previous turn, I assaulted the two NKPA units plus high value leader with one Marine INF, one PIO/ENG, one 3.5 Bazooka Team plus one Colonel with a 1 combat factor as well. The Bunker gave the North Koreans a plus 3 combat modifier but the 3.5Bz gives a plus 2 combat modifier and cancels out fire-first plus the Americans had another PIO/ENG unit to add one more modifier and totally cancelled out the Bunkers advantage. The Bunker was cleared! The American M4Dz & M4Flm, one INF and leader steamrolled the NKPA 76.2mm entrenched gun before the M4Flm took the step loss mentioned earlier. Also, remember, if the American Bazooka Teams, is not attacking enemy bunkers, armor or vehicles, it stacks free and add one to assault hexes and you never know when one point might push an assault to the next advantage column, so use them! The NKPA Ba64 unit was destroyed by an American M26 unit, just like historically after they tried to reinforce a SMG unit. With all that action, it’s hard to believe the last North Korean units to be cleared were still on the two hex Wolmi-do Island. With full concentration the American cleared that as well but only on the second to last turn. The Marines won a total victory, achieving all four objectives and the whole map was clear except one disrupted Kommissar that ran away and was never tracked down. Ok, it may have been a complete Marine victory but it was so fun to play, with four objectives and a time constraint of only 15 turns, the Marines have their hands full and the NKPA have to choose when and where to strike. I few dice rolls either way and the whole situation can change. Moving these many varieties of units around with an awesome fire-power was just satisfying to tryout in this scenario. I highly recommend playing this one, even with a few extra scenarios rules, it worth it. |
||||||||||||
| 0 Comments |
| Sea landing | ||||||||||||||
|---|---|---|---|---|---|---|---|---|---|---|---|---|---|---|
This is the report of my first try at sea landing in PG ! Globally interesting and smooth going. A few remarks first. There's an error in the scenario with the landing ship capacity and the number of units to transport : there's one unit step in excess. So we agreed to adapt the ships to the number of units listed in the OB. Second : when an AFV lands on the shore from a ship, it costs 1 movement point to both ship and AFV but may the AFV go on expending the remaining movement points on land ? We have agreed it was possible that way. I was commanding the Marines force and I must admit the approach seemed quite risky from the start. The North Korean player has 1 X 40mm AA gun, 1 X 76 mm Art and 1 X 122 Art that all have a significantly good capacity of inflicting losses on the LVT3C (their armor is 0 !) and even better on the other ships (unarmored). Since we play face to face using the hidden units option, there was no unit visible on the Incheon coast... I chose to enter the LVT3C,only, on the first turn and on the most southern part of the coast trying to outrange the guns that might be located on the Wolmi-do island. The 40mm AA was set up entrenched on the top of the round hill and it sank a LVT3C right away with the transported units. Answering the threat, I sent the aircrafts against the hill but ... no result. Then I directed all the artillery (2 X 30 + 1 X 24) against the same target and got it eventually : one gun less ! No other theat materialized on the first turn. On the second turn, I immediately landed the personnel from the LVT3C (too dangerous !) to begin recon on the shore and no other entry. On third turn, the Marines + LVT3C completed the recon and it appeared that Wolmi-do was empty of enemy. Further infantry entering in the unarmored ships landed safely on the island. Next turn, the ships transporting the tanks (Pershings, Flame shermans, Dozer) landed safely in the same area. And the US invaded the city without difficulty smashing everything dangerous with artillery. On turn 8, the North Korean conceded. I really wonder what would have happened if the North Korean player had opted for a more forward defense... |
||||||||||||||
| 4 Comments |
Hi Leonard!
This sounds like a great scenario to play face-to-face with real hidden units. How do you think it would go solo? Still a 4 rating?
~ drew
Leonard, thanks for playing that scenario. I have done a lot of amphibious scenarios from Saipan 1944, Marianas 1944 and a few from The Korean War: Counter-Attack. I always want AAR feedback on these, as they are fun to play but take a lot more work to design than the normal scenarios. The Korean War amphibious scenarios were harder to make compared to the Pacific WWII ones, as initially the NKPA didn't put up a lot of resistance, making them harder to simulate.
Hi Andrew,
Well... I don’t play PG solo that much so I’m rather inexperienced in that field. However, the scenario should be rather short and brutal in any way. I think the only valid option for the North Korean is to set up his guns on the shore to maximize the kill possibilities on the incoming ships. Even if moderately lucky, the NK player could destroy half of the Marines force but then ... he will probably also win the scenario. So, it is mainly a question of dice rolling during the very first turns and this could be frustrating because strategy is limited. Difficult to balance. Not a top scenario but fun to try.
Hi Jay,
Yes, it is fun to play ! Thanks for that. As I explained it to Andrew above, it surely is difficult to balance.