
|
Task Force Davidson Counter Attack #28 |
||
|---|---|---|
| (Defender) North Korea | vs | United States (Attacker) |
| Formations Involved |
|---|

| Total | |
|---|---|
| Side 1 | 0 |
| Draw | 1 |
| Side 2 | 4 |


| Overall Rating, 5 votes |
|---|
|
3.8
|
| Scenario Rank: 219 of 913 |
| Parent Game | Counter Attack |
|---|---|
| Historicity | Historical |
| Date | 1950-09-11 |
| Start Time | 09:30 |
| Turn Count | 18 |
| Visibility | Day |
| Counters | 43 |
| Net Morale | 1 |
| Net Initiative | 0 |
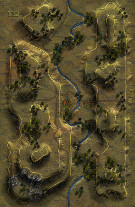
| Maps | 1: 112 |
| Layout Dimensions | 43 x 28 cm 17 x 11 in |
| Play Bounty | 152 |
| AAR Bounty | 159 |
| Total Plays | 5 |
| Total AARs | 3 |
| Battle Types |
|---|
| Bridge Control |
| Hill Control |
| Inflict Enemy Casualties |
| Urban Assault |
| Entrenchment Control |
| Conditions |
|---|
| Entrenchments |
| Off-board Artillery |
| Smoke |
| Scenario Requirements & Playability | |
|---|---|
| Counter Attack | Base Game |
| Introduction |
|---|
|
With the depleted but still-determined North Korean 5th Division threatening to break through the South Korean 3rd “White Skull” Division, the American 24th Infantry Division formed Task Force Davidson of many assorted units to protect Yonil Airfield. To help stabilize the positions held by The Invincible, the task force would pass through the ROK division and attack the key North Korean position on Hill 482. |
| Conclusion |
|---|
|
North Korean machine-gunners – chained to their weapons, according to a ROK account of the fighting – held off Task Force Davidson for the remainder of the day. After an air strike with napalm and a thorough artillery bombardment, the Americans went forward again on 12 September and finally dislodged the stubborn North Koreans from the hill. ROK troops from The Invincible took over the positions and Task Force Davidson returned to corps reserve. |

|
|
|---|
| AFV Rules Pertaining to this Scenario's Order of Battle |
|---|
|
| Chosŏn inmin'gun |
|---|
|


| Army |
|---|
|


| Korean War: Counter-Attack, scenario #28: Task Force Davidson | ||||||||||||
|---|---|---|---|---|---|---|---|---|---|---|---|---|
Korean War: Counter-Attack, scenario #28: Task Force Davidson A nice mix of victory conditions but the North Koreans defend with four entrenchment counters but not to worry, the Americans bring some cool (M) weapons, in the form of: M16s, M19s and M26s vehicles to hopefully offset those North Korean entrenchments, which set on both 60 meter hill tops and one adjacent leaving the forth one to setup adjacent to the village on the west side of the river. The NKPA concede the village on the east side of the river. Each side gets one point for every eliminated step, tank steps count double, one point for each village and bridge hex controlled, two points for each 60 meter hexes controlled and the NKPA get four points for each entrenchment controlled while the Americans only get one point for each entrenchment controlled. The American don’t have a huge force but enough if they organize their attacks but only 18 turns to do so. Task Force David leads with the (M) vehicles but find the M16 halftracks very vulnerable and lost both steps in two consecutive turns to the a 40mm AA gun, as zero is weak armored protection. Fighting it very heavy and the Americans are not strong enough to take all four entrenchment counters but manage two out of four but lose one step of M19s to adjacent North Korean ATR fire, that managed to roll a 12 on the dice. In the end of 18 turns the Americans have 21 points, 14 for eliminated enemy steps, 3 for controlling both the villages and one bridge hex, 2 for controlling one 60 meter hex and 2 for controlling two entrenchment counters. The North Koreans have 19 points, 9 for eliminated enemy steps, 2 for controlling one 60 meter hill hex and 8 for controlling two entrenchment counters. The Americans lead by 2 points but a side needs to win by 6 or more points just to achieve a minor victory, so it is a Draw. The key to this and when I try it again for the Americans is two assault those North Korean entrenchments with the M16s, M19s and M26s but suppressing the 40mm North Korean AA gun and the ATR before getting into their range. The American Infantry units cannot take too great of a beating as there is not enough of them to keep recovering to assault again and with only 18 turns, they are going to lose some steps. It is a delicate balance for each side and the NKPA need to setup with all units supporting each other and maybe to totally abandon the villages and bridge hexes below the hills. So I made couple mistakes with both sides. The entrenchments are the key to this battle/scenario. Just like historically the North Koreans held off Task Force Davidson, if only for a day. |
||||||||||||
| 2 Comments |
| US Firepower | ||||||||||||
|---|---|---|---|---|---|---|---|---|---|---|---|---|
I played this one to test an Optional Rule for artillery suppression I've come up with and hope to write up in a Daily Content article for AP. It had some effect but not much to skew the results. The NK forces set up with a hill top defense, a delay in the town at the bridge and forward line at 40 meter line to force the Americans into a kill zone. The US brushed aside the delay then turned south to take on the hill. The first line of defense took about four turns to break and then the desperate fight for the hill top began. It was a tough slog for the US forces as two sides of the hill defense held out to the bitter end but the overwhelming US firepower finally took its toll. The game ended with the US fully in control of the hill and winning decisively 27 to 6. |
||||||||||||
| 0 Comments |
| The Task Force Does Its Job! |
|---|
|
This was a pretty interesting scenario. The North Koreans have an infantry heavy force, with a good number of HMGs, plus a 40mm AA gun for defense. They also get 4 entrenchments. That AA gun is handy because the US has 2 thin skinned armored units which could become easy prey to it. The M16 and M19 (the thin-skinned ones) put out a LOT of firepower. The US also has a good morale, well led infantry force, with 3 of its own HMGs and an engineer platoon. They also have 2 81mm mortars (the NorKs have 1) and 18 points of OBA As the North Koreans, I put one of the entrenchments near the 2 towns and bridges (worth VPs to whomever control them), along with a lot of infantry (and all the SMGs) to make the Americans take as long as possible to have to clear it. I put on entrenchment on a 60m hill, along with dug in mortars, and the other 2 entrenchments on the corners of the 40m hill near the 60m crest. In retrospect, I should have clustered these 3 entrenchments. As the Americans, I sent the M16 and M19 to where they were out of range of the AA gun and could still attack the towns, and sent most of my infantry and my other tanks to take the town first. I decided to send all 3 HMG and a couple of infantry platoons to pin the defenders on the hill. The approach to the town was bloody, with North Korean mortars, and concentrated fire from the town and entrenchments taking their toll. However, the heavy fire from the M16 and M19 started to wear down the defenders, and with only 7/6 morale, when these guys had had enough, they had had enough and scooted (North Korean leaders were not good at rallying them, either). On the southern flank, the HMGs were keeping pressure on the big hill because the concentrated firepower of 3 HMGs (30 factors) is still a 16 shot with the maximum 2 shifts. The US finally had to assault into the town and bridges, and took some lumps there, as the North Koreans had some nice die rolling. However, the numbers (both morale and quantity) worked against the Communists, and they were forced out by about turn 11, with the entrenchment holding out longest. Also, a long range shot from the AA guns did cost a step of the M16s. With less than half the scenario to go, the fight for the large hill was on. Here's where not being able to concentrate fire from the entrenchments really hurt the North Koreans. US artillery and long range firepower finally eliminated the AA gun, allowing armor to come close, and the entrenchments were too far from each other to mutually support each other. The US was, to some extent, able to deal with them piecemeal. The North Korean 7/6 morale didn't help, either, because demoralized in an entrenchment (and as I type this I realize I forgot the "don't have to flee from an entrenchment" rule) still means rolling less than a 7, and the recovery rolls were not good. 3 of the 4 entrenchments had fallen by turn 17, and both of the 60m hill hexes were in American hands. The North Koreans surrendered, well behind on points. It was a major American victory. Had I remembered the "didn't have to flee" rule, it might have been slightly different. And the extra shifts for fighting demoralized guys might have just resulted in more North Korean casualties and only a slight hitch to the timetable. I think the bigger issue was the poor placement of the entrenchments. A good scenario, which I rate a 4 instead of a 5 because, as with many assault scenarios, there's not a lot for the North Koreans to do. There are some decisions on when to give up on defending the town, and past that it's "what's the best target for my unit" without a lot of maneuver. The North Koreans have to deal with a ton of US firepower in this, and need to protect the AA gun as long as possible. Because when those 24 and 16 point direct fire units get close, it's a bad day to be anywhere, even an entrenchment. |
| 0 Comments |
I'm playing this now and it sounds like my setup is similar. I have the 40mm in the 60m entrenchment (I only put 1 there). The MSM are way off on a 40m hill to the northwest where they can spray the town and where the 40mm can't hurt them. That's great for the town, I'm not sure how it will help against the hill.
Looking forward to how your game turns out.