
|
Counterattacked Go for Broke #23 |
||
|---|---|---|
| (Attacker) Germany | vs | United States (Defender) |
| Formations Involved | ||
|---|---|---|
| Germany |  |
716th Infantry Division |
| United States |  |
442nd "Nisei" Infantry Regiment |

| Total | |
|---|---|
| Side 1 | 1 |
| Draw | 0 |
| Side 2 | 0 |


| Overall Rating, 1 vote |
|---|
|
5
|
| Scenario Rank: --- of 913 |
| Parent Game | Go for Broke |
|---|---|
| Historicity | Historical |
| Date | 1944-10-21 |
| Start Time | 13:00 |
| Turn Count | 20 |
| Visibility | Day |
| Counters | 69 |
| Net Morale | 1 |
| Net Initiative | 1 |
| Maps | 2: 11, 9 |
| Layout Dimensions | 56 x 43 cm 22 x 17 in |
| Play Bounty | 162 |
| AAR Bounty | 171 |
| Total Plays | 1 |
| Total AARs | 1 |
| Battle Types |
|---|
| Covering Action |
| Urban Assault |
| Conditions |
|---|
| Off-board Artillery |
| Reinforcements |
| Scenario Requirements & Playability | |
|---|---|
| Battle of the Bulge | Maps |
| Elsenborn Ridge | Counters |
| Go for Broke | Base Game |
| Introduction |
|---|
|
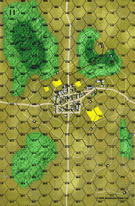
While the rest of the regiment was fighting at Hill 505, the 100th Infantry Battalion had quietly worked their way east over a mile from the nearest friendly unit. Unfortunately they were discovered and became pinned down on a ridge overlooking Biffontaine. The German grenadiers subjected the Nisei to a heavy barrage from three sides to soften them up, then struck at their exposed right rear flank. |
| Conclusion |
|---|
|
The 100th Battalion was overextended. If they had been left on their own for any length of time, they would have had trouble dealing with the situation. Luckily, the 2nd Battalion had completed their assignment at La Broquaime and raced to intercede. With characteristic verve the Asian-Americans hit the grenadiers hard and from an unexpected direction, driving them off. They spent the rest of the night toting water and ammunition to the hard-pressed 100th Infantry Battalion and helping them reinforce their forward position. |

|
|
|---|
| AFV Rules Pertaining to this Scenario's Order of Battle |
|---|
|
| Heer |
|---|
|


| Army |
|---|
|


| 3 Errata Items | |
|---|---|
| Scen 23 |
Note that this scenario requires Map #9 from Battle of the Bulge. It should be placed in the same configuration as the following scenario. (Matt W
on 2012 Apr 19)
|

|
The reduced direct fire value of the Heer HMG became 5-5 starting with Fall of France. (plloyd1010
on 2015 Jul 31)
|

|
The morale and combat modifiers of German Sergeant #1614 should be "0", not "8". (Shad
on 2010 Dec 15)
|
| Choices |
|---|
|
This is a very interesting scenario. The German must protect against a number of Nisei objectives. The Nisei have a severe manpower shortage, being outnumbered almost 2-1 but with a significant morale advantage and the initiative they can make the Germans spread out and be subject to defeat in detail. My play didn't work out quite that way but that was more a result of devastating German artillery and direct fire. The Germans initially attempted to close down all of the Nisei options and advanced to invest the Nisei in their starting position. The Nisei, for their part chose to remain in place and absorb any assault. 4 turns in and there had been no losses. The Nisei reinforcements arrived on turn 4 and promptly ran into a hail of opportunity fire, losing two steps. Turn after turn the Nisei took multiple step losses and by turn 7 had lost 8 steps to 1 German. They were gaining a better battlefield position and the losses evened out such that by turn 12 the Nisei had lost 20 steps total to the German 11 but by then the remaining Nisei were cut up into two pockets and the likelihood of any win had disappeared. Up until that point, however, the play had been close. The Nisei seemed to be able to gain a number of victory points from securing a supply line and moving well ordered troops towards Biffontaine. Only when the central position on the initial setup hill fell to artillery and direct fire losses did the supply line possibility disappear. I give it a "5" for the puzzle it presents both players. It is the best of the 23 I have played out of GFB to date. I really like the way the morale and victory conditions combine to give the Nisei the initiative despite their low numbers. This is one that can be replayed and look completely different each time. |
| 0 Comments |