
|
Fortress Leuntea Grossdeutschland 1944 #1 |
||
|---|---|---|
|
(Defender)
Germany
(Defender) Romania |
vs | Soviet Union (Attacker) |
| Formations Involved |
|---|

| Total | |
|---|---|
| Side 1 | 0 |
| Draw | 0 |
| Side 2 | 1 |


| Overall Rating, 1 vote |
|---|
|
4
|
| Scenario Rank: --- of 913 |
| Parent Game | Grossdeutschland 1944 |
|---|---|
| Historicity | Historical |
| Date | 1944-08-20 |
| Start Time | 09:45 |
| Turn Count | 24 |
| Visibility | Day |
| Counters | 168 |
| Net Morale | 1 |
| Net Initiative | 3 |
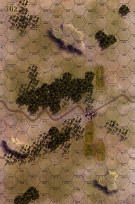
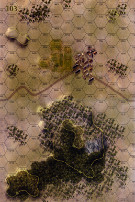
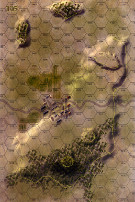
| Maps | 3: 102, 103, 105 |
| Layout Dimensions | 84 x 43 cm 33 x 17 in |
| Play Bounty | 206 |
| AAR Bounty | 171 |
| Total Plays | 1 |
| Total AARs | 1 |
| Battle Types |
|---|
| Hill Control |
| Inflict Enemy Casualties |
| Urban Assault |
| Conditions |
|---|
| Anti-infantry Wire |
| Entrenchments |
| Minefields |
| Off-board Artillery |
| Randomly-drawn Aircraft |
| Reinforcements |
| Scenario Requirements & Playability | |
|---|---|
| Armata Romana | Counters |
| Broken Axis | Maps + Counters |
| Grossdeutschland 1944 | Base Game |
| South Flank | Counters |
| Introduction |
|---|
|
On the left flank of 4th Mountain Division (and its parent XXIX Corps), Soviet recon had accurately found the boundary with the neighboring XXX Corps (also the boundary between the German Sixth and Romanian Third Armies). To cover the gap between the two Axis armies and protect their open right flank, the Germans had built up a considerable entrenched position at Leuntea, a wine-growing village sited on the dry bed of the Dnestr River's former course |
| Conclusion |
|---|
|
Leuntea had been turned into a fortress, surrounded by trenches, wire and minefields with a full battalion of artillery dedicated to its support. To add impetus to their attack, Sixth Guards Rifle Corps had stripped the second echelon 195th Rifle Division of its medium and heavy mortar batteries and heavy anti-tank guns, attaching them to the two forward divisions to increase their firepower at the point of impact. The preliminary bombardment, supported by direct-fire weapons and mortars, obliterated many of the Gem1a11 fighting positions and the troops within them. The surviving German troops fought hard, but the Soviets applied maximum force and blocked the advance of a Romanian relief column. Neither reaction affected the Soviet advance, which rolled forward regardless. |

|
|
|---|
| AFV Rules Pertaining to this Scenario's Order of Battle |
|---|
|
| Heer |
|---|
|


| Army |
|---|
|


| Army (RKKA) |
|---|
|


| Guards |
|---|
|


| 4 Errata Items | |
|---|---|

|
The reduced direct fire value of the Heer HMG became 5-5 starting with Fall of France. (plloyd1010
on 2015 Jul 31)
|

|
The morale and combat modifiers of German Sergeant #1614 should be "0", not "8". (Shad
on 2010 Dec 15)
|

|
The movement allowance on the counters in Airborne is misprinted. It should be "3." (rerathbun
on 2012 Jan 30)
|

|
Kommissars never get morale or combat modifiers. Ignore misprints. (Shad
on 2010 Dec 15)
|
| Last ditch defense | ||||||||||||
|---|---|---|---|---|---|---|---|---|---|---|---|---|
A fair defensive line was built along central and eastern portions of the map. The West was, however slighted a bit as it was thought by the command that the real action would be in the center and Western portions of the map, in that was where the greater portion of "Victory Points" were. The plan held up as well as could be expected. The German/Romanian forces fought a delaying action across the South Central hard terrain. A group of German forces got trapped there getting out after they lost the high ground. They were not needed, hovever, as the German/Romanian forces DID hold onto the last town. The whole thing was decided by but three points. A closely fought battle (and WAY too long). |
||||||||||||
| 0 Comments |