
|
Fighting Slovaks First Axis #22 |
||
|---|---|---|
| (Defender) Slovak Republic | vs | Germany (Attacker) |
| Formations Involved | ||
|---|---|---|
| Germany |  |
Kampfgruppe von Ohlen |
| Slovak Republic |  |
Dubrovodsky Combat Group |

| Total | |
|---|---|
| Side 1 | 1 |
| Draw | 0 |
| Side 2 | 1 |


| Overall Rating, 2 votes |
|---|
|
4
|
| Scenario Rank: --- of 913 |
| Parent Game | First Axis |
|---|---|
| Historicity | Historical |
| Date | 1944-09-02 |
| Start Time | 07:00 |
| Turn Count | 28 |
| Visibility | Day |
| Counters | 82 |
| Net Morale | 0 |
| Net Initiative | 0 |
| Maps | 4: 15, 17, 18, 21 |
| Layout Dimensions | 86 x 56 cm 34 x 22 in |
| Play Bounty | 164 |
| AAR Bounty | 165 |
| Total Plays | 2 |
| Total AARs | 2 |
| Battle Types |
|---|
| Exit the Battle Area |
| Conditions |
|---|
| Off-board Artillery |
| Randomly-drawn Aircraft |
| Scenario Requirements & Playability | |
|---|---|
| First Axis | Base Game |
| Road to Berlin | Maps + Counters |
| Introduction |
|---|
|
As with other former members of the Axis, Slovak troops fought against the Germans with far greater enthusiasm than they had ever fought alongside them. Falling back from the Var valley, the Slovaks received more troops, tanks and most importantly, large-caliber anti-tank guns. The Germans would come to regret having given these to their allies - weapons never fired at the Soviets - but they had made good their tank losses and picked up a few more. |
| Conclusion |
|---|
|
The Slovaks held their ground this time, but not without serious losses. German Stuka dive-bombers destroyed several artillery batteries, and all of the Slovak tanks fell victim to German tanks and anti-tank guns. Repelled, the Germans pulled back and re-grouped for another try while reinforcements flowed in from Germany, Poland and elsewhere. |

|
|
|---|
| AFV Rules Pertaining to this Scenario's Order of Battle |
|---|
|
| Heer |
|---|
|


| Slovenská Armáda |
|---|
|


| 4 Errata Items | |
|---|---|
| Scen 22 |
Loan the Slovaks 3 Soviet wagons, as all their wagons are used for the Prava trucks (reverse side). (campsawyer
on 2010 Sep 02)
|

|
The reduced direct fire value of the Heer HMG became 5-5 starting with Fall of France. (plloyd1010
on 2015 Jul 31)
|

|
All SS PzIVH tanks should have a movement of 8. (Shad
on 2010 Dec 15)
|

|
The morale and combat modifiers of German Sergeant #1614 should be "0", not "8". (Shad
on 2010 Dec 15)
|
| Winning by losing all your troops | ||||||||||||
|---|---|---|---|---|---|---|---|---|---|---|---|---|
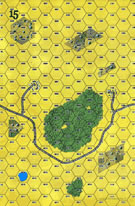
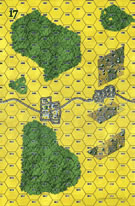
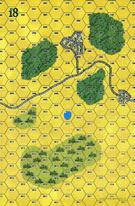
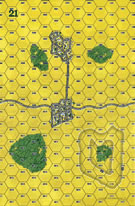
This scenario is the largest German/Slovak action of the Uprising, it has the first German Heer units cutting through the Slovak defenses. An interesting point to this scenario is that the Slovaks use German 88mm against there former allies as well as the Slovak OOB including 75mm AT guns and German Marders. The German force is a well balanced combined arms force featuring PzIVh's, OBA, and aircraft. The Slovaks field aircraft during this scenario as well. All of which make it a challenge for both sides to achieve victory. The victory conditions have the Germans trying to get off the southern side of the board, which is quite a distance as it is double boards setup length-wise, the Slovaks just need to keep as many Germans from exiting as possible. Morale is going to tough for each side as it is only 7/6 for both sides. The setup has the Slovaks in a cowards defense. The setup all units as close to the north edge as possible. The 75mm AT setup in the towns on board 21 with 37mm AT guns supporting the with several infantry platoons. The 88mm AA gun setup on board 15 in town 0407 with supporting infantry dugin around them. The Slovak armor is placed in the woods on board 15 and in the town on board 15 hex 0710. The Marder is placed on the only hill on board 21. The Slovak mountain gun is placed behind the hill to provide bombardment to the front line troops. The German strategy will be to clear a lane in the middle of the board so that the trucks can ferry the troops down to the southern end of the board. The tricky part will be to see how many Slovak units that they must destroy to do this. The AT/AA guns and tanks will be a priority as they have the greatest range. The Slovak OBA/bombardment and aircraft will be the wild card for the Germans. At 7:00 the scenario starts, German infantry advance on the board dismounted due to the proximity of the Slovak defenders. Weak Slovak Op fire allow the Germans to move right next to the town at 21/0603 and 21/0703. German infantry and engineers get into the town and assault the 75mm and 37mm AT guns and eventually destroying them. On board 15 a reinforced company move to attack the 88mm in 15/0407. Moving through the fields, they advance to the outskirts of town without much Slovak Op fire response. German mortars get the range on the Slovak 88mm and demoralize it, a subsequent recovery attempt fails eliminating the unit. By 8:00 the Germans have eliminated 5 Slovak units and have taken have of the town at 21/603 and are posed to take 15/0703. The Slovaks reinforce the town at 21/0603 with units from 21/0709. Slovak Op fire continue to be weak and the German advance more units into the town at 21/0603. The German tanks, having moved on the board in the far western side of the board to avoid the Slovak at guns, engage the Slovak tanks in the town at 21/0710. German armor is far superior to the Slovak tanks and the LT35's are destroyed. The Marder on the hill attempted to even the score but is to destroyed by the PzIVh's. Slovak Op fire on board 15 starts to have effects by disrupting and demoralizing the advance elements of the reinforced platoon. Slovak resistance in town 21/0603 stiffens with the loss of a German step but at the loss of a Slovak platoon. At 9:00am the German tanks have encircled the town at 21/0709 and have started to shell its defenders. Without tank support or AT support the Slovak infantry can only sit and hide from the shelling. Meanwhile the assault on the town at 21/0603 continues with the defenders holding on while the Germans attack. This now starts slowing down the Germans advance. On board 15 the Slovak LT 38 pops out of the woods to fire on the advancing Germans. The sight of the tanks firing at the German infantry disrupts and demoralizes the troopers. Aircraft is called in and a tank busting Hs. 129 destroys three of the LT38 tanks two more remain but a call to the PzIVh's for support it made. The Slovak infantry try to mount counterattacks but are stopped by German OBA. 10:00am starts with the Slovaks having most of there forces disrupted or demoralized. Troops holding the town 21/0603 flee after trying to recover from the German assaults. The Germans press on to the town at 21/0709, while assaults on the town at 15/407 force the Slovak defenders to flee into the woods south of town. German panzers move to circle around the hill on board 21 and attack the Slovak 75mm mountain gun that has be disrupting the German attack. The Slovak infantry attached with the mountain gun charge the tanks demoralizing them. The tanks subsequently retreat with the Slovak infantry following. Support German units appear and the pursuing troops stop. An airstrike on the 75mm mountain guns hex demoralizes it and stops the Slovak shelling. But the Slovak OBA starts to find its mark at the German reinforced company moves to attack the woods on board 15. Germans trucks start to advance onto the board to stay within range of the troops when it becomes time to get off the board. Town assaults dominate the 11:00am hour. German units assault 21/0709 and 21/0710, but the Slovak defenders have well hidden defending positions and it takes until 12:00pm to get results. Eventually they take the town with the Slovak remnants heading for the woods. Slovak OBA scores several demoralizations on the advancing German trucks slowing down the advance. German tanks engage the last full strength Slovak platoons with the mountain gun struggles to recover. At this point most of the Slovak units are destroyed or demoralized and move activations are spent trying to recover. The Germans are having a tough time as early FoW keep them from advancing. 12:00 has the Germans thinking about moving past the remnants of the Slovaks to position for moving south, but the few Slovak defenders have other thoughts. Slovak OBA is on target disrupting more trucks and units, while the Germans fail to weed out the last few Slovak units defending in the woods, towns and on the hill. The Germans look to press several units ahead of the fighting forces to try to get off the board. FoW works against the Germans again as the turns within the hour end very early( only 5 or 6 activations per side). At 1:00pm the Germans get a bit desperate and try to push units forward leaving them open to Slovak OBA and Op fire. Several more Germans are stopped by disruption or demoralization. By 1:30 it is clear that the Germans will not be able to get enough units off board to meet the victory conditions so the Slovaks with the scenario. I was very pleased with this scenario, nice balance of attacking forces as well as a decent defense by the Slovaks. Other factors like OBA and aircraft made a difference at keep points but the lower morale held back the Germans the most. Although the Slovaks take heavy casualties, it they can keep their officers around to direct OBA and bombardment they can win. The Germans must keep moving at the same time attacking key points to allow the lighter trucks to ferry units across the board. A well designed scenario. |
||||||||||||
| 0 Comments |
| All Together Now |
|---|
|
Another situation where the Slovaks must delay a strong detachment of Germans. While there is more time than scenario 21 (7 full hours in this one), they must cover twice the distance and also have twice the effective width to cover. On the other hand, the Slovaks do not have a river to content with so wherever the Germans choose to enter it is likely that the entire Slovak force will be eventually able to contest the crossing. In addition, the Slovaks pulled their super Porocik (a 1-10-2) and use him with a company of infantry in the first truly defensible position, a town on the western edge of the board. They have their AT strength (2 75s, an 88 and a Marder placed so as to give the PzIVHs fits with potential crossfire set up with the 37s and 1940 era tanks (35s and 38s). They also, somehow, have air support. The Germans enter on the western edge of the playing surface, directly hitting the super Porocik. In a huge surprise the town falls quickly to the Germans and the Porocik is killed in the first shot at his hex. The 88 is quickly dispatched after its first shot, a lousy "3" on the AT table... The Germans remain concentrated, trying to ensure that the Slovak tactic of hitting to delay with disruptions and demoralizations rather than pursuing kill shots (continued pounding of the same hex to gain double demoralizations) in order to delay the Germans. At the same time the Slovaks are rallying their forces from the eastern side of the board as the Germans are fully committed to the western axis. Halfway through the Germans appear poised to gain a major victory by exiting nearly their whole force. Up to this point, they have only lost 6 steps to the Slovaks 17 and 5 armor steps. The concentrated German force is difficult for the Slovaks to assault and the Slovak artillery is too weak to cause any significant damage. At this point, however, there begins a series of 11 turns, 9 of which have endings determined by Fog of War rolls. Apparently, the German commander was taking a siesta given the ease with which they had rolled through the first 2/3 of the battlefield. While the Slovak resistance improved at this point it remained too feeble to cause any significant losses (ultimately 10 plus 2 armor) but their delays on the Germans did keep 7 steps on board and with some better rolls earlier in the scenario they might have pulled out a victory. The end was not close but the play was interesting throughout. The key is to realize that the Slovaks will not win in a fight but the German morale is such that they will fail many of their checks and will have difficulty recovering. The Slovaks need to keep the Germans in sight and take chances to disrupt and demoralize the German units as often as possible. The variety of Slovak units makes for an interesting set of defensive strategies. While they didn't work out for them in this play it is clear that they can win this one. I give it a "4" for the variety and general fun of it. |
| 0 Comments |