
|
Christmas Day First Axis #12 |
||
|---|---|---|
| (Defender) Slovak Republic | vs | Soviet Union (Attacker) |
| Formations Involved | ||
|---|---|---|
| Slovak Republic |  |
1st "Janošík" Infantry Division |
| Soviet Union |  |
31st Rifle Division |

| Total | |
|---|---|
| Side 1 | 1 |
| Draw | 1 |
| Side 2 | 0 |


| Overall Rating, 3 votes |
|---|
|
2.67
|
| Scenario Rank: --- of 913 |
| Parent Game | First Axis |
|---|---|
| Historicity | Historical |
| Date | 1941-12-25 |
| Start Time | 06:30 |
| Turn Count | 28 |
| Visibility | Day |
| Counters | 94 |
| Net Morale | 0 |
| Net Initiative | 1 |
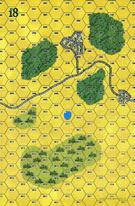
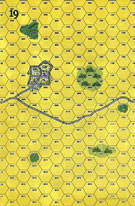
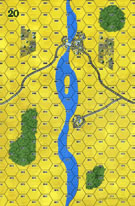
| Maps | 3: 18, 19, 20 |
| Layout Dimensions | 84 x 43 cm 33 x 17 in |
| Play Bounty | 161 |
| AAR Bounty | 159 |
| Total Plays | 2 |
| Total AARs | 3 |
| Battle Types |
|---|
| River Crossing |
| Rural Assault |
| Conditions |
|---|
| Off-board Artillery |
| Reinforcements |
| Terrain Mods |
| Scenario Requirements & Playability | |
|---|---|
| Eastern Front | Counters |
| First Axis | Base Game |
| Road to Berlin | Maps |
| Introduction |
|---|
|
Knowing their enemies to enjoy Christmas celebrations, the Red Army launched numerous attacks on the holiday. The Slovaks were dug in behind a river, with strong German formations on either side of them. But the Soviets had made careful preparations and backed their attacking infantry with strong artillery support, knowing this would unnerve the fragile Slovak brigade. The German divisions were struck at the same time, to make sure neither could lend assistance. |
| Conclusion |
|---|
|
The Slovaks held their positions, despite a lack of German support (powerful attacks kept their neighbors well-occupied themselves). The Slovak "division" had already detached one of its four battalions to coast defense duties on the Sea of Azov, leaving it the equivalent of a reinforced regiment. The duty on the Mius line would be the Slovak division's only extended exposure to combat, and it held up very well. |

|
|
|---|
| AFV Rules Pertaining to this Scenario's Order of Battle |
|---|
|
| Slovenská Armáda |
|---|
|


| Army (RKKA) |
|---|
|


| 1 Errata Item | |
|---|---|

|
The reduced direct fire value in Kursk: Burning Tigers is 4-4. (plloyd1010
on 2015 Jul 31)
|
| I Found This Tough As Slovak Commander But What A Dramatic Finale | ||||||||||||||
|---|---|---|---|---|---|---|---|---|---|---|---|---|---|---|
This game was played against Alan Sawyer over three sessions (one of which was a short final session). I chose this game as at the time as I had not played a river crossing in some time and I also looked for one that as Axis forces would look to be one that would really test me and be difficult to get a positive result from. This scenario featured a small Slovak force, with minimal OBA consisting of 10 foot platoons (inc 2 HMG), 1 mortar and a couple of AT’s. Their job was to defend against a Soviet major river crossing across a width of a board. For their part, the Soviets consisted of 28 foot units (inc 4 ENG & 4 HMG), a couple of T26 units and 4 batteries of 76mm guns. There was no Soviet OBA so the guns would be their main bombardment source. Before play began, I knew with 4 x ENG, the Soviets would be able to at least stretch my forces if they needed as they would be able to threaten crossings in numerous places. Both sides morale is 7/6. Both sides score points for inflicting casualties, but the Soviets also get points for each undemoralised step across the west bank. The Slovaks get a 15 point bonus if they keep the Soviets to less than 15 undemoralised steps on the west-side. Finally, if the Soviets do get 15 steps across, there is a chance that Slovaks will get some reinforcements, albeit they have to roll a 6 on a 1d6 at the start of each turn to get these. For deployment, I placed 2 platoons in a town hex that sits on its own on the west bank. The others had to be placed intermittently to cover all avenues of attack, but with a view of being at least able to get decent firepower on targets if they did come their way. This did lead to a little dispersion on the Slovak part, but there really was no other choice. This was made harder in the fact that they only had two leaders with a morale modifier (one was a ‘2’ though but he couldn’t be put with any concentration of forces). A 37mm AT gun was placed toward each end so as not to give the tanks a free-pass anywhere. As expected, the Soviets set up in a manner that showed that they may attack and cross anywhere. Time would have to be the guide and the Slovaks would need to maneuver hither & thither to counter Soviet moves. The battle kicks off on a winter’s morning at 0630 hours. This means the Slovaks can not even see initial Soviet troops as they advance. Slowly they came to the waters edge and their engineers appeared to be hanging back awaiting an opportunity to deploy when a weak spot was found or created. One of the ENG platoons did however go forward but he was soon demoralized under some fire he faced and moved away to regroup. The Soviets sent troops to either flank, but also large segments of forces to just right and left of centre of the crossing area. Of these, the tanks and 2 x companies of infantry made their way to the town area across from the town hex that the Slovaks had also placed a couple of platoons. From here, the Soviet tanks and infantry continuously blasted at the Slovak platoons in an effort to carve out a safer landing area. The tanks seemed almost immune as a Slovak AT tried to hit them at distance. The Slovak infantry here held on for some time, but were slowly losing their will to stand. To try and bolster this location, the Slovaks sent up one of their HMG platoons. It looked good until they came into range of the Soviet rifles where they were mercilessly cut down before reaching their area of deployment. Across the rest of the river bank, both sides had to march men in different directions in order to find their best places to defend or cross. Soviet artillery made it dangerous for the Slovaks to operate in the open and their HMG’s were also taking up positions to sweep fire lanes across to the Slovak side should any defenders come too close to the riverside. By turn 13 (0930) casualties had been just the Slovak HMG platoon, but by now, almost half-way through, the Slovaks were being stretched by the measured Soviet approach. The Reds were intent and deliberate in breaking the Slovak’s fighting spirit before launching across the river. Over the next 3 turns, 4 x Slovak INF steps became casualties to yet more Soviet small-arms fire and demoralizations. The screw seemed to be being turned. But for the Slovaks, their fortunes were now also being improved. Their AT guns managed 3 hits on T26 units over a 5 turn period and a Soviet INF step had also been lost as the river crossings were now being implemented across the face of the Slovak front. Crossings were placed on both the extreme left and right flank of the Slovak force. One by the town area and then one further south of the town. These crossing were all something of a lottery for both sides. The Soviets overall must have had poor boats or poorly assembled pontoons as they more often than not failed to cross when required (6 or under crossing number). Slovak OBA disrupted and demoralized here and there, but was generally ineffective (a single module of 15pt OBA). Also to the Slovak detriment was the fact that their sole mortar platoon in a town away from the river had demoralized early on in the battle and had not recovered for about 14 turns, losing them a 12pt bombardment (self-spotting). The battle was therefore on a knife-edge. Perhaps, only on the Slovak right with the most southerly crossing could they perhaps count themselves comfortable. The ‘2’ rated leader, HMG and an INF competently held the Soviets back whenever they tried to cross as decent fire power swept the crossing point. The Soviets lost casualties and morale at this particular point and never crossed the river at all. But it was the other 3 crossing areas that were piling on the pressure. Dribs and drabs of Soviets were slowly crossing, albeit extremely slowly. The weight of the battle was slowly keeling in favour of the Soviets as pressure mounted at the crossing points and Slovak morale was breaking. Direct fire and 76mm bombardments were demoralizing the Slovak line making any coherent defence extremely weak. With 4 turns to go, the Soviets had 10 steps across the river. Each time their troops were exalted to cross, they just couldn’t pick themselves up to make a successful go at it (roll 6 or less in game terms). Moreover, one more of the crossing points had been damaged by Slovak OBA as a Soviet ENG demoralised and could not help crossing until in good order. He did get up to disrupted but failed to recover fully. The crossing in the far north had managed to off-load all its waiting troops to the west bank and they were under a little derisory fire from Slovak infantry, but nothing too much to worry them. It was the crossing point near the town where the final part of the battle would be decided. This had already survived an M2 MC much to Slovak disappointment and this stack would now be the crux of the whole battle and its result. Going into the final turn, the Soviets had 20pts (14 steps crossed and 6 Slovak steps eliminated). The Slovaks had 24pts (9 step-equivalents eliminated plus the 15pts defence bonus for keeping Soviets less than 15 steps across the river). This was therefore at the point of a draw unless the Slovaks could gain 1pt for a minor win or either side attains some kills, crossings or demoralizations for other scenario final results. The Soviets had two INF platoons on the ENG waiting to cross and a +2 initiative lead. As the initiative dice were rolled, the Slovaks preyed for an against the odds initiative lead. But a Slovak ‘4’ roll and a Soviet ‘3’ roll gave the Soviets a one activation lead-off advantage in a 5-6 Soviet initiative win. They wasted no time in declaring that the troops on the crossing point would attempt to cross. The first one rolled a 10, meaning it failed. Yes!! I thought "He has to fail this very very last roll." The second INF …. A 6 !! He was across! What a sickening blow that felt after so much game tenseness and pressure play had kept the Reds away for 27 turns. A last turn killer (again – after Wayne’s last turn Westwall win in scenario 10). What there was of Slovak direct fire now laced into the Soviet unit in opportunity attempts. It HAD to be demoralized in order to avoid defeat. An INF on the crossing units left flank fired at them on the 7col, missed. An AT gun fired at them on the 2col, missed. A disrupted INF unit fired at them on the 4col, missed. These Soviets were hugging the ground and keeping their nerve. Moreover, the points had now changed. With 16 steps across, the Soviet point score was 22, but because they had more than 15 steps, the Slovaks would lose their 15pt bonus and have a mere 9pts for a major defeat. A Soviet unit HAD to be demoralized to get a draw back. The Slovaks next activation was to take a final shot with the mortars before an advancing Soviet platoon tied it in assault. Manically throwing shells down the tubes, they bombarded the newly crossed Soviet INF on the 12col ……… Bah, a miserable 8 rolled and yet another miss. Soviet 76mm artillery responded by disposing of a demoralized Slovak AT gun as it failed an M1 MC. With only my 15pt OBA left (12col shot), I declared it to fire at those determined crossers that had hung on so. Down the OBA whistled as it homed in on its intended target. BANG! Snake-eyes! And an M2 MC. Anything more than a ‘7’ and these guys would demoralize, throwing the game back towards a draw result. The unit was tested and………. Failed! Maybe an 8 or a 9 was rolled, I don’t remember, but the battle had been saved in dramatic fashion. The Slovaks had a couple more shots as they tried to find 2 more points for a minor victory. These both missed and with both sides having spent all their chances of any further game changing moves, the battle ended in the very last turn. An honourable draw for both. I gave this a ‘3’ despite the exciting and tense ending as it was kind of standard and general fun throughout, without being exceptional in any way. This scenario I think is pretty balanced, despite Matt.W’s earlier Slovak win where Soviet ENG’s kept failing all morale checks. I personally found this to be a big stretch on the thin Slovak forces and really did depend on some of those poor crossing rolls that Alan found during the game. Quite simply, had just 2 or 3 of those gone the other way, the game may have been easily lost. On the other hand, if the Slovaks can hurt the Soviet ENG regularly, they will find it just as easy to lose. Our game kind of fell between those two choices. His ENG units generally held up well, but his crossing throws were very poor. Casualties I would suggest were quite light really. The Slovaks losing an AT gun, 4 INF and 2 HMG. The Soviets 3 x T26 steps and 3 x INF. I would recommend this as a play for any dual game. Top Tip: Remember, there are NO bridges anywhere. AND take note, the VC’s state that for a Soviet unit to count for VP’s, they must not be in a river-hex having crossed. Therefore, they will need to leave the river bank. You can’t just hold them there |
||||||||||||||
| 0 Comments |
| No Christmas presents for the Soviets | ||||||||||||||
|---|---|---|---|---|---|---|---|---|---|---|---|---|---|---|
This was a Skype game played against Vince Hughes over three sessions. It is a tough river crossing for the Soviets in the middle of December, a rough time to go for a swim. We had good sessions with the troops but low morale and firepower kept the casualties relativity light. I found the at the Soviets have a lot of men but they are fairly brittle with morale. Leaders favored the Slovaks with two good leaders, high morale and modifiers, while the Soviets were the uninspired leftovers from Stalin's purge. So on with the battle. The scenario starts at dawn and the Soviets get a chance to move up with lowered visiblity, but they must advance from a couple of kilometers away. I had the troops in two groups, one to press the town with the blown up bridge and the other force to move south to the town in the center by the river. The tricky part was to be to disguise where the ENGs would setup. I knew that they would attract all the fire from the Slovaks once they reached the river. The northern force reached the town first, with the T-26's in the lead. They setup to blast away at the Slovaks in the opposite town with an infantry force to help. The Slovaks were discovered in the town and stategicly dugin behind. A 37mm AT soon started firing at the T-26's in the town without much effect. INF's and HMG's were behind the river bank covering the crossing. For my Soviets, the 76mm guns setup in the fields behind the town to provide crossing support. The commanding Colonel started the battle with them to combine there fire but had to move out later to provide inspiration to the men. The support fire was ok, with some disruptions and demoralization's to the Slovaks, but low fire power numbers should have been a keep to be a bit more aggressive with their deployment. The ENG's assigned to the northern group attempted to cross south of the town but were quickly fired at and they skedaddled back to the fields. The other ENG move to the northern end of the board and was able to setup a crossing point on the edge. In the town the T-26's hammered away at the Slovak INF's for many turns before the morale started to crack. But a bigger key was the loss of a Slovak HMG trying to reposition itself. This loss of the key unit was something thing at severely weakened the defense. With the Slovaks falling back, the second ENG back in good order, the second crossing point was established just south of the town. But now the troops had to get across. At this point I will put a little commentary on the river crossings, particularly for the Soviets. With this scenario, Vince and I hashed out a few particularities of the river crossings, which inspired me to do some research on this. The Soviet early war river were not like late war or Western Allies crossings. They were troops reaching a river and the leaders saying you need to go across any way possible. They did not have any specialized equipment, many times cutting trees and strapping them together to make rafts. Many times initial units swam the river with rope and then others followed. Point being with these early crossings, they were tough for the Soviets and this scenario shows it. The first troops to try to cross on the northern crossing point waited several turns before the require '6' was rolled. Subjected to Slovak fire, there was a couple of times they did disrupt and had to recover, before they tried again. But while they recovered the ENG's dugin to keep themselves safe from fire. South of the town the other ENG's started to cross troops. They were a bit more successful with two units crossing and capturing the other part of town opposite the river. The Slovaks musters more units to defend bringing the other 37mm AT gun up as well as some INF's from the south. The AT's seemed more of a nuisance rather than a threat, but the 37's were able to muster hits on the T-26's, three of them for some valuable points. I had been a bit cavalier in there positioning and should have moved them back to a better hidden position from the guns. The bigger drama occurred at the end of the game at the southern crossing point the Soviets were able to mass three INF's to cross at once. With the volume of dice rolls I knew I had to get a low number and get a another unit across. This was key because at that point I only need two units across to counter the Slovak VC points. On the last turn the Soviets were able to get the final unit across, but the then had to face OP and BF fire from the Slovaks. With the volume that they threw at the unit, some sort of morale check was going to occur, and with the low morale the unit demoralized. This gave the Slovak's back the point and the game barely at a draw. The Soviets cemented the draw when the crew of one of the pesky 37mm guns gave up after heavy Soviet BF fire. To the south, not much happened of the two crossing points established at the center town and the south end of the board only one unit was able to make it across. These locations were able to lock some key Slovak units from coming to the rescue of the northern defense, but there was far too many Soviets that were also locked in the as well. All in all it was a good game, tough for both sides, and lessons learned with there fickle Soviets. |
||||||||||||||
| 0 Comments |
| So, how's that engineering degree working out for you? | ||||||||||||
|---|---|---|---|---|---|---|---|---|---|---|---|---|
Another river crossing required by the Soviets against an undermanned Slovak defense. Yet somehow the Slovaks get enough play from their artillery and direct fire to disrupt and then demoralize the enginners time and time again. Of the 11 step losses suffered by the Soviets 2 were engineers out of 4 available. They were targets from the word go. One can only feel sorry for the poor engineers who had to work in the open, under the guns of the Slovaks and who, time after time, were chased from the river before they could get anyone across. The first troops to cross made it at the fourth hour of combat and were promptly demoralized and their leader deserted leaving them motionless and cowering by the riverbank. The remainder of the forces to cross didn't make it until the last 1 1/2 hours of the battle. As a coup de grace the engineers were again demoralized with an hour to go which effectively ended the battle. Of some tactical note. There is a town on board 20 which is also a crossing point for the river. The Slovaks entered this hex and held it for 5 1/2 of the 7 hour scenario. This was critical as the protection provided by the town made it possible for the engineers, once they reached it, to resist the artillery and to recover from any morale losses they incurred. In any event the game had a lot of waiting in it to see if the Soviets could cross. Ultimately they couldn't which led to a quick play and a ton of frustration for the Soviets. If the Soviets can cross in any significant numbers, it is hard to see if the Slovak reinforcements can make a difference. I give it a 2. |
||||||||||||
| 0 Comments |