
|
Struggle and Flight First Axis #4 |
||
|---|---|---|
| (Attacker) Slovak Republic | vs | Hungary (Attacker) |
| Formations Involved | ||
|---|---|---|
| Hungary |  |
23rd Infantry Brigade |
| Slovak Republic |  |
Mobile |

| Total | |
|---|---|
| Side 1 | 2 |
| Draw | 2 |
| Side 2 | 4 |


| Overall Rating, 8 votes |
|---|
|
3.75
|
| Scenario Rank: 231 of 913 |
| Parent Game | First Axis |
|---|---|
| Historicity | Historical |
| Date | 1939-03-24 |
| Start Time | 07:30 |
| Turn Count | 24 |
| Visibility | Day |
| Counters | 49 |
| Net Morale | 0 |
| Net Initiative | 1 |
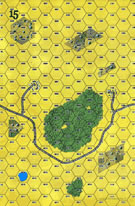
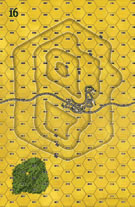
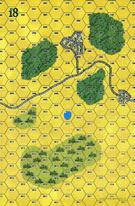
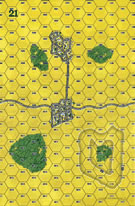
| Maps | 4: 15, 16, 18, 21 |
| Layout Dimensions | 112 x 43 cm 44 x 17 in |
| Play Bounty | 149 |
| AAR Bounty | 159 |
| Total Plays | 8 |
| Total AARs | 3 |
| Battle Types |
|---|
| Urban Assault |
| Conditions |
|---|
| Off-board Artillery |
| Randomly-drawn Aircraft |
| Scenario Requirements & Playability | |
|---|---|
| First Axis | Base Game |
| Road to Berlin | Maps + Counters |
| Introduction |
|---|
|
While the Slovaks inherited a fair number of tanks from the former Czechoslovak army, they lacked crews and many vehicles had been sabotaged by the Czechs. The Slovaks quickly began repairs, and the first group of armored cars reported to the front a day after the Hungarian assault. The Slovak command immediately ordered them to spearhead a counter-attack. |
| Conclusion |
|---|
|
Told to expect no resistance, the Hungarians had already had several rude surprises. They were in no way prepared for their enemies to counterattack at all, let alone within a day and with armor and air support. The Slovak attack made initial progress and drove the Hungarians back several kilometers, but Hungarian reserves stabilized the situation and the Slovak advance stalled in the face of heavy artillery fire. The infantry panicked when two of their armored cars were knocked out, and by day's end all of their gains had been lost. |

|
|
|---|
| AFV Rules Pertaining to this Scenario's Order of Battle |
|---|
|
| Army |
|---|
|


| Slovenská Armáda |
|---|
|


| La compañía ciclista pudo desnivelar el combate. |
|---|
|
En este escenario una fuerza húngara, compuesta por los efectivos aproximados de un batallón de infantería, debe defender varias poblaciones ante el ataque de una fuerza eslovaca integrada por un batallón reforzado de infantería, una compañía ciclista y una sección de coches blindados OA.30. Ambos bandos disponen de artillería fuera del mapa, siendo la eslovaca la más poderosa (3 x 15 frente a 2 x 15). Ambos contendientes tienen la misma moral (7/5). Los húngaros deben defender seis poblaciones: tres de ellas de un hex, una de tres hexes y dos de cuatro hexes. Los contendientes obtienen puntos de victoria (VP) por causar bajas al adversario y por controlar hexes de población. El control de hexes de población por parte de los eslovacos puntúa el doble. La batalla tiene lugar sobre cuatro mapas. Los húngaros distribuyen sus fuerzas entre las seis poblaciones, desplegando más unidades en las localidades occidentales, las más expuestas en principio al ataque enemigo. Esto supone que las dos ciudades más orientales (las más grandes) quedan semidesguarnecidas. Los eslovacos comienzan el combate atacando la población más occidental del mapa 15. Los húngaros ofrecen una fuerte resistencia, pero el fuego directo combinado de infantería y de la sección de coches blindados eslovaca aniquila a la mitad de la guernición. La otra mitad es aniquilada es sucesivos asaltos. La segunda población del mapa 15 ofrece una resistencia tenaz, tan tenaz que los eslovacos no consiguen controlarla en toda la partida. La artillería, el fuego directo y constantes asaltos de los atacantes reducen la guarnición húngara a la mitad (una sección de NHP y un líder), pero esa pequeña fuerza resiste innumerables asaltos enemigos y consigue sobrevivir. La siguiente ciudad (la más occidental del mapa 18) es fácilmente conquistada por los eslovacos: la artillería y el fuego directo desmoraliza rápidamente a las dos unidades húngaras que la guarnecían, que huyen al bosque próximo. A continuación la infantería eslovaca, avanza, la ocupa y en los siguientes turnos consigue aniquilar también a los huidos y a otra unidad húngara que había acudido en su ayuda. El tiempo va pasando inexorable y los eslovacos apenas tienen tiempo de lanzar un ataque coordinado sobre la ciudad oriental del mapa 18, que resiste bien los inconexos ataques enemigos. Al final los húngaros controlan dos de los tres hexes de esta población. El combate está muy nivelado. El comandante eslovaco ve como unidad posiblidad de victoria el avance con sus unidades rápidas, la compañía ciclista y la sección de coches blindados, hacia el mapa 21 y ocupar al menos unos hexes de las semidesguarnecidas poblaciones húngaras. El avance se produce, pero los húngaros dirigen el fuego de su artillería sobre la compañía ciclista, que sufre un duro castigo: una sección es aniquilada, otra y el líder son desmoralizados y la tercera sección consigue llegar a las cercanías de una de las poblaciones, pero no puede penetrar en ella por falta de liderazgo. Por su parte, la sección de coches blindados consigue entrar en la otra población, pero al estar desprovista de apoyo de infantería es asaltada y desmoralizada. Al final, tras una competidísima y emocionante lucha, los eslovacos consiguen 16 VP y los húngaros 14 VP. Empate. Magnífico escenario. |
| 0 Comments |
| Read Your Chandler | ||||||||||||
|---|---|---|---|---|---|---|---|---|---|---|---|---|
Two understrength and unsuspecting Hungarian battalions have occupied a big swath of Slovakian territory and have established themselves in two enclaves separated by miles of space. A large Slovakian force with a mobile component (Cyclists and an armored car) and air support arrive to take back their country. Readers of Chandler will recognize the opportunity created by that large open space between the two Hungarian forces as a perfect opportunity to take the central position. Apparently the Slovakian leader had access to time travel (since it was published in 1973), read carefully, and sent his mobile forces around the Hungarians and grabbed some defensible terrain between the two forces. The advancing Hungarian force ground itself to dust on the mobile force while only contesting two town hexes, while the forward Hungarian force was reduced by artillery and concentric assault. The Slovaks won a major victory without any real effort. The only real possibility for the Hungarians is to abandon their forward positions and attempt to link up with the advancing battalion. To stand and fight is to get crushed. As tempting as it is to try to kill Slovaks as they advance, there are just too many of them and you will not be successful. The Slovaks can still probably grab that central position but there is the chance to at least make them pay for it. The addtions of low morale on both sides (7/5) make this a battle marked by stretches of recovery. A solid 3. |
||||||||||||
| 0 Comments |
| So much for the mobile assault |
|---|
|
This scenario is a great showing of why the Slovaks aren't really good at offensive operations. First, their troops are mediocre. Second, their morale is mediocre. Third, their leadership is mediocre, or worse. Yet, here they are surprising a bunch of Hungarians and trying to push them out of a bunch of villages. They are aided by generous artillery support, a bit of air support, and some mobile troops, consisting of 4 units of motorcycle troops and one armored car unit. Things went poorly for the Slovaks from the start, as Hungarian OBA zeroed in on the motorcycle troops, causing a step loss on turn 1. That unit demoralized (7/5 morale will do that to you) and did eventually recover to full morale...on turn 23. The Slovaks pushed forward, taking the forward most town from the Hungarians via assault. As they tried to move up through the woods towards the next town, accurate Hungarian OBA and mortar fire disrupted and demoralized a number of units, and several leaders. The motorcycle troops took it worst, as their leader was killed, and 2 more of the units were reduced, demoralized and never recovered. The 4th unit later took a step loss and was demoralized, too. It took the Slovaks many turns to rally leaders and be able to mount another offensive, and time was running short. They did manage to take another town hex from the Hungarians, and the armored cars made a dash for the far towns, however the Hungarians had troops in all the towns to engage them in assault and deny control. Note that with no anti-tank weapons, the Slovaks can use gamey tactics to run the armored car through town hexes to change control if the score is close. When all was said and done, the Slovaks inflicted 9 step losses (including killing the Hungarian mortars with aircraft on a snake-eyes) and controlled 2 town hexes for 13 points. The Hungarians inflicted 6 step losses and controlled 12 town hexes for 18 points. The Slovaks basically needed 2 more town hexes to win, and that was next to impossible. The Hungarians are basically reactive here and defending the towns, there's not a ton for them to do, making this scenario better suited for solo play. |
| 0 Comments |