Panzer Grenadier Battles on April 27th:
Arctic Front Deluxe #40 - Children's Crusade Broken Axis #14 - Târgu Frumos: The Second Battle Scenario 3: Sledge Hammer of the Proletariat
Army Group South Ukraine #6 - Consternation Road to Berlin #73 - She-Wolves of the SS
Errors? Omissions? Report them!
Massed Armor
Armor of Saipan #1
(Attacker) Japan vs United States (Defender)
Formations Involved
Japan 136th Infantry Regiment
Japan 26th Tank Regiment
United States 27th "New York" Infantry Division
United States 766th Tank Battalion
Display
Balance:


Overall balance chart for EqRS001
Total
Side 1 1
Draw 0
Side 2 1
Overall Rating, 2 votes
5
4
3
2
1
4.5
Scenario Rank: --- of 913
Parent Game Armor of Saipan
Historicity Alt-History
Date 1944-06-01
Start Time 22:30
Turn Count 24
Visibility Night
Counters 103
Net Morale 0
Net Initiative 1
Maps 2: 82, 83
Layout Dimensions 56 x 43 cm
22 x 17 in
Play Bounty 184
AAR Bounty 171
Total Plays 2
Total AARs 1
Battle Types
Road Control
Conditions
Off-board Artillery
Scenario Requirements & Playability
Elsenborn Ridge Counters
Armor of Saipan Base Game
Saipan 1944 Maps + Counters
Introduction

Like all American divisions, Army or Marine, the New York National Guard's 27th Infantry Division went to battle on Saipan with an attached tank battalion. The Marine general commanding the invasion force, Holland M. "Howlin' Mad" Smith, deeply disliked the New York unit, calling them "militia" and disparaging the upper-crust social origins of many of its National Guard officers. The disdained Army division covered the area more likely to see a tank battle had the Japanese held back their reserves of armor

Conclusion

Japanese troops fought extremely hard on all of the Marianas, and a strong armored reserve no doubt would have aided their resistance. But with no means of resupplying themselves with food, ammunition or fuel, they could not hope to conduct actual mechanized operations for any length of time. Had they managed to surprise the Americans with the presence of more or less modern tanks on Saipan, neither the Army nor the Marines had brought along the most potent anti-tank weapons available.

Additional Notes

The OOB includes 6 Type 1 and 6 Type 4 Japanese tanks platoons, however only five of each are included in the Journal. The data included here only include 5 of each.


Display Relevant AFV Rules

AFV Rules Pertaining to this Scenario's Order of Battle
  • Vulnerable to results on the Assault Combat Chart (7.25, 7.63, ACC), and may be attacked by Anti-Tank fire (11.2, DFT). Anti-Tank fire only affects the individual unit fired upon (7.62, 11.0).
  • AFV's are activated by tank leaders (3.2, 3.3, 5.42, 6.8). They may also be activated as part of an initial activating stack, but if activated in this way would need a tank leader in order to carry out combat movement.
  • AFV's do not block Direct Fire (10.1).
  • Full-strength AFV's with "armor efficiency" may make two anti-tank (AT) fire attacks per turn (either in their action segment or during opportunity fire) if they have AT fire values of 0 or more (11.2).
  • Each unit with an AT fire value of 2 or more may fire at targets at a distance of between 100% and 150% of its printed AT range. It does so at half its AT fire value. (11.3)
  • Efficient and non-efficient AFV's may conduct two opportunity fires per turn if using direct fire (7.44, 7.64). Units with both Direct and AT Fire values may use either type of fire in the same turn as their opportunity fire, but not both (7.22, 13.0). Units which can take opportunity fire twice per turn do not have to target the same unit both times (13.0).
  • Demoralized AFV's are not required to flee from units that do not have AT fire values (14.3).
  • Place a Wreck marker when an AFV is eliminated in a bridge or town hex (16.3).
  • AFV's do not benefit from Entrenchments (16.42).
  • AFV's may Dig In (16.2).
  • Closed-top AFV's: Immune to M, M1 and M2 results on Direct and Bombardment Fire Tables. Do not take step losses from Direct or Bombardment Fire. If X or #X result on Fire Table, make M morale check instead (7.25, 7.41, 7.61, BT, DFT).
  • Closed-top AFV's: Provide the +1 modifier on the Assault Table when combined with infantry. (Modifier only applies to Germans in all scenarios; Soviet Guards in scenarios taking place after 1942; Polish, US and Commonwealth in scenarios taking place after 1943.) (ACC)
  • Tank: all are closed-top and provide the +1 Assault bonus, when applicable

Display Order of Battle

Japan Order of Battle
Imperial Japanese Army
  • Towed
United States Order of Battle
Army
  • Mechanized
  • Towed

Display Errata (1)

1 Errata Item
Scen 1

The scenario list 6 Type 1, 6 Type 3 and 6 Type 4 but since there are only 5 Type 1 , 6 Type 3 and 5 Type 4, go with that for the scenario.

The Gold-Club came with QTY 5 Type 1, 6 Type 3 and 5 Type 4 counters.

(JayTownsend on 2015 Dec 25)

Display AARs (1)

Golden Journal, Equinox 2015: Massed Armor
Author JayTownsend
Method Solo
Victor Japan
Play Date 2016-08-01
Language English
Scenario EqRS001

Golden Journal, Equinox 2015: Massed Armor

Ok, I have been wanting to play this for a long time, as it uses my game design but is not my scenario design, so I can give an unbiased AAR! It also uses counters and maps from Saipan, the Equinox 2015 and a few counters from Elsenborn Ridge so it is pretty easy to setup and play. I have always wanted to play with these more modern Japanese armor types. The only thing that will come somewhat close to this, is my yet to be published Philippines 1944-45 design, that has the whole Japanese 2nd Tank Division, with boat loads of Type 97 Shinhoto 47mm tanks, Type 1 Ho-NI 1 75mm and Type 4 Ho-Ro 150mm self-propelled tanks but still nothing like the Type 1, Type 3 and Type 4 tanks in the Equinox, left on the Japanese homeland at the end of the war. Now it is time to finally test them out in a Panzer Grenadier setting.

I found a little errata for this scenario I must mention, so others will be able to play this as well. First the Equinox only provided (5) Type 1 and (5) Type 4 counters and the setup says 6 each, so go with five unless you own two copies of the Equinox which I do and will play with all of the requested counters but it should not make a big difference. Second the Americans should setup first and the Japanese second. Last, the visibility should be two hexes throughout the game. Minor things, but people will ask.

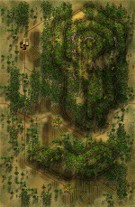
Now the setup for both sides should be straight forward depending on your strategies but the victory in this scenario all depends on if the Americans control any of the east-west road hexes with a unit on or adjacent to these road hexes at the end of game. The Japanese Infantry starts setup on the map as do all the American units including their armor while the Japanese huge armor force of the 26th Tank Regiment enters on the east edge of the map on the first turn. I setup all the Americans on, or adjacent to the road or in supporting defense positions for counter-attacks on the east-west road on map 83. The American armor and AT guns and infantry are pretty intermixed to support each other. The placed the Japanese Infantry on the west edge of map 82, to be able to attack right away as the Japanese armor might take a couple of turns to reach them. I thought about waiting for the armor but decided against it. The American have a large off-board artillery while the Japanese a much smaller amount to call on. This should be interesting.

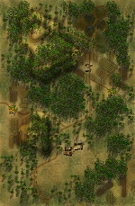
I ended up playing this scenario on and off again for about 4-5 days and enjoyed it very much. I took about 40 pictures to tell the story but realized I was only going to post 3 of them, as it was way too many photos to post. The Japanese obviously had to go on the offensive to win and clear the east-west road of American units. I pushed the Japanese Infantry head-long into the American lines to try and soften it up a bit for the huge Japanese armor force bring up the rear. But it became obvious to me that they were already taking too many Infantry casualties and needed to wait a bit more for the armor. The Americans only job was to shift units about and position and reposition their armor. At first I thought all the Japanese would bottle up on the one road and would never break through, but I remember the Saipan special rules in the scenario book, where Mechanized units can move through jungle at the cost of 4 movement points and also found two movement areas with not too much jungle to slip armor through and break the bottleneck. Visibility allowed the Japanese to close in adjacent to American units in most case. The Japanese assault bonus off set the dug-in Americans somewhat. The Sherman tanks and Stuart tanks could handle the Shinhotos and Type 1 Japanese tanks but the Type 3s were equal and the Type 4s were better. The Americans having efficiency offset this a little but the Japanese tank numbers were telling with 40 steps to American 18 steps and 2 steps of 57mm AT guns. Once the Japanese eliminated the American armor, they could concentrate on the American Infantry and supporting units. The off-board artillery favored the American but they only rolled high in the beginning of the game and then not so well, trying not to hit their own intermixed units.

The battle took almost all the turns to get an outcome however, as the terrain is rough and it is night but in the end after pushing some American back again and off the adjacent road hexes, the Japanese won a victory in a wild night action, with the Japanese armor I have always wanted to play with since I first started gaming. I would give this scenario a 5 out of 5 but for the errata mentioned above, so I’ll give it a 4.5 out of 5. Great fun in this hypothetical scenario, that is well worth playing!

0 Comments
You must be a registered member and logged-in to post a comment.
Errors? Omissions? Report them!
Page generated in 0.421 seconds.