Panzer Grenadier Battles on April 27th:
Arctic Front Deluxe #40 - Children's Crusade Broken Axis #14 - Târgu Frumos: The Second Battle Scenario 3: Sledge Hammer of the Proletariat
Army Group South Ukraine #6 - Consternation Road to Berlin #73 - She-Wolves of the SS
Errors? Omissions? Report them!
Bobruisk Bridgehead
Eastern Front #29
(Attacker) Germany vs Soviet Union (Defender)
Formations Involved
Germany 10th Motorized Division
Germany 6th Panzer Regiment
Soviet Union 117th Rifle Division
Display
Balance:


Overall balance chart for EFDx029
Total
Side 1 3
Draw 3
Side 2 0
Overall Rating, 6 votes
5
4
3
2
1
3.5
Scenario Rank: 405 of 913
Parent Game Eastern Front
Historicity Historical
Date 1941-07-06
Start Time 05:00
Turn Count 28
Visibility Day
Counters 127
Net Morale 1
Net Initiative 0
Maps 3: 1, 2, 8
Layout Dimensions 84 x 43 cm
33 x 17 in
Play Bounty 103
AAR Bounty 171
Total Plays 6
Total AARs 1
Battle Types
Inflict Enemy Casualties
Surprise Attack
Urban Assault
Conditions
Off-board Artillery
Scenario Requirements & Playability
Eastern Front Base Game
Introduction

The German 10th Motorized Division, advancing on the right flank of the 3rd Panzer Division, was struck in the flank by the Soviet 117th Rifle Division supported by tanks. The Soviet formation had, unknown to the Germans, crossed the Berezina River during the night. The Battle for Smolensk had begun.

Conclusion

The 117th Rifle Division went into action only partially mobilized, but determined to stop the German invaders. After ferocious fighting, a German tank battalion arrived and made the difference. By noon the Soviets had been thrown back. the 117th lost almost one-fifth of its personnel in just two days' fighting, along with 48 tanks. The Soviet soldiers gave as good as they got; in just this action the Germans lost 21 tanks and more than 200 men.


Display Relevant AFV Rules

AFV Rules Pertaining to this Scenario's Order of Battle
  • Vulnerable to results on the Assault Combat Chart (7.25, 7.63, ACC), and may be attacked by Anti-Tank fire (11.2, DFT). Anti-Tank fire only affects the individual unit fired upon (7.62, 11.0).
  • AFV's are activated by tank leaders (3.2, 3.3, 5.42, 6.8). They may also be activated as part of an initial activating stack, but if activated in this way would need a tank leader in order to carry out combat movement.
  • AFV's do not block Direct Fire (10.1).
  • Full-strength AFV's with "armor efficiency" may make two anti-tank (AT) fire attacks per turn (either in their action segment or during opportunity fire) if they have AT fire values of 0 or more (11.2).
  • Each unit with an AT fire value of 2 or more may fire at targets at a distance of between 100% and 150% of its printed AT range. It does so at half its AT fire value. (11.3)
  • Efficient and non-efficient AFV's may conduct two opportunity fires per turn if using direct fire (7.44, 7.64). Units with both Direct and AT Fire values may use either type of fire in the same turn as their opportunity fire, but not both (7.22, 13.0). Units which can take opportunity fire twice per turn do not have to target the same unit both times (13.0).
  • Demoralized AFV's are not required to flee from units that do not have AT fire values (14.3).
  • Place a Wreck marker when an AFV is eliminated in a bridge or town hex (16.3).
  • AFV's do not benefit from Entrenchments (16.42).
  • AFV's may Dig In (16.2).
  • Closed-top AFV's: Immune to M, M1 and M2 results on Direct and Bombardment Fire Tables. Do not take step losses from Direct or Bombardment Fire. If X or #X result on Fire Table, make M morale check instead (7.25, 7.41, 7.61, BT, DFT).
  • Closed-top AFV's: Provide the +1 modifier on the Assault Table when combined with infantry. (Modifier only applies to Germans in all scenarios; Soviet Guards in scenarios taking place after 1942; Polish, US and Commonwealth in scenarios taking place after 1943.) (ACC)
  • Tank: all are closed-top and provide the +1 Assault bonus, when applicable
  • Prime Movers: Transports which only transport towed units and/or leaders (May not carry personnel units). May or may not be armored (armored models are open-top). All are mechanized. (SB)

Display Order of Battle

Germany Order of Battle
Heer
  • Motorized
Soviet Union Order of Battle
Army (RKKA)

Display Errata (4)

4 Errata Items
Overall balance chart for 2

Two 105mms (ID#s 1204, 1205) have "16-31" fire values in black (direct fire), when they should be in white (indirect fire).

(Shad on 2010 Dec 15)
Overall balance chart for 20

The reduced direct fire value of the Heer HMG became 5-5 starting with Fall of France.

(plloyd1010 on 2015 Jul 31)
Overall balance chart for 486

The Pz IVe appearing in the original Panzer Grenadier game had an Anti tank value of 4-7. As of Afrika Korps (2002), continuing onward through the 3rd and 4th edition games, the anti tank value has been 4-4.

(plloyd1010 on 2016 Jul 25)
Overall balance chart for 951

The reduced direct fire value in Kursk: Burning Tigers is 4-4.

(plloyd1010 on 2015 Jul 31)

Display AARs (1)

A very decisive and bloody stalemate -temporary cease-fire declared
Author Brett Nicholson
Method Solo
Victor Draw
Play Date 2014-04-26
Language English
Scenario EFDx029

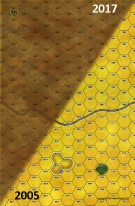
By the conclusion of turn 25/11:00 the Germans and Soviets both stopped fighting with the control of the larger town on map 2 disputed as they had both met step-loss victory conditions through attrition. Losses were about equal though slightly in favor of the Soviets. So, what went wrong? Well, nothing on the part of the Soviets. The Germans realized much too late that taking the town was beyond their means but only after investing in too many urban assaults gone wrong and the loss of too many panzers. In hindsight the best strategy for the Germans would have been to "Hit it and quit it" but even generating 33 Soviet step losses was hard enough with units engaged at such close quarters. In this case the Germans did not manage this until there were just three turns left to go. The Soviets on the other hand inflicted their 20+ German step losses at 09:45/turn 20.

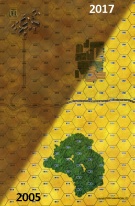
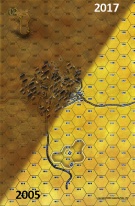
A few notes about the battle: First off, the Germans were in such a hurry to storm the town on map 2 that they almost forgot to take the uncontested, smaller town on map 1! That was soon remedied by sending a unit back which had not yet disembarked from it's truck transport. Immediately Soviet units made a beeline to occupy the larger town with minimal losses on the approach. Once there they found that they had just enough strength to at least prevent the Germans from seizing total control of it. The Germans on the other hand were complacent from the earlier successes of Barbarossa and thought, as their führer did, that all they had to do was "kick the door down and that the whole roof would collapse" -they were sadly mistaken. After 2 hours/8 turns, with time ticking away the Germans began to mount some disasterous urban assaults in an ambitous effort to take the town without successfully weakening the defenders with direct or indirect fire. Those three assaults on the western portion of the town remained bogged down for most the battle and in the end only one of the three contested hexes of many eventually fell under German control. The one bright moment for the Germans was when the 6th Panzer Division reinforcements arrived right on time from the east at 08:00/turn 13 and in turn raised the German intiative by 2 points. Initially a lot of the Bt-7s holed up in the town were easily elimated while the T-34As kept firing back blanks in return. Soon enough however the T-34s found their marks and began tearing the more formidable panzers apart and the only German tanks really capable of doing any damage to the T-34s (the one platoon of PzIVEs) were reduced, demoralized and sent fleeing the battlefield. After that it was pretty much all downhill for the German assault on the town with their losses continuing to pile up. A random event occured at 09:30/turn 19, which added insult to the German's injuries when a Soviet sniper efficiently picked off the German Major. The next turn the Soviets reach their enemy step-loss VCs. Now the Germans were fighting for a draw with limited and shrinking resources but with shrewd resolve were finally able to extract the 33 required Soviet steps right before time ran out.

I think this was a good scenario that would of made for a better face-to-face match. It gets an average "3" rating for my solo play. In conclusion I believe the best German approach would be to forget taking the town despite the lower Soviet morale -there'e just too many of them and too many town hexes to take. Perhaps if the initial German urban assaults were more successful and timely then things would of turned out differently, maybe not. One thing for sure this is that this one ended in a bloodbath and both sides saw a decisive victory elude them. The Soviets did seem to hold together a lot better than their aggressors in the bitter end after getting rolled over in so many other earlier urban struggles.

0 Comments
You must be a registered member and logged-in to post a comment.
Errors? Omissions? Report them!
Page generated in 0.346 seconds.