
|
Hitting the Road Cassino '44 #27 |
||
|---|---|---|
| (Attacker) Britain | vs | Germany (Defender) |
| Formations Involved | ||
|---|---|---|
| Britain |  |
5th Northamptonshire Infantry |
| Britain |  |
6th Royal Inniskilling Fusiliers |
| Germany |  |
Kampfgruppe Bode |

| Total | |
|---|---|
| Side 1 | 1 |
| Draw | 1 |
| Side 2 | 3 |


| Overall Rating, 6 votes |
|---|
|
4.17
|
| Scenario Rank: 48 of 913 |
| Parent Game | Cassino '44 |
|---|---|
| Historicity | Historical |
| Date | 1944-05-15 |
| Start Time | 03:30 |
| Turn Count | 24 |
| Visibility | Day & Night |
| Counters | 125 |
| Net Morale | 0 |
| Net Initiative | 2 |
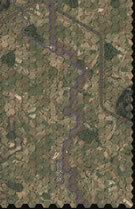
| Maps | 2: CassLL, CassUL |
| Layout Dimensions | 43 x 28 cm 17 x 11 in |
| Play Bounty | 134 |
| AAR Bounty | 165 |
| Total Plays | 5 |
| Total AARs | 2 |
| Battle Types |
|---|
| Road Control |
| Conditions |
|---|
| Minefields |
| Off-board Artillery |
| Randomly-drawn Aircraft |
| Illumination |
| Scenario Requirements & Playability | |
|---|---|
| Cassino '44 | Base Game |
| Introduction |
|---|
|
With the British 28th Brigade's failure to establish a crossing of the Rapido, it was decided to commit the 78th Division to attack across the Liri Valley. No bridges had been completed near Cassino Town so the division was forced to cross near Sant' Angelo. This was the main supply route for 8th Indian Division so there was much delay in getting across, but as soon as they did so they received orders for an immediate attack towards the Cassino-Pignataro road. |
| Conclusion |
|---|
|
The 6th Inniskilling Fusiliers led the attack with the 5th Northamptonshire Regiment on their right. Their objective was the "Grafton" line (named after a famous English foxhunt) just west of the Cassino-Pignataro road. By early morning the line had been captured but the Germans launched counterattacks and the area was not secure until mid-day. |

|
|
|---|
| AFV Rules Pertaining to this Scenario's Order of Battle |
|---|
|
| Army |
|---|
|


| Heer |
|---|
|


| Luftwaffe |
|---|
|

| 9 Errata Items | |
|---|---|

|
The "Optional Values" for the 17-Pdr given in an Avalanche Press Daily Content piece on the 17-Pdr Anti-Tank gun (and printed on a replacement counter sheet Download) are now the Official Ratings, published in games like Cassino '44, Grossdeutschland 1946, and Indian Unity, as shown in one of the two counter images. These are: 5-5 / 8-8 MA 0 (Towed). (caryn
on 2012 May 03)
|

|
All Bren carriers should have a movement value of 7. (Shad
on 2010 Dec 15)
|

|
Ignore the direct fire values. (Shad
on 2010 Dec 15)
|

|
The reduced direct fire value of the Heer HMG became 5-5 starting with Fall of France. (plloyd1010
on 2015 Jul 31)
|

|
All SPW 251s have an armor value of 0. (Shad
on 2010 Dec 15)
|

|
Strongpoints are single step units and can be eliminated with X results like any other single step unit. (Shad
on 2010 Dec 15)
|
|
|
The standard mix of strongpoints may be downloaded from Avalanche Press: http://www.avalanchepress.com/German_Strongpoints.php This is the standard mix found in Airborne, Airborne-IE, and Edelweiss Expanded. The strongpoint mix in Cassino '44 is different from that of other PG games. (plloyd1010
on 2012 Feb 01)
|
|
|
Strongpoints are affected by the terrain in their hex just like any other unit.
Even though they can't move, they can attack using Assault Combat if an enemy unit moves into their hex.
They may not dig in or benefit from entrenchments.
(rerathbun
on 2014 Apr 21)
|

|
The movement allowance on the counters in Airborne is misprinted. It should be "3." (rerathbun
on 2012 Jan 30)
|
| Cassino ’44, scenario #27: Hitting the Road | ||||||||||||
|---|---|---|---|---|---|---|---|---|---|---|---|---|
This scenario is excellent, it has some of everything: mines, strongpoints, Italian armor in German use, NW 41 rocket units, British armor cars, a FLM unit, off-board artillery, air-support, illumination-flares, both night & day turns and two beautiful maps with lot of space to move on. As usual, it takes me a while to see which of the four maps are in use but it’s worth it. I won’t go into too much detail, as I want other guys to play this scenario, but my three staging areas of British units must clear the Cassino-Pignataro Road of German units and they try to close with the Germans under early morning darkness but those Germans keep firing flares to light thing up. All three British group kind of get pushed to the north in combat but this actually helps them concentrate in force and clear the northern sector and move south. The British are clearing the road but taking too many step losses especially the armor. The Germans are also taking a pounding and with only 24 turns, it could go either way. Both sides receive a minor victory, as the British lost too many steps but cleared the road with some luck. I messed up getting some German units back on to the road or they would of had a major victory but as it is, it’s a Draw. I certainly messed that scenario up with a couple of bad decisions in my movement on the last couple of turns but I guess that happens in the real life battlefields as well. Great scenario, I highly recommend it! |
||||||||||||
| 0 Comments |
| Victoria pírrica alemana en el valle del Liri |
|---|
|
En este escenario un Kampfgruppe alemán, integrado por dos batallones de panzergrenadiere, apoyados por una compañía de StugIIIG, dos secciones de Stug 75/34, dos secciones de cazacarros Nashorn, más diversas armas de apoyo (Nebelwerfern, artillería, vehículos SPW 251...) defiende una carretera. Los atacantes británicos cuentan con aproximadamente los efectivos de un regimiento de infantería, dos compañías de tanques Sherman, dos compañías de vehículos blindados ligeros (Stuart VI, Stag y Daimler I) y varias unidades de apoyo (morteros, cañones AT, vehículos Bren...). Cuentan también con una potente artillería fuera del mapa y la colaboración esporádica de la RAF. Los alemanes se despliegan a lo largo de la carretera que une Cassino con Pignataro. Se apoyan en unas colinas de poca altitud (20 metros) y en las escasas zonas boscosas. El terreno abierto está protegido por cuatro campos de minas y tres strongpoints. Los británicos se concentran en torno a tres puntos al este de la carretera. El río Rapido no supone nngún obstáculo, ya que en anteriores combates los aliados lograron conquistar ambas riberas. Los británicos inician su avance de noche y con casi nula visibilidad (un hex). Concentran sus fuerzas en el ala derecha de su dispositivo. Una vez se produce el contacto, su potente artillería fuera del mapa (3 x 20) abre hueco en las líneas alemanas, cuyas unidades se ven asaltadas y destruidas. Los alemanes se valen de las pìstolas de bengalas para iluminar el campo de batalla. De esta manera consiguen ver en la oscuridad dos secciones de vehículos Stag, que son casi totalmente destruidas por los temibles cazatanques Nashorn. A pesar de ello, los británicos consiguen perforar el ala izquierda alemana, donde sólo resisten algunas unidades aisladas. Conforme aumenta la luz solar aumenta la intervención de los blindados de ambos bandos. Se produce una virulenta batalla de tanques. Los británicos pierden la mitad de sus Sherman, principalmente a manos de los Nashorn, armados con un demoledor cañón de 88 mm. Los británicos responden con los vehículos supervivientes y con los cañones AT de 17 libras y destruyen todos los Nashorn y casi todos los Stug. La batalla aumenta en intensidad a lo largo de toda la extensión del campo de batalla. Los británicos consiguen desalojar a casi todos los alemanes de la carretera, aunque en algunos puntos -y sobre todo en el ala derecha alemana- éstos resisten desesperadamente. La RAF interviene esporádicamente, aunque sin resultados decisivos. Al llegar el último turno la batalla no está aún decidida. Los alemanes, a pesar de haber sufrido bajas espantosas, están desesperadamente afianzados a algunos hexes de carretera. Los británicos desencadenan la ofensiva final... que fracasa. Algunas unidades alemanas consiguen mantener sus posiciones en la carretera sin desmoralizarse, por lo que obtienen una victoria menor. El precio en sangre que han pagado ambos bandos ha sido terrible. Los británicos han perdido 38 steps. Los alemanes 52, por lo que han sido casi totalmente destruidos. Este ha sido uno de los mejores escenarios que he jugado. Uno de los pocos de Cassino 44 en que ambos bandos han podido utilizar generosamente sus unidades blindadas en terreno abierto y sin preocuparse por el cruce de ríos. |
| 0 Comments |