
|
Blitzkrieg C&CV1: War in the East #3 |
||
|---|---|---|
| (Attacker) Germany | vs | Poland (Defender) |
| Formations Involved | ||
|---|---|---|
| Germany |  |
9th Panzer Division |
| Poland |  |
19th Infantry Division |

| Total | |
|---|---|
| Side 1 | 3 |
| Draw | 0 |
| Side 2 | 1 |


| Overall Rating, 4 votes |
|---|
|
3.5
|
| Scenario Rank: --- of 913 |
| Parent Game | C&CV1: War in the East |
|---|---|
| Historicity | Alt-History |
| Date | |
| Start Time | 08:00 |
| Turn Count | 24 |
| Visibility | Day |
| Counters | 184 |
| Net Morale | 0 |
| Net Initiative | 0 |
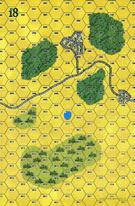
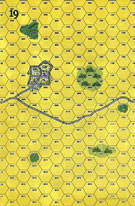
| Maps | 3: 18, 19, 6 |
| Layout Dimensions | 84 x 43 cm 33 x 17 in |
| Play Bounty | 185 |
| AAR Bounty | 159 |
| Total Plays | 4 |
| Total AARs | 3 |
| Battle Types |
|---|
| Road Control |
| Urban Assault |
| Conditions |
|---|
| Off-board Artillery |
| Randomly-drawn Aircraft |
| Scenario Requirements & Playability | |
|---|---|
| C&CV1: War in the East | Base Game |
| Eastern Front | Maps + Counters |
| Road to Berlin | Maps + Counters |
| White Eagles | Counters |
| Introduction |
|---|
|
The full weight of German combined arms comes to bear on a Polish infantry division holding one of the main roads to Warsaw. And since this is a fictional encounter, Polish cavalry do get a charge German tanks. |
| Conclusion |
|---|
|
Here's another big scenario where the Poles have plenty of numbers with which to hold back the Germans, but they have little cover while the Germans have overwhelming firepower. Polish Leader Characters will earn plenty of LPs for rallying disrupted and demoralized units, and those with the Rural Assault Skill will have plenty of opportunities for LPs and medals. |

|
|
|---|
| AFV Rules Pertaining to this Scenario's Order of Battle |
|---|
|
| Heer |
|---|
|


| Wojska Lądowe |
|---|
|


| 4 Errata Items | |
|---|---|

|
The reduced direct fire value of the Heer HMG became 5-5 starting with Fall of France. (plloyd1010
on 2015 Jul 31)
|

|
The Pz IVe appearing in the original Panzer Grenadier game had an Anti tank value of 4-7. As of Afrika Korps (2002), continuing onward through the 3rd and 4th edition games, the anti tank value has been 4-4. (plloyd1010
on 2016 Jul 25)
|

|
The morale and combat modifiers of German Sergeant #1614 should be "0", not "8". (Shad
on 2010 Dec 15)
|

|
One unit of Polish Calvary from White Eagles has a printed movement of 5, it should be 6 like the rest. (garbare83686
on 2023 Aug 13)
|
| Immer Geradeaus Fahren ! | ||||||||||||||
|---|---|---|---|---|---|---|---|---|---|---|---|---|---|---|
Polish Campaign part 3: Blitzkrieg Third scenario in the 1939 Polish Campaign, and basically the title says it all! A vast array of German platoons and their armored compadres have to clear the board and wipe out as much Polish defenders as possible. The Poles on the other hand have the daunting task of keeping the Germans from surging on towards Warschau and probably more accurate, to keep the losses tally low to keep the campaign alive. The Polish defense line was this time split in groups: the most western town was heavily defended, the road between the 2 center woods was sandbagged, more roadblocks were placed further east and a considerable contingent occupying the eastern towns as a last resort. Several AT platoons were deployed concealed deep in the woods en marshes. German infantry engulf the board while the Panzers stay off board until the Luftwaffe cleared the potent Polish AT from the field. While the Stukas are pounding the canons, the first town gets surrounded and assaulted. Fierce Polish defenders try to make the going tough but they know that the overwhelming odds don’t look promising. Overall, the German advance in the opening stages is not very Blitzy! The advance is slow because their tactic is sure and ruthless: pound what is ahead with artillery and send in the infantry to mop up what is left standing when dust falls. After three hours of continuous air strikes, most AT firepower is blown to smithereens and the German Panzers finally put some millage on their meters. Soon enough, they form point in the vanguard, giving vital support to the PBI. Four hours into the battle, the Western town succumbs, killing just about all its Polish occupants. But their valiant sacrifice is not in vain, they bought invaluable time that might save other brothers from the same fate. Most roadblocks are no more than mere hurdles that never seem to stop the German onslaught and things are not exactly going peachy for the Poles. But then suddenly momentum starts to drop and the German invaders have to take a cigarette break. Some well placed MG nests prove too hard to take out and the Armored Cars that bypassed this position, overstretched, which led to their demise. So the Germans cut their losses and decided upon clearing the road as priority, leaving the Eastern towns for what they were. A last minute gamey Polish counter tactic to take some road section back by bike, failed miserably and both sides decided that dinner was served and game ended. The Germans had it in the bag: they occupied the western town, had some influence in the lone town hex on the eastern side, controlled two thirds of the road and killed tons of Polish units! Overall, a very easy German victory (surprise, surprise) which was still pretty substantial when we started counting VP’s. Germany 67 – 30 Poland. Campaign wise, the Germans take back the lead with a comfortable 32 VP’s. Both our characters were not very successful. On the German side, only LT König proved his worth but fell short to earn himself a shiny badge, still at 9-1-1, he is no sissy anymore. LT Jung got drawn into the town sluggathon but couldn’t hold his own. LT Nutzlos was not present. On the Polish side, Por Lato was seen running from the battle which resulted in a reprimand, just what the doctor ordered. Por Kowalski fought ferociously defending a 75mm platoon, he got demoralized several times but only left his post when his unit got killed, kudos but no cigar! Por Lubanski, the hero of scenario 2, took a most cautious approach and was never in the thick of it, but still he managed to collect some LP’s. This battle took us a fair amount of time to complete, not because it is a monster, but basically because both players couldn’t stay healthy for more than one week. On to part 4 and healthier times! |
||||||||||||||
| 0 Comments |
| More Bricks |
|---|
|
The Germans enter this scenario with tons of OBA and a strong combined arms force. The Poles have plenty of artillery but it is on board and open to attack by swarms of German planes (2 counters per turn!). Other plays of this scenario have gone unabashedly to the Germans primarily due to the OBA. As you can see, the Poles won this scenario by loading up the first town with leader characters with Urban Assault abilities, engineers and having some of the best fire (direct and indirect), assault and morale check rolls ever. The German planes hit the artillery again and again but were never able to dent it. While the units sometimes lost order they regained it every time and often were able to fire prior to the German aerial assaults by gaining the initiative. The German losses were so heavy that the Poles had the initiative advantage for most of the game (the Germans lost 21 steps in the first four turns). After 17 turns of slamming against the Poles they were only able to claim three town hexes and one board's road against 6 town hexes for the Poles and two boards with undemorlized Poles on them. The Poles certainly were not going to lose the town hexes they held as the Germans still had to root out the engineers in the first town hex but an advance was likely to cost the Germans some more armor and plenty of steps. The potnetial victory would by pyrrhic as the Poles already outnumbered the Germans remaining. Better to offer terms to the Poles. The engineers surrendered to the Germans giving them a fourth town hex but the Germans withdrew, thereby stopping the OBA and aerial assaults. The final score was Poles 72 - Germans 45. The dead piles of both groups were high but the German losses were tremendous. The leaders of both sides, however, were unable to advance as gains in LPs were matched by losses through disruptions and demoralizations. In addition, two Polish leaders were seriously wounded and will not be available for the next scenario (luckily a mechanized brawl). If there was one leader who really made a difference, however, it was the Polish captain with an artillery ability, whose management of the Polish heavy guns was devastating to the Germans. One of the interesting pieces of the campaign system in C&CV is that it gives you the right to stop a losing battle. You can "grant" victory to the opposing side by withdrawing and cutting your losses and thereby keep from running up the VP total for the other side. Had this been a stand alone scenario the Germans might have tried a "Hail Mary" type attack with very little chance for success and a high likelihood of increasing the Polish margin of victory. As it was, a more rational route was followed. The scenario is a fun one but will rarely work out as I experienced. I can see this one for any venue although it is long with many activations for both sides so PBEM would be a many month affair. I give it a "4". |
| 0 Comments |
| Blitzkrieg indeed! | ||||||||||||
|---|---|---|---|---|---|---|---|---|---|---|---|---|
A well led German light panzer division with excellent artillery and aircraft support has to push across three boards taking town hexes, clearing the main west-east road and inflicting casualties against dug in Poles with good morale but lacking AFV's and off board artillery. This was a solitaire game, the Poles main quandary is deployment. Too far forward could result in a very quick game too far back give the Nazi's easy VP with town capture and road clearance. The Polish commander went for a stand in the first town and then a fall back defense to the final board, the idea being to slow the Germans down and hope to get them bogged in an urban assault so by game end the road was uncleared the final town still Polish and a narrow win with VP. The German plan was to use combined arms and engineers to clear the town, identify the Polish A/T guns and eliminate with bombardment or Stuka those guns then unleash the tanks to encircle further Polish units. Regrettably for the Poles the latter plan worked very well, although the Germans did fail to clear the road and take the second town the Polish casualties were too heavy, and the Germans ran out easy winners. The only Polish highlight was taking out the German Col with a 7 opportunity fire shot which certainly slowed the Germans central thrust by a few turns! As a simulation of Blitzkrieg this scenario is very good, as a FtF game I would not rate it very highly. If part of the campaign game then there would be plenty of chances for German officer characters to gain Leadership points! |
||||||||||||
| 0 Comments |