Panzer Grenadier Battles on April 27th:
Arctic Front Deluxe #40 - Children's Crusade Broken Axis #14 - Târgu Frumos: The Second Battle Scenario 3: Sledge Hammer of the Proletariat
Army Group South Ukraine #6 - Consternation Road to Berlin #73 - She-Wolves of the SS
Errors? Omissions? Report them!
Obsession Junction
Black SS #31
(Defender) Germany vs United States (Attacker)
Formations Involved
Germany 1st SS "Leibstandarte Adolf Hitler" Division
Germany 2nd SS "Das Reich" Division
United States 30th "Old Hickory" Infantry Division
United States 3rd "Spearhead" Armored Division
Display
Balance:


Overall balance chart for BlSS031
Total
Side 1 2
Draw 0
Side 2 0
Overall Rating, 2 votes
5
4
3
2
1
3.5
Scenario Rank: --- of 913
Parent Game Black SS
Historicity Historical
Date 1944-08-10
Start Time 14:00
Turn Count 12
Visibility Day
Counters 58
Net Morale 0
Net Initiative 1
Maps 1: 29, 31
Layout Dimensions 43 x 28 cm
17 x 11 in
Play Bounty 137
AAR Bounty 171
Total Plays 2
Total AARs 1
Battle Types
Road Control
Urban Assault
Conditions
Off-board Artillery
Reinforcements
Terrain Mods
Scenario Requirements & Playability
Black SS Base Game
Cassino '44 Counters
Elsenborn Ridge Counters
Fall of France 1 Maps
Introduction

Each side had dug in it heels at RJ278, and it had become a matter of pride to control it. The Germans had stopped trying to overwhelm the roadblock at L'Abbaye Blanche to the south and did not send any reinforcements to Kampfgruppe Ullrich so that RJ278 could remain well-defended. For their part, the Americans had worked all day to bring up enough armor support to insure that they controlled RJ278 at sundown.

Conclusion

The Americans steadily advanced until an antitank gun destroyed their dozer tank. The fighting then seesawed until a small battle group from the SS Lifeguard hit the American left flank. the Americans fell back with the Germans declining to follow.

Additional Notes

Playable without using the black SS counters.


Display Relevant AFV Rules

AFV Rules Pertaining to this Scenario's Order of Battle
  • Vulnerable to results on the Assault Combat Chart (7.25, 7.63, ACC), and may be attacked by Anti-Tank fire (11.2, DFT). Anti-Tank fire only affects the individual unit fired upon (7.62, 11.0).
  • AFV's are activated by tank leaders (3.2, 3.3, 5.42, 6.8). They may also be activated as part of an initial activating stack, but if activated in this way would need a tank leader in order to carry out combat movement.
  • AFV's do not block Direct Fire (10.1).
  • Full-strength AFV's with "armor efficiency" may make two anti-tank (AT) fire attacks per turn (either in their action segment or during opportunity fire) if they have AT fire values of 0 or more (11.2).
  • Each unit with an AT fire value of 2 or more may fire at targets at a distance of between 100% and 150% of its printed AT range. It does so at half its AT fire value. (11.3)
  • Efficient and non-efficient AFV's may conduct two opportunity fires per turn if using direct fire (7.44, 7.64). Units with both Direct and AT Fire values may use either type of fire in the same turn as their opportunity fire, but not both (7.22, 13.0). Units which can take opportunity fire twice per turn do not have to target the same unit both times (13.0).
  • Demoralized AFV's are not required to flee from units that do not have AT fire values (14.3).
  • Place a Wreck marker when an AFV is eliminated in a bridge or town hex (16.3).
  • AFV's do not benefit from Entrenchments (16.42).
  • AFV's may Dig In (16.2).
  • Open-top AFV's: Immune to M, M1 and M2 results on Direct and Bombardment Fire Tables, but DO take step losses from X and #X results (7.25, 7.41, 7.61, BT, DFT). If a "2X" or "3X" result is rolled, at least one of the step losses must be taken by an open-top AFV if present.
  • Closed-top AFV's: Immune to M, M1 and M2 results on Direct and Bombardment Fire Tables. Do not take step losses from Direct or Bombardment Fire. If X or #X result on Fire Table, make M morale check instead (7.25, 7.41, 7.61, BT, DFT).
  • Closed-top AFV's: Provide the +1 modifier on the Assault Table when combined with infantry. (Modifier only applies to Germans in all scenarios; Soviet Guards in scenarios taking place after 1942; Polish, US and Commonwealth in scenarios taking place after 1943.) (ACC)
  • Tank: all are closed-top and provide the +1 Assault bonus, when applicable
  • Tank Destroyer: do not provide the +1 Assault bonus, even if closed-top (SB)
  • APC – Armored Personnel Carrier: These are Combat Units, but stack like Transports. They can transport personnel units or towed units. They are not counted as combat units for the +1 stacking modifier on the Direct Fire and Bombardment Tables (4.4). They may be activated by regular leaders and tank leaders (1.2, 3.34, 4.3, 5.43). They do not provide the +1 Assault bonus (ACC).
  • Prime Movers: Transports which only transport towed units and/or leaders (May not carry personnel units). May or may not be armored (armored models are open-top). All are mechanized. (SB)

Display Order of Battle

Germany Order of Battle
Heer
  • Mechanized
Schutzstaffel
  • Mechanized
  • Towed
United States Order of Battle
Army
  • Mechanized

Display Errata (2)

2 Errata Items
Overall balance chart for 47

All SPW 251s have an armor value of 0.

(Shad on 2010 Dec 15)
Overall balance chart for 424

The reduced direct fire value of the SS HMG is 5-5 in Beyond Normandy and Road to Berlin.

(plloyd1010 on 2015 Jul 31)

Display AARs (1)

Obsession Junction
Author Poor Yorek
Method Solo
Victor Germany
Play Date 2010-11-12
Language English
Scenario BlSS031
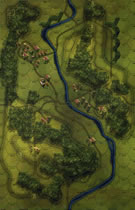
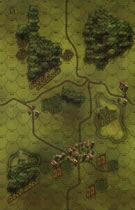
  1. The Germans bunkered down in the crossroads and town hexes, keeping the PZIVF2 and 75/41 AT dug-in on the 20-m hill spur behind the two town hexes. German leaders were mixed: very good senior ones, but fairly normal junior ones.

  2. The US approached up and over a field-covered hill from the West and along a 3-hex wide open terrain corridor from the SW; the armor took both those routes and sent the M10 (used an M18 counter for the purpose) on a loop around a large field (all woods are fields) to get a flanking bonus on the PZIV from the SSE. US leaders were quite good (save for one 7-0-0 LT); otherwise six of the eight were flipped to the "better" side with three having 10 morale.

  3. US armor took a crushing, but eventually, after loosing 3 steps of M4's and both steps of the M10, managed to take out the PZIV (and OBA accounted for the spotted AT gun, which had itself accounted for a step of M4's).

  4. Opportunity fire had taken quite a toll on the US advance, despite an amazing run of twenty consecutive morale checks/recoveries.

  5. Americans engaged an assault on the southern of the two contiguous town hexes (containing two SS ENGs and 10-1-2 and 10-0-1 leaders. This assault continued for about seven turns with the Americans taking the brunt of the hits; the Germans only counter assaulted once when all surviving US units were demoralized. Meanwhile, American OBA and stacked mortars bombarded the crossroads hex and the adjacent town hex. Americans had kept two M4 platoons to the West along the road to guard vs. SS reinforcements.

  6. Panther and three GRENs arrived on turn 7. The panther and two GRENs approached from the west, one entered into the town (on a board edge) along with the SPW 251s whilst the GREN in that hex reinforced the town assault hex to its south.

  7. The panther and GRENS took out the M4's despite some poor shooting by the PzV crews: the grenadiers came in handy as the panther rolled poorly, missing half of its attacks whilst the others only took out a single step. Other US armor shot up the German half-tracks.

  8. The US had also recovered sufficient force to assault the crossroads hex. American rolling dramatically improved and both assaults began to go poorly for the Germans. Fortunately for the SS Das Reich, the last GREN half-step (and leader) recovered from demoralization to hold that hex until the two GRENs with the panther (from the Leibstandarte) could reinforce.

  9. On the last turn, the US finally captured one town hex (the southern one).

So the game ended with the US holding one of the three required victory hexes and hence this was a German victory.

This scenario was very exciting albeit that the German player for the most part simply tried to defend in the town assault hexes; the assault on the crossroads hex was, as might be expected, more back-and-forth. Although the US had armor in the town assault, the German player thought that risk of the negative col shifts for attacking in a town outweighed the possible AT shot and hence only defended. The German player was faced early on with a risk-reward choice for the PzIVF2 and the AT gun.

The die rolls went back and forth: the US player had a hot streak early on morale checks, but a poor run on AT rolls, allowing the PzIVF2 to get in a few more kills. The middle few turns were somewhat phlegmatic in terms of die rolls with nothing dramatic occurring. Once the panther and 3xGREN reinforcements arrived, however, US rolling became insane and what appeared to be a mopping up by the SS turned into near panic. Only some stronger rolling on the last two turns by the Germans and weaker rolls by the US kept RJ 278 in German hands.

From the perspective then of drama and the "thrill of victory/agony of defeat" that comes with the vagaries of die-rolling, this scenario was quite a success and had a couple of dramatic changes of fortune. It was doubtful whether the US could ever have taken the second (northern) town hex (and hence a victory in game terms), but the players essentially turned the battle down the stretch into a contest for a moral victory regarding the two assaults on the road junction and the southern town hex.

Had the SS leaders not been quite so strong, but all else been equal, the US might well have been difficult to stop.

Highly recommended, particularly for an aggressive and short scenario.

0 Comments
You must be a registered member and logged-in to post a comment.
Errors? Omissions? Report them!
Page generated in 0.553 seconds.