
|
On to Ondefontaine Black SS #12 |
||
|---|---|---|
| (Defender) Germany | vs | Britain (Attacker) |
| Formations Involved | ||
|---|---|---|
| Britain |  |
4th Dorsetshire Infantry |
| Britain |  |
5th Dorsetshire Infantry |
| Britain |  |
Sherwood Rangers Yeomanry |
| Germany |  |
10th SS "Frundsburg" Panzer Division |

| Total | |
|---|---|
| Side 1 | 3 |
| Draw | 0 |
| Side 2 | 0 |


| Overall Rating, 3 votes |
|---|
|
3.67
|
| Scenario Rank: --- of 913 |
| Parent Game | Black SS |
|---|---|
| Historicity | Historical |
| Date | 1944-08-04 |
| Start Time | 17:00 |
| Turn Count | 12 |
| Visibility | Day |
| Counters | 42 |
| Net Morale | 0 |
| Net Initiative | 1 |
| Maps | 1: 10 |
| Layout Dimensions | 43 x 28 cm 17 x 11 in |
| Play Bounty | 132 |
| AAR Bounty | 171 |
| Total Plays | 3 |
| Total AARs | 1 |
| Battle Types |
|---|
| Inflict Enemy Casualties |
| Urban Assault |
| Conditions |
|---|
| Off-board Artillery |
| Scenario Requirements & Playability | |
|---|---|
| Battle of the Bulge | Maps |
| Beyond Normandy | Counters |
| Black SS | Base Game |
| Introduction |
|---|
|
As part of Operation Bluecoat, 43rd Wessex Division continued their push steadily southward toward Mont Pincon, the tallest height in Normandy. One day after being rebuffed in their effort to reach the heights, the division tried again. This time the going was much easier, as most of the German force they had encountered the previous day relocated. |
| Conclusion |
|---|
|
Again British and German accounts are at odds. The British claim to have been stopped short of the village, while the Germans claim the British entered the village and were driven out by a counterattack. Whatever the real story, the Germans would abandon the village during the night only to concentrate their forces farther south. |
| Additional Notes |
|---|
|
Playable without using the black SS counters. |

|
|
|---|
| AFV Rules Pertaining to this Scenario's Order of Battle |
|---|
|
| Army |
|---|
|


| Heer |
|---|
|

| Schutzstaffel |
|---|
|


")
")

| 6 Errata Items | |
|---|---|
| Scen 12 |
The HMG unit should be replaced with a WPN counter. There are not HMG's in either the Beyond Normandy or the Liberation '44 counter mixes. (plloyd1010
on 2016 Aug 03)
|

|
All Bren carriers should have a movement value of 7. (Shad
on 2010 Dec 15)
|

|
All SPW 251s have an armor value of 0. (Shad
on 2010 Dec 15)
|

|
The reduced direct fire value of the SS HMG is 5-5 in Beyond Normandy and Road to Berlin. (plloyd1010
on 2015 Jul 31)
|

|
The Units in Beyond Normandy were misprinted with a movement factor of 5. The movement factor should be 8. (rerathbun
on 2012 Mar 21)
|
|
|
Liberation 1944's counters are mislabeled 'PzIVF2.' The counter's ratings are correct (Armor 5, Move 8, DF 11-6, AT 6-8). (rerathbun
on 2014 Feb 14)
|
| Black SS, scenario #12: On to Ondefontaine | ||||||||||||
|---|---|---|---|---|---|---|---|---|---|---|---|---|
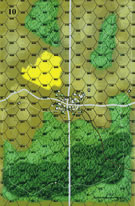
Black SS, scenario #12: On to Ondefontaine This scenario uses one map board from the first Battle of The Bulge game set, which I really like for a changeup. The British must enter the board from the west side, navigate through a dense forest, with one road directly through the middle and one path that shoots off in another westerly direction but all hexes exit the forest directly in front of the city hexes that must be controlled for victory. Obviously the Germans, about half the size must defend these hexes and shift units out that become demoralized, with whatever they have left. There are only 12 turns, so the British don’t have time to organize for too long once they get through the forest and must go on the attack, ready or not in some cases. This little battle turned into a blood-bath for it’s size. I think a few high rolls on the German side in a row, changed to outcome of this battle to a Major German victory. If I could have had a few go the British way, they could have had at least a minor victory but that is the unknowns of war. I think the forces that face each other in this battle situation are balanced pretty well, that either side has a chance to win. The Terrain is difficult to manage units however. |
||||||||||||
| 0 Comments |