
|
Counterattack at Cheux Beyond Normandy #10 |
||
|---|---|---|
| (Attacker) Germany | vs | Britain (Defender) |
| Formations Involved | ||
|---|---|---|
| Britain |  |
10th Highland Light Infantry |
| Britain |  |
46th (Highland) Infantry Brigade |
| Britain |  |
7th Royal Tank Regiment |
| Britain |  |
Army |
| Germany |  |
12th SS Panzer Regiment |
| Germany |  |
26th SS Panzergrenadier Regiment |
| Germany |  |
2nd "Vienna" Panzer Division |
| Germany |  |
3rd Panzer Regiment |

| Total | |
|---|---|
| Side 1 | 1 |
| Draw | 2 |
| Side 2 | 2 |


| Overall Rating, 5 votes |
|---|
|
3.2
|
| Scenario Rank: 607 of 913 |
| Parent Game | Beyond Normandy |
|---|---|
| Historicity | Historical |
| Date | 1944-06-27 |
| Start Time | 09:30 |
| Turn Count | 11 |
| Visibility | Day |
| Counters | 84 |
| Net Morale | 1 |
| Net Initiative | 1 |
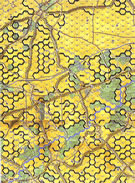
| Maps | 1: BN1 |
| Layout Dimensions | 88 x 58 cm 35 x 23 in |
| Play Bounty | 121 |
| AAR Bounty | 159 |
| Total Plays | 5 |
| Total AARs | 3 |
| Battle Types |
|---|
| Delaying Action |
| Inflict Enemy Casualties |
| Urban Assault |
| Conditions |
|---|
| Off-board Artillery |
| Randomly-drawn Aircraft |
| Severe Weather |
| Smoke |
| Scenario Requirements & Playability | |
|---|---|
| Beyond Normandy | Base Game |
| Introduction |
|---|
|
The planned nighttime relief of 46th Brigade in CHeux and le Haut du Bosq had left the 9th Cameronians in the northern outskirts of le Haut du Bosq. The 5th Duke of Cornwall's Light Infantry were to move forward to relieve the 10th HLI. The Highlanders were engaged in their second attempt to advance south and were in no position to resist an unexpected German attack from the flank. |
| Conclusion |
|---|
|
The attack by the Panthers of 2nd Panzer Division drove into the flank of the British line at Cheux, even to the point of over-running the 5th DCLI Battalion headquarters. With no accompanying infantry to protect them, the Panthers gradually fell victim to a combination of anti-tank guns and PIAT teams. The 5th DCLI was soon the bright spot of the day as they proved that stout-hearted infantry could defeat tanks. |

|
|
|---|
| AFV Rules Pertaining to this Scenario's Order of Battle |
|---|
|
| Army |
|---|
|


| Heer |
|---|
|

| Schutzstaffel |
|---|
|


")
")


| 8 Errata Items | |
|---|---|
| Scen 10 |
Scenario instructions indicate the Panthers enter between hex numbers 1005 and 1013 on the west edge. Correct hexes should be 0105 to 0113. (thomaso827
on 2014 Aug 20)
|

|
The "Optional Values" for the 17-Pdr given in an Avalanche Press Daily Content piece on the 17-Pdr Anti-Tank gun (and printed on a replacement counter sheet Download) are now the Official Ratings, published in games like Cassino '44, Grossdeutschland 1946, and Indian Unity, as shown in one of the two counter images. These are: 5-5 / 8-8 MA 0 (Towed). (caryn
on 2012 May 03)
|

|
All Bren carriers should have a movement value of 7. (Shad
on 2010 Dec 15)
|

|
Ignore the direct fire values. (Shad
on 2010 Dec 15)
|

|
All SPW 251s have an armor value of 0. (Shad
on 2010 Dec 15)
|

|
The reduced direct fire value of the SS HMG is 5-5 in Beyond Normandy and Road to Berlin. (plloyd1010
on 2015 Jul 31)
|

|
The Units in Beyond Normandy were misprinted with a movement factor of 5. The movement factor should be 8. (rerathbun
on 2012 Mar 21)
|
|
|
Liberation 1944's counters are mislabeled 'PzIVF2.' The counter's ratings are correct (Armor 5, Move 8, DF 11-6, AT 6-8). (rerathbun
on 2014 Feb 14)
|
| Panther Hunting | ||||||||||||
|---|---|---|---|---|---|---|---|---|---|---|---|---|
The panthers coming in from the west side of the board slowed down to exchange shots with AT guns and Churchills that were set up on the west end of the British defense. In hindsight, I probably should have kept them moving north for an end run around most of the British AT but the two that did go ended up being destroyed in the bocage as they tried to approach the town of Cheux from the west. With a stack of 3 British infantry and a 10-0-1 leader, I gave one platoon the Piat shot and just assaulted with the others. Piat took out a step and the others took out 2 more. This after the Panthers had lost a step to AT fire from turn 1 and 2 when they exchanged fire with the Churchill and a 6lber that got in a lucky shot. The SS tanks and infantry attempted to skirt the British to the east of the positions, and both sides had little effective artillery support. Even when they got it, the fire dice rolled 6 and 7 very consistently. In the end, Germans had lost 19 steps and British had lost 7, with Germans only barely contesting one of the 3 town hexes needed and missing the 10 steps needed for a step loss victory. Great game, and this solo play helped me sort out how I might change things in face-to-face play. |
||||||||||||
| 0 Comments |
| More of a small diversionary Feint | ||||||||||||
|---|---|---|---|---|---|---|---|---|---|---|---|---|
Casualty count is noted as (x-y), where x=German step losses, y=British step losses THE BATTLE0930: Panzers advance and the British Bren APCs flee. The Grenadiers advance and are hit hard by artillery and mortars. One platoon is lost (2-0). The British call in an tactical air strike and a direct hit by a B-25 Mitchell Bomber eliminates a second Grenadier platoon! (4-0) First Turn and the Germans are already suffered more than half their allowable losses. German Command is Demoralized 0945: German PzV attacks in the southwest le haute du Bosq. British are demoralized and lose a step. (4-1) PzIVH move into a firing line with the British Churchills of the 7th RTR. The remaining Grenadiers and HMG platoons move west to assist the PzVs. 1000-1015: Churchills fire uphill as the PzIVH fire down into the town. Both sides miss. PzV platoons eliminate the RIF in the SW and German foot enter le haute du Bosq! (4-3) 1030: PzIVH move west out of firing lane with the Churchills. Long range armour battle is just too risky. Fearfull of the PzVs, the Churchills do not pursue. The 10th Highland Light Infantry takes further casualties. (4-4) 1045: PzVs disrupt the RIF in du Bosq and the Grenadiers assist by armour assaults. RIF loses 2 steps, but the Grenadiers are also reduced (1 in 6 chance!) (5-6) Germans have turned this attack around and suddenly it is looking very tense! 1100: British HMG enters the assault as the PzVs advance on the town outskirts. 1115: PzV continue up the street aided by the SS PzIVH. British in SW end of le haute du Bosq are isolated and hit hard (assault 30 to 18). Grenadiers are demoralised. (5-7) 1130: PzIVH exit assault as the HMG advances. The Germans are shaken, but the British AT Gun is eliminated. (5-8) British infantry reinforces the assault. Half an hour to go. 1145: Two assaults are underway. The first assault sees the Germans on the attack (30 to 13) and the Br WPN is eliminated (panzer disrupted)! (10-5) The Germans have achieved their objective! British initiate the second assault (13 to 18) as they need to inflict further casualties, resulting in morale checks. The Germans fail to recover. British Churchills advance, but the PzIVH pull back. 1200: Germans win initiative and recover. The British retreat their disrupted men and the Churchills are sent into the assault! Churchill, RIF and 1/2 WPN vs. 2 PzV and HMG! (18 to 30). Desperate the British attack and the SS HMG is reduced! (10-6)! (British suffer a M2). British mortars have no effect and the battle is over. GERMAN VICTORY!!! AftermathIf I planned a counter-attack, I’d hope to have more units than the enemy. Marching a single company against 2 battalions seems crazy! Thankfully the “cause casualties” objective allowed the Germans to avoid taking on the whole British force in a massive Urban assault! This battle went down to the wire, the Germans were just cautious enough to deliver their 10 step losses required for victory but only receiving 6 step losses (1 away from British victory). As historical, the Germans caused significant damage to the British flank. If the scenario was longer, I’m certain the historical outcome would have been reached of the PzVs slamming into the 5th DCLI Battalion and being slowly overcome. Scenario Rating: 3/5 – Big set-up for the British where a number of units saw no action in this short scenario (fairly typical of these historical scenarios). This battle took nearly as long to set-up as it did to play through! Balanced victory conditions saw this one going down to the wire earning a 3/5. |
||||||||||||
| 0 Comments |
| Didn't need eleven turns | ||||||||||||||
|---|---|---|---|---|---|---|---|---|---|---|---|---|---|---|
This scenario was played as a team event by my gaming group. I act as moderator and facilitator for each game, and I do not participate directly as a player. My listing of “winning” is based on the PG HQ site cannot support a neutral role in AARs. Time to catch up on some back traffic from my gaming group. Counterattack at Cheaux is a short scenario pitting an outnumbered German force attacking a well-entrenched British force, with the intent of taking three towns hexes or inflicting ten steps without receiving seven steps in return. The Germans have a strong armor component against a primarily infantry and gun British force with a small amount of armor. Mud reduces movement, favoring the Brits, but the southern British unit has already suffered seven steps placing their morale in danger. The German players takes the bold decision to charge the north central British line with their four Panther units, and hit an indentation on the line placing them at risk from multiple British ATG units, trying to hit them before they can dig in. The mixed force to the south cannot support the Panthers, and the entire south end of the British line has little to do but harass the advancing German left. The Panthers do manage to penetrate the British line, and cause havoc with British on board mortar units, which helps protect the southern advance. But the cost is wicked. The British reposition their ATGs to provide crossfire, and what Panthers don’t die from ATG fire quickly become mired in assault hexes. Six of eight Panther steps die, along with two steps inflicted against the southern German force, that still has yet to hit the British line. The British lose one step in the German penetration. After four turns the Germans are pulverized while the British have barely broke a sweat. We call the game and pull out a light game to finish the night. The German players chose a risky and none to brilliant strategy, but was trying to smack the Brits before they could dig in. The lack of support for the Panthers, along with the decision to hit an indentation of the line vice the one point the Brits were actually jutting out, spelled disaster. German rolling was also abysmal, while Brit rolling was very good. But the Germans also couldn’t advance against the British right, as every unit that stuck its head up was on the receiving end of massive arty, mortar, and direct fire. The Germans should have hit the southern end of the line with everything hoping for the weakened unit guarding the flank to begin collapsing. But even with the Panthers supporting the southern push, the British could roll units from the north to help, while the mortars would have created more problems since they were not flushed out. I rated this scenario a 2. The German force is too small, not enough infantry, the Brits are too strong and well positioned, and have easier victory conditions. A push against the British right may give the Germans the ten steps they need, but they’ll still be hard pressed to avoid seven steps themselves. Forget the town based VCs, that’s completely unlikely as that is at the northern terminus of the Brit line, and the Germans would take the entire scenario just trying to move the forces there, while the Brits would overload the defense. Can the Germans win? Sure, but the likelihood is small. It just felt too unbalanced by the entire group. |
||||||||||||||
| 0 Comments |