
|
Grevils-Bresil Battle of the Bulge #39 |
||
|---|---|---|
| (Defender) Germany | vs | United States (Attacker) |
| Formations Involved | ||
|---|---|---|
| Germany |  |
101st Panzer Regiment |
| Germany |  |
Führer Begleit Brigade |
| Germany |  |
Führer Begleit Fisilier Battalion |
| United States |  |
328th Infantry Regiment |

| Total | |
|---|---|
| Side 1 | 1 |
| Draw | 3 |
| Side 2 | 0 |


| Overall Rating, 4 votes |
|---|
|
3.25
|
| Scenario Rank: --- of 913 |
| Parent Game | Battle of the Bulge |
|---|---|
| Historicity | Historical |
| Date | 1944-12-23 |
| Start Time | 11:15 |
| Turn Count | 36 |
| Visibility | Day |
| Counters | 72 |
| Net Morale | 0 |
| Net Initiative | 3 |
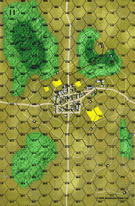
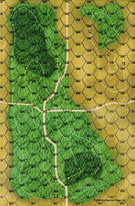
| Maps | 2: 11, 9 |
| Layout Dimensions | 43 x 28 cm 17 x 11 in |
| Play Bounty | 95 |
| AAR Bounty | 171 |
| Total Plays | 4 |
| Total AARs | 1 |
| Battle Types |
|---|
| Urban Assault |
| Conditions |
|---|
| Off-board Artillery |
| Terrain Mods |
| Scenario Requirements & Playability | |
|---|---|
| Battle of the Bulge | Base Game |
| Introduction |
|---|
|
Advancing north in a line, the three divisions of the American IIIrd Corps had little information save a direction in which to move and knowledge that the Germans were ahead. On the 23rd the 26th Division's leftmost regiment, the 328th ran into German positions in the town of Grevils-Bresil. |
| Conclusion |
|---|
|
The two companies of the Führer Grenadier Brigade and their tank support held the 3rd Battalion, 328th Regiment at bay and continued to do so when element of the 1st Battalion join in as night fell. The arrival of the American 39th AAA Battalion on the 24th would spell the difference. |

|
|
|---|
| AFV Rules Pertaining to this Scenario's Order of Battle |
|---|
|
| Heer |
|---|
|


| Army |
|---|
|


| 4 Errata Items | |
|---|---|
| Scen 39 |
As with Scenario 38, there are two time-turn conflicts given the 1115 start: Second American group is listed as Turn 18 (1600) - Turn 18 is 1530 American OBA listed as Turn 12 (1430) - Turn 12 is 1400.I used Turn for reinforcements, time for OBA. (splat99
on 2012 Feb 04)
|

|
The reduced direct fire value of the Heer HMG became 5-5 starting with Fall of France. (plloyd1010
on 2015 Jul 31)
|

|
The morale and combat modifiers of German Sergeant #1614 should be "0", not "8". (Shad
on 2010 Dec 15)
|

|
All SPW 251s have an armor value of 0. (Shad
on 2010 Dec 15)
|
| DRAWING BLOOD |
|---|
|
A small German force (5 GREN, 1 HMG, 1 81mm, a 234/3 armored car, and a Panther) starts in and around a hilltop town. It's a stark winter landscape; all woods (both kinds)and fields are ignored. But there are several hills. The Germans mostly set up in town, except for the 234/3, which set up forward and then moved onto a small hill on the southern board, to force the Americans to deploy early and with some care. (The American 81mm mortars - which will eventually total five units - could use the south slope of that hill as a nice post for firing on the town, fully sheltered.) The Americans trickle in in two groups. The first is 10 INF, 4 HMG, 3 81mm, and an M8 armored car - plus a truck-towed 57mm ATG unit. The second (which does not start entering until halfway through the 36-turn scenario) is 7 INF, 3 HMG and 2 81mm. Both forces roll each turn to see how many units can enter; it took 7 turns for the first group to be complete. Using the status of hills as limiting terrain, the Americans advanced the first detachment, as they came on, to the front of the southernmost hill. The M8 and the 57mm set up adjacent to each other 6 hexes away from the 234/3, but could not see it until it fired because it also was on a hill. So one INF platoon was sent forward, intending to either make the armored car fire or to Assault it. When the Amis got adjacent, the 234/3 opened fire, and rolled a "12" - taking out one step of the attackers, demoralizing the surviving step, and killing their leader. In the meantime, the German Panther had advanced to a point where it could fire on the M8 as soon as it revealed itself by firing. However, although needing a "10" or greater to do any damage, the 57mm was able to take out the 234/3 in its initial 2 shots, allowing the M8 to remain "hidden." It then began to maneuver to where it could set up a "crossfire" shot on the advanced Panther. But a lone German leader had advanced to the front brow of the hill the town was on, from where he was able to spot the 57mm when it fired. He called down OBA on it (strength 36), and the entire hex - leader, ATG and truck - was Demoralized. When the 57mm failed to recover, it was eliminated, thus taking any crossfire out of the equation. The Panther - now pretty much immune to all but Assault - began playing cat-and-mouse with the M8. In response, two American stacks (each composed of an INF and HMG) closed to within Assault range, though one of the INF was Disrupted by OBA in the process. Had the Americans won initiative the following turn, the Panther would have been tied up in an assault, but instead the Germans won and it was able to pull back out of range. The dance continued, while the remaining Americans gradually advanced toward the small hill the 234/3 had died upon. By the end of Turn 12 most of the first American group was positioning on that hill - a good jumping-off point for the eventual dash on the town - and the Panther had pulled back to a forward position on the town's hill. There was a brief "détente" period after the first American group had more or less arranged itself on the small hill SW of town, but did not yet have OBA available. That came in at 1430 (Turn 14.) One leader was sent out alone towards the town for spotting purposes; the Panther pulled back into town and the lone leader was blasted with German OBA but survived. With quite a few turns until the second group was due to start arriving, the US decided not to let their OBA (as well as a safely-hidden stack of 3 81mm) go to waste, and began approaching town, spread out as much as possible while still trying to keep some strength together - and getting close enough to use OBA on the town itself. German DF from the town (including the Panther and a halftrack, as well as GREN units), the 81mm mortar in town, and OBA began hitting whatever they could, causing a few step losses and some morale drama. But there were enough different US stacks that the Germans couldn't hit them all, and some were able to get up close to town. In Turn 20 (1600 hours) the first US units were able to assault into a town hex, reducing the one GREN in the space and demoralizing its leader. Meanwhile arty had caused the one German HMG to flee to the center of town. As various American infantry closed in, the M8 moved around to a side of the town out of the Panther's LOS and prepared to enter as well, once it had an assault to join. And starting Turn 19, the second American group began arriving, and lucked out by being able to bring 5 units on board each of the first two turns. By Turn 23 the US had 3 assaults going in the town, but on Turn 22 lost their ninth step. So unless at least three town hexes could be cleared by game's end, the Germans would win outright. The US had one advantage here: numbers. With step loss count no longer a victory concern, the Amis continually funneled more men to the town border, risking the enemy OBA (and occasional DF) as they drew close enough to launch assaults or to reinforce ongoing assaults after demoralized units fled and made room. The Germans, needing to hold every hex possible, were stretched thin and unable to reinforce city fights in progress. The German defenses were so spread out that the northernmost two town hexes were each held by individual SPW251 units. After the M8 briefly aided an assault, the Americans realized, since the M8 does not give the assault bonus as an AFV, that it would do better to try and pick off the halftracks. Once it moved into firing position, though, the Germans were able to switch forces around and send the APC's to the other side of town and fill in their former hexes with GREN units. The Panther was demoralized in an assault hex, failed to recover, and fled first to the center of town, then failed recover again and fled one more hex to the edge of town. Meanwhile, the M8 had circled around to that side of town, and was able to get two shots off at a halftrack in the Panther's hex, but missed both times. This enabled the Panther, after recovering to Disrupted status, to take out both M8 steps, despite being half-strength due to disruption. In Turn 31, the US took their third town hex, having gradually ground down the enemy in assaults. They kept attacking, since German OBA (as well as the Panther if adjacent) were still capable of emptying the captured hexes. So assaults went forth into the next group of town hexes, which also left two of the captured locations out of enemy LOS and useful both for staging reinforcements and for allowing demoralized units a safe haven to recover. (However, also in Turn 31, Random Events cut US wires for the turn AND ran the American OBA out of ammo.) By the final turn of the game (Turn 36/2000 hours) the Allies had cleared five hexes and had 2 HMG, 1 INF and several good leaders in an assault against the lone Panther, now reduced. The Germans won initiative by 5, allowing them the first three activations. The Panther took a risk and fled the assault hex, surviving the "free shot." This allowed an adjacent German group to call down OBA on the crowded hex, but it missed. They then used the third activation to vacate their hex, which was now meaningless. With visibility down to 1, the Americans could achieve nothing meaningful, and the game ended. It was a draw, but a bloody one on the American side. The US lost one 9-2-1 CAPT, it's one 57mm ATG step, both M8 steps, 15 of 34 INF and 5 of 14 HMG. Quite a toll...but since they also held six town hexes, the German victory requirement of 9 US steps eliminated was negated. For their part, the stubborn defense cost the Germans a 9-1-2 LT, a 9-1-1 SGT, both of their 234/3 steps, 1 of the 2 Panther steps, both HMG steps, 2 of 3 SPW251 and 2 of 10 GREN. One assumes the Germans pulled out of town that night, having made the Amis pay a fearful price in taking it. I did use FOW, which cropped up now and again, and the Random Events. I also note several turn/time contradictions, given that the scenario starts at 1115:
I had a lot of fun, but I rate this a 3 because it seems to me that a draw is the most likely result. If the US is aggressive I think he can't help but take 3 town hexes, but he'll surely lose at least 9 steps doing so. If he's more conservative, he will lose fewer units but might run out of time to grab three hexes. Still, it does seem pretty well-balanced, at least. |
| 0 Comments |