
|
Rochefort Battle of the Bulge #33 |
||
|---|---|---|
| (Attacker) Germany | vs | United States (Defender) |
| Formations Involved | ||
|---|---|---|
| Germany |  |
130th "Lehr" Panzer Division |
| Germany |  |
902nd "Lehr" Panzergrenadier Regiment |
| United States |  |
29th Infantry Regiment |
| United States |  |
309th Engineer Battalion |
| United States |  |
335th Infantry Regiment |
| United States |  |
638th Tank Destroyer Battalion |
| United States |  |
84th "The Railsplitters" Infantry Division |
| United States |  |
Army |

| Total | |
|---|---|
| Side 1 | 0 |
| Draw | 3 |
| Side 2 | 3 |


| Overall Rating, 7 votes |
|---|
|
3.14
|
| Scenario Rank: 654 of 913 |
| Parent Game | Battle of the Bulge |
|---|---|
| Historicity | Historical |
| Date | 1944-12-24 |
| Start Time | 02:00 |
| Turn Count | 48 |
| Visibility | Day & Night |
| Counters | 77 |
| Net Morale | 0 |
| Net Initiative | 0 |
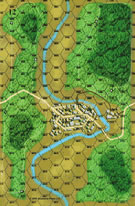
| Maps | 1: 12 |
| Layout Dimensions | 43 x 28 cm 17 x 11 in |
| Play Bounty | 97 |
| AAR Bounty | 165 |
| Total Plays | 6 |
| Total AARs | 2 |
| Battle Types |
|---|
| Urban Assault |
| Conditions |
|---|
| Off-board Artillery |
| Terrain Mods |
| Scenario Requirements & Playability | |
|---|---|
| Battle of the Bulge | Base Game |
| Introduction |
|---|
|
As Panzer Lehr Division raced west, the 902nd Panzer Grenadier Regiment assaulted the town of Rochefort. Initial reports were that the town was empty, but was found to be held by a battalion of the 335th Infantry Regiment when a complacent German advance on the town was repulsed with heavy casualties. An attack by the entire regiment with Panther tanks in support was laid on for 0200 on Christmas Eve. |
| Conclusion |
|---|
|
The battle lasted until shortly after noon when the Americans withdrew. The panzer grenadiers had managed to secure the eastern end of the town and slowly began to drive the Americans out. What was unexpected was that it took 11 hours to take a town thought to be unoccupied. German casualties were heavy and although the road to Dinant seemed open, the German advance had reached its limit. |

|
|
|---|
| AFV Rules Pertaining to this Scenario's Order of Battle |
|---|
|
| Heer |
|---|
|


| Army |
|---|
|


| 3 Errata Items | |
|---|---|

|
The reduced direct fire value of the Heer HMG became 5-5 starting with Fall of France. (plloyd1010
on 2015 Jul 31)
|

|
The morale and combat modifiers of German Sergeant #1614 should be "0", not "8". (Shad
on 2010 Dec 15)
|

|
The M18 has a special rule in Battle of the Bulge but it applies globally: "A two-step M18 unit can fire one anti-tank shot and move half its movement allowance (retain fractions) in a single impulse. The order in which it does these two actions is the player's choice." (Shad
on 2010 Dec 15)
|
| Battle of the Bulge, Scenario # 33/Rochefort | ||||||||||||
|---|---|---|---|---|---|---|---|---|---|---|---|---|
I play Rochefort over the weekend. It uses one board but packs 64 unit counters and another 23 leader counters plus all the markers, so that board fills up with some interesting assault towers. It started out on the East Side of the board as the American's must set up East of 06## and the Germans enter anywhere on the East edge. Crossing the river never came into play! The first 14 out of the 48 turns are 1 hex visibility as it is night. I set up most American's 3 hexes away from the town, dug in! Thought they could eliminate 10 German steps and fall back into town, thus denying the German their victory, which was to keep the American at least two hexes away from the town. With the first 14 turns in the dark, it turned into one big assault line. It turned into a draw! The Americans got more then enough eliminated German steps, while the German almost eliminated every American unit, or there were none with in the two hexes of town. I should have moved more Americans back into the town, at the start of the scenario, but they got mixed up in the assault combat very fast. The game was over before I reached the 30th turn. It was a draw because of the German losses and the Americans were not able to keep any unit within 2 hexes of the town. The Germans were delayed a little bit and had heavy casualties but the victory condition should have included American casualties into the victory conditions as well, as they were basically push off the map. I never had this size of a scenario with so many step losses. But I did enjoy it, as unlike most people who like huge scenarios, I prefer medium to small type the best. Also, don't forget about the new rule for the M18. Being able to move and fire on the same turn. That pretty cool, it is rule #4 in the Bulge scenario book. |
||||||||||||
| 0 Comments |
| Fighting it Out at Rochefort |
|---|
|
As per the set up instructions, the US formed a line east of town. However, sensing the German approach, planned on withdrawing most units into the protection of the town. The Germans split their forces and approached the US left and right flanks. The limited visibility required the Germans to approach to point-blank range, but they managed to get through some dug-in US units hoping to delay the attack and approach the town. By 0400, the Germans had managed to initiate assaults against two town hexes. Meanwhile, US units that were dug-in on the left flank (southeast of town) were still holding on. At 0530, the Germans were still bogged down in the two town hexes. The US left flank was still dug in southeast of town, and the Germans had been unsuccessful at dislodging them. Both sides were taking casualties.At 0615, the attrition continued as the Germans mopped up the US right flank. As visibility improved, the US artillery harassed the demoralized and disrupted German units scattered in the countryside. At 0700, the Germans have initiated an assault in a third town hex. They are wearing down the US, as American leaders keep sending in replacements. An important event occurs at 0745. An ammunition shortage (random event) results in no further US off-board artillery for the remainder of the scenario. At 0800, the Germans finally control one town hex following a strong coordinated armor/infantry assault, but they are still stuck in assaults in the other two hexes. But the panzer/infantry team is now free to move further into town. Thirty minutes later, a thunderstorm struck (another random event), reducing visibility. But it mattered little, as three town hexes were being assaulted. By 0845, the Germans had control of 30 percent of the town and were assaulting another 30 percent. The US forces were being eliminated piecemeal. They kept pushing reduced units back into the fight, but the Germans still had armor and good-order infantry. Both sides had suffered terrible losses. In fact, the US had attained their victory condition of eliminating 10 German steps. Could the remaining Germans force a draw by driving the few US units out of town by 1400? Within 90 minutes (at 1000) the German coordinated assaults had resulted in control of 80 percent of the town. One group of buildings across the river would also need to be cleared. Nearly all US units had been destroyed, but the German would need to drive all away from the town, and keep the bypassed dug-in units to the southeast from getting closer to town. An hour later, the Germans controlled the town. All that was left was to mop up the remaining reduced infantry platoon west of town, and those bypassed units. They had three hours to do this. At 1115, the lieutenant took his two infantry platoons from the relative safety of their foxholes and made a brave attempt to storm the east side of town. Amazingly, they survived opportunity fire and found themselves in position to assault. The next initiative roll would be critical. Could the US get a victory out of this? One of the US infantry platoons misunderstood its orders (another random event!), and moved south away from town. The lieutenant and his remaining infantry assaulted the German-held hex, but a strong German counter-attack eliminated them. Meanwhile, the reduced US infantry platoon to the west was eliminated by combined fire from three platoons of panthers. Only US leaders were left scattered west of town. The Germans earned a draw in this scenario, but as in the historical outcome, suffered substantial casualties in the process. |
| 0 Comments |