
|
Second Try Airborne - Remastered #8 |
||
|---|---|---|
| (Defender) Germany | vs | United States (Attacker) |
| Formations Involved | ||
|---|---|---|
| Germany |  |
709th Static Infantry Division |
| United States |  |
101st "Screaming Eagles" Airborne Division |
| United States |  |
501st Parachute Infantry Regiment |

| Total | |
|---|---|
| Side 1 | 1 |
| Draw | 0 |
| Side 2 | 1 |


| Overall Rating, 2 votes |
|---|
|
4.5
|
| Scenario Rank: --- of 913 |
| Parent Game | Airborne - Remastered |
|---|---|
| Historicity | Historical |
| Date | 1944-06-06 |
| Start Time | 08:30 |
| Turn Count | 24 |
| Visibility | Day |
| Counters | 82 |
| Net Morale | 0 |
| Net Initiative | 1 |
| Maps | 1: 13 |
| Layout Dimensions | 43 x 28 cm 17 x 11 in |
| Play Bounty | 164 |
| AAR Bounty | 171 |
| Total Plays | 2 |
| Total AARs | 1 |
| Battle Types |
|---|
| Bridge Control |
| Urban Assault |
| Conditions |
|---|
| Off-board Artillery |
| Reinforcements |
| Terrain Mods |
| Scenario Requirements & Playability | |
|---|---|
| Airborne - Remastered | Base Game |
| Battle of the Bulge | Counters |
| Elsenborn Ridge | Counters |
| Introduction |
|---|
|
Though his division fought very well on D-Day despite its scattered landings, Gen. Taylor remained concerned that his troops failed to blow up or even attack the road and railroad bridges across the Douve River north of Carentan. Although the lock at La Bourquette and the two wooden bridges to the east were in American hands, the German-held highway bridge was an open door to Utah Beach's southern flank. Taylor ordered the 506th Parachute Infantry Regiment to attack. |
| Conclusion |
|---|
|
German resistance halted the advance before the paratroopers even reached St. Come-du-Mont. The fighting raged all morning around the hamlet of Les Droueriers and ended with the withdrawal of the American force. |
| Additional Notes |
|---|
|
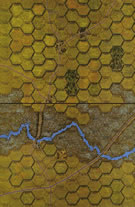
Map is available in Airborne, Airborne-IE, Airborne remastered (print edition) or the Woods & Hill accessory. Board 13 is also known as board 0201. This scenario appears in Airborne/Airborne-IE and is playable with those components. |

|
|
|---|
| AFV Rules Pertaining to this Scenario's Order of Battle |
|---|
|
| Heer |
|---|
|


| Airborne |
|---|
|


| Army |
|---|
|


| 2 Errata Items | |
|---|---|

|
The reduced direct fire value of the Heer HMG became 5-5 starting with Fall of France. (plloyd1010
on 2015 Jul 31)
|

|
All SPW 251s have an armor value of 0. (Shad
on 2010 Dec 15)
|
| A bridge too far |
|---|
|
This one started. out very well for the Paras. They were able to cross the river in the east and set up a good defensive position that was not threatened the rest of the scenario. Initial contact with the Germans was quite successful. Using a combined arms attack of tanks and infantry the paras were able to shatter the forces defending to the north of the river. A combination of DF attacks followed by Assaults worked very well. These actions, however, took time and before the paras could get to the bridge the Germans had received their reinforcements. Th paras were able to set up a good position and were able to continually feed fresh troops into the fight for the bridge/town but, the German defenders were just too resilient. The paras eventually got their armor into the town but, during the next assault the Germans caused a 3 step reduction to the paras. That took the offensive power out of them and forced a withdrawal. The Germans employed the PZ IV, and engineer and a rifle platoon in the town making it a very strong position. |
| 0 Comments |