
|
The Final Push Aachen 1944 #7 |
||
|---|---|---|
| (Attacker) Germany | vs | United States (Defender) |
| Formations Involved | ||
|---|---|---|
| Germany |  |
108th Panzer Brigade |
| Germany |  |
116th Panzer Division |
| Germany |  |
1st Separate SS Battalion |
| Germany |  |
246th Volksgrenadier Division |
| Germany |  |
506th Heavy Panzer Battalion |
| Germany |  |
902nd Sturmgeschultz Brigade |
| United States |  |
30th "Old Hickory" Infantry Division |
| United States |  |
743rd Tank Battalion |
| United States |  |
823rd Tank Destroyer Battalion |

| Total | |
|---|---|
| Side 1 | 0 |
| Draw | 0 |
| Side 2 | 1 |


| Overall Rating, 1 vote |
|---|
|
5
|
| Scenario Rank: --- of 913 |
| Parent Game | Aachen 1944 |
|---|---|
| Historicity | Historical |
| Date | 1944-10-12 |
| Start Time | 09:00 |
| Turn Count | 30 |
| Visibility | Day |
| Counters | 214 |
| Net Morale | 0 |
| Net Initiative | 2 |
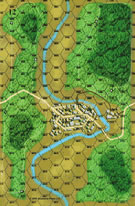
| Maps | 3: 12, 24, 25 |
| Layout Dimensions | 84 x 43 cm 33 x 17 in |
| Play Bounty | 204 |
| AAR Bounty | 171 |
| Total Plays | 1 |
| Total AARs | 1 |
| Battle Types |
|---|
| Inflict Enemy Casualties |
| River Crossing |
| Road Control |
| Urban Assault |
| Conditions |
|---|
| Off-board Artillery |
| Randomly-drawn Aircraft |
| Terrain Mods |
| Scenario Requirements & Playability | |
|---|---|
| Aachen 1944 | Base Game |
| Battle of the Bulge | Maps + Counters |
| Cassino '44 | Counters |
| Elsenborn Ridge | Maps + Counters |
| Road to Berlin | Counters |
| Introduction |
|---|
|
The Germans had been rebuffed in their first effort to reach Bardenberg but were determined to succeed today. Feeling they had not allowed themselves enough room for maneuver the first time, they would attack on a broader front with 116th Panzer Division maintaining its current line of attack while the rest of the forces slid over to test the American 120th Infantry Regiment. Added to the mix were the remnants of the 108th Panzer Brigade. |
| Conclusion |
|---|
|
By noon the Americans were extremely worried the Ger- mans would succeed in their efforts. Gen. Leland Hobbs even claimed all the enemy forces that had bedeviled his division at Mortain were again after him. But American airpower and artillery turned the situation in their favor, and by the end of the day the Germans knew they would not be able to prevent Aachen from being encircled. |

|
|
|---|
| AFV Rules Pertaining to this Scenario's Order of Battle |
|---|
|
| Heer |
|---|
|


| Schutzstaffel |
|---|
|


")
")
")

| Army |
|---|
|


| 6 Errata Items | |
|---|---|

|
The reduced direct fire value of the Heer HMG became 5-5 starting with Fall of France. (plloyd1010
on 2015 Jul 31)
|

|
All SS PzIVH tanks should have a movement of 8. (Shad
on 2010 Dec 15)
|

|
The morale and combat modifiers of German Sergeant #1614 should be "0", not "8". (Shad
on 2010 Dec 15)
|

|
All SPW 251s have an armor value of 0. (Shad
on 2010 Dec 15)
|

|
The movement allowance on the counters in Airborne is misprinted. It should be "3." (rerathbun
on 2012 Jan 30)
|

|
The reduced direct fire value of the SS HMG is 5-5 in Beyond Normandy and Road to Berlin. (plloyd1010
on 2015 Jul 31)
|
| One big bloody battle | ||||||||||||
|---|---|---|---|---|---|---|---|---|---|---|---|---|
The Final Push is a great name for this scenario as this is a big scenario having the Germans needing to push an entire American Infantry Division out of a town and across the river. The Germans have the manpower to do it, but the morale is questionable. In the scenario the Germans get a big force of Grenadiers, Volksgrenadiers, SS, PzIVH's Panthers, Tiger II's, Stugs (both G's and 42). The Americans face them with an Infantry Division with tank support, OBA and air power. The Americans just need to hold on and kill alot of Germans steps, 35 in all to get a Marginal Victory, if they keep them out of Bardenberg they get a major victory. The Germans must push the Americans out of the town and over the river for a major victory, minor can be achieved with just taking the town and the roads out of it. The first major decision for the Germans is how to attack the town. You have two choices, straight up the road and into the town or flanking it to the right and coming in from the east. Both have pluses and minuses, in this one I went for the right flank. They would move up the road clear the Americans holding the light woods. Then turn and attack the town and push for the river. The first half of the scenario was a good one for the Germans. The troops were able to overrun a battalion and a half of Americans in the woods to the right of Bardenberg and get into a position to attack from both the south and the east. American casualties went through the roof, 40 steps by the middle of the game, but the Germans had lost 20. This was due to the low quality morale of the VG and SS. The second half of the game went to the Americans and their dice rolls. The first issue was Fog of War rolls, 12 out of 15 turns ended with FoW and only averaged 8 activations per side. With large forces to move, fire and recover, this severely limits what can be done. The second was Americans rolls were better than the Germans. Passing critical morale checks and making key fire rolls kept the Germans slowed down. In the end the Americans were able to kill enough steps to get a marginal victory, while keeping enough troops in Bardenberg and on the roads. The Germans couldn't get a turn long enough to get all the troops moving and when they did the Americans disrupted/demoralized/killed the units. I fine scenario to play. A bit long for a solo effort but it is definitely worth it. You will play to the end as the victory conditions keep you going to the end. |
||||||||||||
| 0 Comments |