
|
The Tank Sausage Arctic Front Deluxe #31 |
||
|---|---|---|
|
(Attacker)
Finland
(Attacker) Germany |
vs | Soviet Union (Defender) |
| Formations Involved | ||
|---|---|---|
| Finland |  |
18th Infantry Division |
| Germany |  |
303rd Sturmgeschütz Brigade |
| Soviet Union |  |
64th Guards Rifle Division |

| Total | |
|---|---|
| Side 1 | 1 |
| Draw | 0 |
| Side 2 | 0 |


| Overall Rating, 2 votes |
|---|
|
4
|
| Scenario Rank: --- of 913 |
| Parent Game | Arctic Front Deluxe |
|---|---|
| Historicity | Historical |
| Date | 1944-06-27 |
| Start Time | 07:00 |
| Turn Count | 30 |
| Visibility | Day |
| Counters | 107 |
| Net Morale | 0 |
| Net Initiative | 1 |
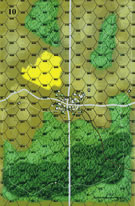
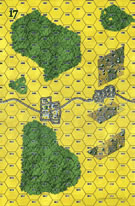
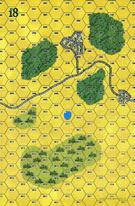
| Maps | 3: 10, 17, 18 |
| Layout Dimensions | 84 x 43 cm 33 x 17 in |
| Play Bounty | 158 |
| AAR Bounty | 165 |
| Total Plays | 1 |
| Total AARs | 2 |
| Battle Types |
|---|
| Urban Assault |
| Conditions |
|---|
| Off-board Artillery |
| Scenario Requirements & Playability | |
|---|---|
| Arctic Front Deluxe | Base Game |
| Battle of the Bulge | Maps |
| Road to Berlin | Maps + Counters |
| Introduction |
|---|
|
With dangerous Soviet penetrations in and around Tali, Maj. Gen. Ruben Lagus of the Finnish Armored Division formed a three-pronged attack against the Soviet pocket the Finns called the "tank sausage" from its shape on situation maps. In the center, Col. Vaino Forsberg had three infantry battalions supported by German assault guns. They were to clear the hotly-contested road between Ihantala and Portinhoikka, breaking the sausage in two. But the sausage had other ideas. |
| Conclusion |
|---|
|
Forsberg's battle group made good progress, driving back the Soviets and clearing the road, when suddenly their accompanying German assault guns turned and drove off toward the rear areas. Short of armored support, the assault came to a halt and the Soviets regained much of the ground taken. Forsberg, livid, told the corps command staff that the Germans had panicked and run from the battlefield. The assault gun brigade commander, Capt. Hans-Wilhelm Cardeneo, claimed that his vehicles had run out of ammunition (all 22 of them simultaneously) and had to leave to replenish their stocks. The Finns did not accept his excuse and branded the Germans cowards. |

|
|
|---|
| AFV Rules Pertaining to this Scenario's Order of Battle |
|---|
|
| Army |
|---|
|


")


| Heer |
|---|
|

| Army (RKKA) |
|---|
|


| Guards |
|---|
|


| 1 Errata Item | |
|---|---|

|
All Guards T-34/85 tanks should have AT fire values of 7-7. (Shad
on 2010 Dec 15)
|
| Linear Defence of Soviet Guards Bent And Then Broken | ||||||||||||||
|---|---|---|---|---|---|---|---|---|---|---|---|---|---|---|
This scenario was played over 4 Skype sessions with Tony Langston. Two of those sessions were hampered and slowed by a broken internet 'hub' of mine, but once fixed, we completed in usual time. This battle sees 1944 Finns forced to attack a dug-in and town defence of the elite Soviet Guards. Both sides have a morale of 8, but there was a good number of excellent Finn leaders. The Guards though had plenty of morale boosting leaders of their own. The Soviets edge the Finns in good OBA and both sides have equal on-board bombardment resources. The Finns have 4 x German StG platoons, but these are subject to panic and exit with a test roll each time the Finnish initiative drops. The Guards have 3 x SU76 and 1 x strong T34/85 platoon. The aim of this scenario is to gain points at 1 per enemy step eliminated and also to control as many of the 16 town hexes as possible for reward (SOV's 2VP's & FINNS 4VP's per town hex). Because the Finns enter the board, none are actually in their control at the start although there is a 3 hex town near the entry side of the board. The land is swathed in swamp, woods and fields, so both sides can hop from cover to cover if needed albeit there are open spaces to cross too. Before the Finnish attack began, a scan of the Soviet line revealed an almost single line linear defence based around dug-in positions mainly in fields but with some in front of a town. Also, the use of the town for a defensive pivot could be seen as well. The town, with its central position housed much of the Soviet bombardment forces but also had no less than 4 x HMG platoons dug-in to its front. These were commanded by able officers that had morale mods and also fire-group skills. It was apparent that to attack here could well mean massacre and therefore the following was decided. Aim to push and pressure the Soviets left flank by concentrating the main Finnish attack there. Provide them with the StGs to frighten off any thoughts the SU76's might have of applying their large direct-fire numbers. Once broken and pierced, it should follow that the whole dug-in line would have to evaporate in order to stop the Finns pushing towards the towns at the rear. The game lasted for 23 of the 30 turns. The Finns did vigourously attack the Soviet left and forced the enemy there to either break or die. The SU76's surprisingly did show themselves but were made short work of by the StG's. For a good while after, the StG's were unable to do too much as that menacing T34 kept itself in limiting terrain waiting for the German AFV's to close the range as well as break cover. Soviet OBA seemed to take a terrible toll on Finnish units. Not that Suomi artillery was ineffective, but it never really seemed to reach the accuracy levels of the Soviets. Despite this breaking of their left flank, the main Soviet line remained in position as it had enough enemy forces to its front that it could not simply retire. But the inertia began to cost the Guards dearly. One by one, working from the Soviet left towards the centre, the line of dug-in positions were grindingly eroded. Although the Finns lost some infantry numbers, the Guards were always losing more. Even on the Soviet right, their infantrymen there began to trickle away. By turn 16, the Finns had succesfully managed to send a few platoons to the towns behind the main line. In one case, 5km behind the line ! This had the useful effect not only of capturing town hexes, but also of drawing a few more of the defenders from the main front-line battle. By turn 20, the Soviet line was extinct and Finns were now entering via assault into the forward town. This in itself was a cauldron as both sides brought powerful numbers to the street-to-street fighting. In the first exchanges, the Soviets lost 2 steps but held their morale, the Finns lost 1 step and an officer, but suffered a disruption. After that, both sides in the assault reinforced and hunkered down waiting for the other to attack. Despite losing 2 initiative levels, the German tanks never panicked and they refused to exit. These were able to bring one 30col DF firepower whenever they activated. At turn 23, with all towns either partially captured or completely taken, and with a substantial loss deficit, the Soviets admitted defeat and conceded. The points level at that stage was an impressive Finland 79pts, Soviet 27pts. Losses were high. Finland taking (in steps) 15 Foot, 3 Leaders and the Soviets 31 Foot, 7 Leaders, 6 AFV, 6 Ordnance. Town hexes controlled were Finland 9, Soviet 6 with 1 contested. I rate this a '4'. I really enjoyed the systematic advance and then having to work out a way to chew through the Soviet line. It was hard work though ! |
||||||||||||||
| 0 Comments |
| Come along without. Come along within, You've not seen nothing like the Mighty Finn | ||||||||||||||
|---|---|---|---|---|---|---|---|---|---|---|---|---|---|---|
The title of this AAR could have also been Remember The Alamograd but the Mighty Finn sums it up much better. This was going to be the largest scenario I have played besides Desert Rats #38 Alem Hamza: Right Flank and I was going to get to be the defender this time instead of the Attacker. I was actually looking forward to playing Soviets that could match up with the enemy and thought this would be a great battle. Besides a few points that I will get to later, I did enjoy the battle. SETUP Setups, especially when playing in a face-to-face game, have always had me agonizing over how best to deploy my troops. I tend to over-think the setup and as I play more, I have become better at it but I still have those agonizing moments before I hit the "Send" key on my setup e-mails. In any event, based on the VC of the scenario, I felt I was left with two choices, either setup a layered defense and wear down the Finns/Germans to get to that breaking point for the Armor, or build a large defense in the center of the board and use the armor to swing back and forth to help should a push come one way or the other. I decided on a defensive "bulwark", setting up firing groups of HMGs and combat-efficient leaders in dug out positions in front of the large town in the center of the map with a wing on either side of mixed INF/HMG units dug into the wheat fields. I placed my 76.2 guns and mortars in town and in the adjacent wheat fields, led by a captain who could call on all to fire at once. The T34/85 platoon and my 3 platoons of SU-76s were arrayed in front of town awaiting the German advance. I hid AT units in the woods to the west and the swamps to the east to attempt to surprise any Armor that would try to skirt the town and I did place a sergeant and INF unit forward to act as spotters. BATTLE The Finns and Germans entered the battle and made for the forest in the north, heading towards the first small town with the SGT and INF units. From there, the army split into two groups, A smaller probing force going to the east made up of several officers and 2 companies of INF. three of the four STUG platoons accompanied this force. On the western side of the forest, the remainder of the Finns and the single STUG platoon moved down the western edge of the large forest to the northwest of the bulk of the Soviet force guarding the large town. The SGT and INF unit in the small northern town, were able to escape into the woods and looked to get back to the Soviet lines in order to help in the defense. The Finns pushed on both ends, tying down the eastern flank of the line and putting increasing pressure on the right. I decided to leave my line intact and let my units in the woods along with the SU-76s tie down the approaching Finns. I also had a good compliment of Artillery to assist. Initially, I was able to hold off the Finnish onslaught, getting fairly accurate OBA to inflict several step losses, but the Finns also had a decent amount of artillery, not to mention a ferocious attack in assaulting units. Combined with leaders who were superior from the get-go, the Finns were able to clear the woods and eliminate almost all the SU-76 units by mid-game. As this battle in the woods raged on, the Finns broke off 3 companies of INF and a few platoons of HMGs with several officers and started moving further south, looking to end-run the Soviet line to collapse the western flank and head for the larger town on the southern-most board. Still, I held my ground on the line as the Finns in the woods regrouped and gathered on the edge in order to prepare for an assault on the town. Artillery at this point started raining down from both sides and the Finns fought their way through the western wheat fields just to the edge of town. The Finns in the woods continued to take advantage of their longer-ranged weapons, being able to fire their rifles at the Soviets without fear of return shots. As the losses mounted and the Soviets attempting to finally consolidate their position by pulling back the dug-in troops, the Soviet sausage got smaller and smaller until only the town and the surrounding wheat fields were still in Soviet hands. The Finns did send several units on an end run to the southern-most town, but the T34/85 platoon and a company of Soviet troops were able to hold them in check. After several turns of bitter fighting in and around the central town (renamed the "Alamograd"), the Soviets felt that pressing on would be useless and ran up the white flag. AFTERMATH In retrospect, the setup I had was not as bad as this battle appeared, but its execution was flawed. I mentioned earlier that there were several points that I would cover later concerning the battle and I believe that the turning points here were as follows:
I did enjoy this scenario, despite the outcome. I do believe that the Finns did have the advantage in officers as they had 12 of 16 officers with morale modifiers (3 of them with "2"s), where the Soviets had 6 of 12 (all "1"s) but I don't think that was the deciding factor. It does provide a lot of different options for setup (all of which I agonized over) and a good mix of units and a fairly even OB. |
||||||||||||||
| 0 Comments |