
|
Clearing Ousseltia Valley An Army at Dawn #16 |
||
|---|---|---|
| (Defender) Italy | vs | United States (Attacker) |
| Formations Involved | ||
|---|---|---|
| Italy |  |
1ª Divisone Fanteria "Superga" |
| United States |  |
1st "Old Ironsides" Armored Division |

| Total | |
|---|---|
| Side 1 | 3 |
| Draw | 1 |
| Side 2 | 6 |


| Overall Rating, 11 votes |
|---|
|
4.09
|
| Scenario Rank: 79 of 913 |
| Parent Game | An Army at Dawn |
|---|---|
| Historicity | Historical |
| Date | 1943-01-25 |
| Start Time | 11:15 |
| Turn Count | 16 |
| Visibility | Day |
| Counters | 76 |
| Net Morale | 0 |
| Net Initiative | 2 |
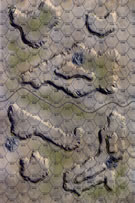
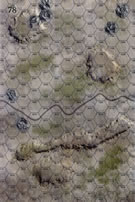
| Maps | 2: 77, 78 |
| Layout Dimensions | 56 x 43 cm 22 x 17 in |
| Play Bounty | 140 |
| AAR Bounty | 147 |
| Total Plays | 10 |
| Total AARs | 5 |
| Battle Types |
|---|
| Exit the Battle Area |
| Inflict Enemy Casualties |
| Conditions |
|---|
| Minefields |
| Off-board Artillery |
| Randomly-drawn Aircraft |
| Smoke |
| Terrain Mods |
| Scenario Requirements & Playability | |
|---|---|
| An Army at Dawn | Base Game |
| Introduction |
|---|
|
Rather than allow Orlando Ward to commit his 1st Armored Division as a complete unit, II Corps’ Lloyd Fredendall attached the 26th Regimental Combat Team from the 1st Infantry Division to Combat Command B as an ad hoc force under the corps headquarters’ direct control. The force had orders to clear the Ousseltia Valley and open the Kairouan Pass. At 0900 hours the team moved forward. |
| Conclusion |
|---|
|
The Americans caught a break. The experienced Kampfgruppe Weber withdrew during the previous night, leaving the defense to a recently-arrived Italian battalion. Around midday the Americans collided with the defenders, prevailing with relatively few casualties on either side. |

|
|
|---|
| AFV Rules Pertaining to this Scenario's Order of Battle |
|---|
|
| Regio Esercito |
|---|
|


| Army |
|---|
|


| Just Passing Through | ||||||||||||
|---|---|---|---|---|---|---|---|---|---|---|---|---|
This scenario has a couple of Italian infantry companies with HMGs, AT guns and 75mm guns and a single Semovente 47/32, dug in over 2 boards, with US coming in strength, 18 platoons with 6 HMGs, 4 Mortars, an Engineer platoon, 2 37mm AT guns with jeeps and 3 Lee tank platoons. The US has to exit as much as possible off the east end of the board and keep casualties low enough not to loose exit points through unit loss. Italy needs to prevent exit and kill as many US troops as possible. There are 3 main avenues available to the US because of the broken ground, so it is difficult to focus a large defense force anywhere. I placed Italian infantry and HMG outposts as far forward as possible, placed the 75s so they could be used either as AT or Arty, with the 2 75s dug in on hills facing the avenues the US troops would have to take, and the 2 47mm AT guns further back to try to catch any that got past the forward guns. The Italians don't have nearly as much arty but do have the 75s and mortars on board, so can sting the US when the luck is with them. Both sides randomly get air support on the half hour and on the hour, with the high roll side getting a random aircraft, Italians winning tie rolls. The US entered in mass centered around the LTC so that the whole infantry/HMG force moved for the first 2 turns on single activations. They entered north of center, using the large hill mass first to shield them and then as a base for the mortars and a good place to spot from for OBA. The Lees came in initially on the road but moved onto and over the northern ridge just at the edge of Italian AT range. Italian guns took poor odds shots and failed to hit anything. First casualties were US troops who were demoralized by very good Italian arty fire, and that started the trend of Italian luck. Throughout the game, when the US fired arty or mortars, more often than not they rolled a 6 or 7, nearly always missing. When the Italians rolled, even individually firing the 2 75s, they rolled a lot more 2s than I remember seeing in a long time. The key for the US force was to keep moving, let local leaders ralley troops as possible but keep the bulk moving to the east and try to keep a majority out of range of direct fire. The Lees didn't quite manage that, as AT fire and the Semovente took out one step and demoralized the survivor, and then a 47mm gun got a lucky shot at long range and took a step from a second platoon, but this time the survivor passed his morale check and was able to keep going, while the one full platoon stopped moving and eliminated the Semovente. A group of US infantry moved along north of the road to tie up as much Italian fire as possible to make it easier for the northern group to keep moving. This paid off, and in the end, the US got 22 steps off the table and killed 22 steps of Italians while losing only 12 steps along the way. This really must be replayed face-to-face so that I can try out an attack against a different setup. Great game, US major victory. |
||||||||||||
| 0 Comments |
| Play it all the way. | ||||||||||||
|---|---|---|---|---|---|---|---|---|---|---|---|---|
I like Enter and Exit scenarios as there is plenty of maneuver in these types of scenarios. And there is trepidation if there is time pressure; this scenario has that. The Italians defended by blocking the road near the center of the map by holding the high ground. The US entered the main effort of one infantry battalion supported by two tank platoons coming south of the road and the high ground with the mission to clear the southern hills. North of the road was supporting battalion with one tank platoon with the mission to clear the north ridge line. The southern battalion had much success and drove up the tanks to dispatch the Semovente platoon which was placed being the Italian MLR in overwatch. The northern battalion came under Italian artillery and mortar fire and their attack was slowed and somewhat broken up. The Americans pressed the attack and the Italians realized they were about to be overrun so they bugged out to establish a blocking position in the read, and they lost all their guns doing so. But they were able to set up a strong position blocking the exit from the road which forced the Americans to go overland. The US pressed and got 16 points exited, and although also causing 10 points of casualties, they left too many on the board and lost the game 38 to 26 for an Italian major victory. Halfway through the game I though the Italians were going to lose, but this one needs to be played to the end no matter how bad the Italians get beat up because the US gets points for units exited, but the Italians get points per US step left on the board. |
||||||||||||
| 0 Comments |
| An Army At Dawn, scenario #16: Clearing Ousseltia Valley | ||||||||||||
|---|---|---|---|---|---|---|---|---|---|---|---|---|
An Army At Dawn, scenario #16: Clearing Ousseltia Valley I played this one because of another PG Player’s AAR post on CSW, that made this scenario seem interesting and it was. Both sides get points for eliminating enemy steps. The Italian also get points for American steps still on the map by the end of turn 16, while the Americans get points for exiting steps off the western edge of the map by the end of turn 16. Both sides get off-board artillery and variable air-support. The Italians start dug-in and have three minefields and can use the terrain to channel the Americans into a funnel, at least on the center where the main road runs through. I found the Americans don’t have enough leaders to not stack many stack to three units instead of two, to avoid that negative modifiers for stacks of three. The American begin by pushing their Lee tanks forward, followed by everyone else but stretched out from north to south, trying to find weaknesses in the Italian lines. The Italian Air-Force struck first followed by both on and off-board bombardments and casualties. The American Lee Tanks push forward but were hit on both flanks by 47mm and 75mm gun fire and paid the price. Out of the six steps only 2 steps made it off the western edge of the map by the end of turn 16, the rest were burning wrecks. Fighting continued throughout the 16 turns but at some point, the Americans realized that they couldn’t get tangled up in fighting too long or they would lose their mission objective of moving west. Some desperation set in to move west. By the end of the scenario, the Americans had lost 13 steps, as the Armor steps count double, while the Italian in their dug-in positions with great terrain defenses only lost 3 steps, sure many were not in a good status morale wise. The biggest problem for the Americans was losing two leaders, as they were already short of these, to keep the forward progress going and to recover Disrupted and Demoralized units. One Leader was lost riding in and jeep unit pulling a 37mm AT Gun. By the end of the scenario the Americans had exited 29 steps but left 25 still on the Battlefield. With the total points, Americans 32, Italians 38, for a difference of 6 points and a minor Italian Victory. A fun scenario to play and much depends on your Italian step up and your Americans being able have some cohesion in their attack and advance and maybe avoiding combat in some situations. |
||||||||||||
| 0 Comments |
| Ousseltia Draw | ||||||||||||
|---|---|---|---|---|---|---|---|---|---|---|---|---|
Shortly after 1100 hours on January 25, 1943, Allied units from CCB of the 1st Armored Division moved east through the Ousseltia Valley in an attempt to open Kairouan Pass, which was protected by the 1st “Superga” Infantry Division. The Italians were dug in on both sides of the road with infantry/HMG in the west and 75’s in the narrow central valley that was also mined. They had 47’s and an ATR platoon along the east road. By noon, three Lee platoons and an infantry group had used the cover of the north ridge to move forward, but Allied progress was slowed in the south by the Italian OBA and fire groups in the southwest wadi. The US troops overran the mortar/75mm artillery position that protected the Italian north flank by 1245 and cleared the entire flank north of the road by 1330. However, US jeeps towing the 37’s hit the central minefield and progress was slowed. By 1400 hours, the US controlled the entire battlefield with the exception the Italian INF/HMG units now perched on the 40m southwest hill. American troops then began moving east through the lines, with all the Lee’s and 16 other units exited by 1500 hours. The objectives of this scenario involve step loss and American unit exit. The Americans start with a large number of units and only have 16 turns to get them off the opposite side of the board, as VP’s are awarded to the Italians for all steps left on the board while the Americans only get a VP for each unit exited. So, in this case, a lack of haste makes waste. It is a difficult task since the board is 26 hexes wide and there are only sixteen turns, needless to say the mortars aren’t going to make it, and any hiccough will end the HMG chances as well (only one HMG ended up exiting by Turn 16). So, the Americans have to exit a number of units to make up for those steps that accrue to the Italians. Italian strategy rests on slowing the American unit progress by disrupting and demoralizing units, causing them to spend turns in recovery. The point to remember in Italian strategy is that US steps left on the board are equal in VP’s to steps that are eliminated, so producing maximum damage to slow units is preferred to elimination. If the American player gets too involved in eliminating Italian units, it will only lead to a loss because of all the Allied units left on the board. In this play, most Italian units were eliminated in either quick infantry assaults or bombardments to clear a safe path for the armor. The American also must leave wounded units for recovery until late in the turn, since fog-of-war severely limits the chance to exit units. In this play, FOW ended 8 of the 16 turns prematurely. The final VP tally was for the Americans, with 22 steps exited (3 Lee’s and 16 soft units) and 13 Italian step losses, while the Italians scored VP’s with 30 steps left on the map and 5 US steps lost. This resulted in a draw since both sides ended up with 35 VP’s. |
||||||||||||
| 0 Comments |
| Push Back the Italians and Exit the Battle Map! | ||||||||||||||
|---|---|---|---|---|---|---|---|---|---|---|---|---|---|---|
This was an exciting, 5-session play-through with the diligent and dauntless, Daedalus, leading a substantial force of dug-in Italian Superga Division infantry holding a series of defensive positions. I led a mixed force of the relatively green, US 1st Armored Division. The American side must force back the Italians, inflict casualties & exit the east edge of the battle map to win. We played with the consolidation, smoke/illum, extended assault, tank riders and excess initiative optional rules. We ignored the FOW in this encounter. In addition, we experimentally used the following 3 house rules: 1) Road Movement for Mechanized & Foot Units All FOOT & MECHANIZED units may move on roads at the rate of 1/2 a Movement Point (MP) per road hex, just like MOTORIZED units, 2) Standardized Movement for Mechanized Units All mechanized units may move through clear hexes at a movement cost of only 1 movement point (MP) per hex, instead of 1 1/2. Add one to this cost if moving up or down slopes hexes, and 3) Dug In Units on Hill Slopes are Automatically in Limiting Terrain in Desert Games Unless prohibited by special scenario rules, ALL units that are dug-in on slope hexes are considered to be in limiting terrain and are spotted if enemy units approach to within 3 hexes, or 4 hexes for reconnaissance units – – unless they are marked with a spotted marker, see 8.22. The initial session (game turns 1-2) included a large-scale American movement-to-contact in the form of a strong-side, right flank advance. It took both game turns to move the entire US force onto the battle map, in the face of occasional Italian OBA and onboard artillery barrages. A single Italian AT gun platoon was eliminated by a lucky US airstrike this session. Our slightly-delayed second session (game turns 3-5) was a continuation of the extended American movement to contact that included; a 3-hex probe of the Italian minefield cluster in the eastern mouth of the pass; and the first two unsuccessful, US close assault on the western margin of the 20-meter high, east-west ridge on Map 77 (Hex 77-0812). The strongside, right flank American advance continued its approach, and the Italians began migrating sundry units to the north in response. By the end of the session, step losses were tied at 2 apiece, as was the victory point tally. A combined FOUR combat 7-die rolls were thrown. The truncated, third session (game turns 6-7) featured a consolidation of the American right flank attack on the southwestern, 20-meter hill on Map 78; with both the beginning of another close assault on the defending Italians (Hex 78-1206), and another columns advancing to setup a second close assault. Relatively ineffective OBA affected both sides, and the US armor split up to support the right flank attacks. At session end: step losses were 2 for the advancing Americans, and 7 for the Italians. The victory point tally was the same. A combined SEVEN combat 7-die rolls were thrown. Our fourth session (game turn 8) was a continuation of the same pair of close assaults, and a further consolidation of the American thrust atop the same 20-meter hill. The original close assault in Hex 77-0812 ended with a forced evacuation & subsequent elimination of the remaining step of Italian infantry and the senior leader present. There was an unsuccessful Italian air strike and an oddly fruitful American counterbattery strike against a platoon of emplaced Italian howitzers. The updated step losses were now: 2 for the advancing Americans, and 9 for the Italian side. Only, TWO combat 7-die rolls were thrown by the GIs. The fifth session (game turns 9-10) featured some very lucky artillery strikes, and by mutual agreement the Italians conceded during game turn 10. The final victory point was 16 for the Americans, and 3 for the Italian side. This was a relatively gamey and slightly unbalanced in favor of the US side, scenario in which the surging Americans may simply bludgeon their way straight across the battle map to exit on the east edge. Though, it was fun to play with a clever, seasoned and resolute opponent, I give this effort a generous rating of 2. This scenario is suitable for a SOLO play only. |
||||||||||||||
| 2 Comments |