
|
Bad Blood An Army at Dawn #15 |
||
|---|---|---|
|
(Defender)
Germany
(Defender) Italy |
vs | United States (Attacker) |
| Formations Involved | ||
|---|---|---|
| Italy |  |
50ª Brigata Speciale |
| United States |  |
1st "Old Ironsides" Armored Division |

| Total | |
|---|---|
| Side 1 | 7 |
| Draw | 0 |
| Side 2 | 3 |


| Overall Rating, 10 votes |
|---|
|
4.3
|
| Scenario Rank: 30 of 913 |
| Parent Game | An Army at Dawn |
|---|---|
| Historicity | Historical |
| Date | 1943-01-24 |
| Start Time | 11:45 |
| Turn Count | 18 |
| Visibility | Day |
| Counters | 63 |
| Net Morale | 1 |
| Net Initiative | 1 |
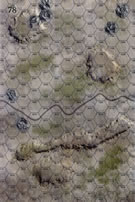
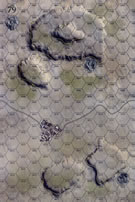
| Maps | 2: 78, 79 |
| Layout Dimensions | 56 x 43 cm 22 x 17 in |
| Play Bounty | 137 |
| AAR Bounty | 159 |
| Total Plays | 10 |
| Total AARs | 3 |
| Battle Types |
|---|
| Exit the Battle Area |
| Urban Assault |
| Conditions |
|---|
| Minefields |
| Off-board Artillery |
| Smoke |
| Terrain Mods |
| Scenario Requirements & Playability | |
|---|---|
| An Army at Dawn | Base Game |
| Introduction |
|---|
|
While Combat Command B earned their spurs in the fighting up north, Combat Command A had yet to see combat. The commander of the 1st Armored Division drew up a plan for them to secure one of the key passes through the Eastern Dorsal at Maknassy. II Corps headquarters overruled the division staff’s orders, changing the plan to just raiding Sened Station twenty-eight miles away. |
| Conclusion |
|---|
|
The successful raid elated the II Corps Commander, Maj. Gen. Lloyd Fredendall, who called his superiors, exclaiming “Trump that if you can.” Successful it may have been, but this blowhard micromanaged the 1st Armored Division throughout this period, often bypassing its commander, Orlando Ward. These flaws accumulated over time and eventually cost both men their commands; Ward would command the 20th Armored Division late in the war while Fredendall received a stateside post in Memphis where he gave away brides. But for now, the raid captured the Germans’ attention and highlighted the vulnerability of Maknassy. They quickly responded just as the 1st Armored Division commander had predicted. |
| Additional Notes |
|---|
|
Special rules for destroying Axis military stores. |

|
|
|---|
| AFV Rules Pertaining to this Scenario's Order of Battle |
|---|
|
| Heer |
|---|
|


| Regio Esercito |
|---|
|


| Army |
|---|
|


| Stuck in Sened Station | ||||||||||||
|---|---|---|---|---|---|---|---|---|---|---|---|---|
This looked like a sure thing for the US troops. I set up the Italians Bersaglieri in town with the Major and Captain, with the Italian infantry in the wadi north of town, the 88 and German LT on the hill to the north, on the southwest crest where it could range in well across the board, and the Italian AT guns and mortar with an LT on the hill south of town, again along the northwestern crests, the LT with the AT gun in the center of the 3 so he could direct fire. First blood was drawn on turn 3 as the T-30 got a bit too close to the 88 and was destroyed in a single shot. The M3/105 and M3/81 moved close enough to bring the 88 under fire and in a few more turns destroyed it completely. The M-3 Stuarts headed towards the hill to the south to engage the AT guns and mortar there, trying to clear the way for the halftrack mounted infantry and engineers to assault the town, and the truck mounted troops maneuvered along the long wadi on board 78 and then between the town and the southern hill on 79 after the town and AT guns were being engaged, heading for the board edge. Although Italian OBA killed 1 truck and it's riding infantry and disrupted another, the US managed to get a single step M3 tank unit and enough trucks with troops loaded to clear the needed 10 steps, just in case they managed to take the town and eliminate the stores. As the US took the southernmost hex, the engineer platoon succeeded in destroying the stores in that hex, but another platoon failed turn after turn to destroy the stores in the eastern hex, while a US captain lead an assault in the northern hex, trading disruptions and demoralizations with the Bersaglieri holding there but never managing to kick them out and destroy the stores. The exchanges of fire and attempts at blowing the stores in the eastern town hex lasted right to the bitter end, keeping the game exciting all the way through the 18 turns. Great game. |
||||||||||||
| 0 Comments |
| Old Ironsides ran out of time | ||||||||||||
|---|---|---|---|---|---|---|---|---|---|---|---|---|
Units from “Old Ironsides” CCA, tasked with raiding Sened Station, moved out at 1145 hours on January 24, 1943. The town was well protected by both mines and elements of the Italian 50th Special Brigade. A German 88 was perched atop the northeast hill, and an Italian 75mm gun and 81mm mortar battery was in the wadi just south of it. As the Americans approached on the road, they were spotted by Italian observers in the southwest wadi took losses from the combined OBA, battery and German 88mm barrages. Progress was slowed, but the Americans controlled the southwest wadi by 1245. As they moved toward the town, they encountered minefields that resulted in more casualties, but lead units reached the southwest sector of town by 1345 hours. The 88 was finally neutralized by 1430, and the US controlled the town by 1530. All military stores and infrastructure were destroyed by 1600 hours in the north and south sectors of Sened Station, but the east section survived an attempt by the engineers to eliminate them there, so the Italians claimed a minor victory. The objectives of this skirmish are to protect (Axis) or destroy (Allied) Sened Station, and US step exit. The scenario is very well done and clearly allows for either side to succeed based on this experience. With another turn or two in town, which the Italians could not have disputed, the engineer platoons that remained would have had a good shot at a minor victory. This could easily have happened except the die rolls for the OBA and artillery group were the kind that anyone would dream of in ftf games. At the beginning of the scenario, one would think the US couldn’t lose, but from about Turn 5 on, it looked like they would have little chance of winning despite overwhelming troop numbers. In the end, they ended up a die roll short of minor victory. The US took a pounding on casualties with 29 step losses to 9 for the Italians. In setting up, digging in the 88 on the 60m hilltop allows coverage of most of the board and can give all the Allied armor fits. For the Allies, controlling the southwest wadi gives a protected avenue of limited terrain to move forward toward the town. In summary, a fun scenario with the chance for many twists and turns. |
||||||||||||
| 0 Comments |
| Stop the Raid on Sened Station | ||||||||||||||
|---|---|---|---|---|---|---|---|---|---|---|---|---|---|---|
This was a fun-filled 5-session play-through with the playful & redoubtable, Capt. Chaos leading an attack by elements of the US 1st Armored Division’s Combat Command A. I led the defending troops of the Italian 50th Special Brigade. The American side drew an excellent set of leaders. The Axis leaders were notable less able. We played with the FOW, smoke/illum, extended assault, tank riders and excess initiative optional rules. In addition, we used the following three house rules: 1) Road Movement for Mechanized & Foot Units All FOOT & MECHANIZED units may move on roads at the rate of 1/2 a Movement Point (MP) per road hex, just like MOTORIZED units, 2) Standardized Movement for Mechanized Units All mechanized units may move through clear hexes at a movement cost of only 1 movement point (MP) per hex, instead of 1 1/2. Add one to this cost if moving up or down slopes hexes. 3) Dug In Units in slope Hexes are Automatically in Limiting Terrain in Desert Games Unless prohibited by special scenario rules, ALL units that are dug-in on slope hexes are considered to be in limiting terrain and are only spotted if enemy units approach to within 3 hexes, or 4 hexes for reconnaissance units – unless they are marked with a spotted marker, see 8.22. Our initial session (game turns 1-2) featured the broad front, movement-to-contact of the American combined arms task force moving ponderously east. Highlights of this first episode included some very accurate long-range AT that eliminated the American M-3/105 SPH. By the end of the session, the US side had fully occupied the large, east-west wadi on Map 78. The second session (game turns 3-5) was a continuation of the, slightly-dented, 3-pronged American movement to contact. The advancing US task force lost 6 more steps, and began encountering considerably more fire power in the second echelon of Axis defense, including a minefield (Hex 79-0416) immediately adjacent to Sened Station. In the north a headlong charge of Stuarts and M-3 Halftrack emerged from the northernmost wadi on Map 78 during game turns 5-6. In the center, the Americans launched a pair of mobile probes as the bulk of their infantry continued moving east up the long east-west wadi on Map 78. Simultaneously, in the south, a brave armored spearhead closed in on the Italian’s hilltop gun emplacements in Hex 79-0515. Our prolonged 3rd session (game turns 7-9) was an especially costly episode for both sides! The updated step losses were 21 for the advancing Americans, and the first 2 step losses for the Axis. The US attackers merged into a 2-pronged effort. Both Italian steps lost were dug-in, hill slope artillery emplacements on the southern margin of Map 79. This event cleared that essential hilltop and allowed a short-lived, US armored probe to briefly occupy the east Hex of Sened Station (Hex 79-0611) during game turn 8. Accurate short-range, AT fire from the lethal German 88mm platoon caused considerable havoc in the center of the battle map as some excessively brave Stuart light tanks & M-3 halftracks tried to support an American close assault in the wadi just north of Sened. By the end, there was just a single intact Stuart tank platoon in the south. However, the strategic American right flank movement had gained considerable maneuver room, preparatory to an anticipated lunge at Sened Station from the south. The fourth session (game turns 10-12) included the arrival of two prongs of the American movement-to-contact in the vicinity of Sened. Frighteningly accurate, long-range German AT fire continued, resulting in the US side being reduced to only a single M-3 halftrack platoon. The US right flank attack from the hills south of Sened made good, but costly, progress and that initiated a close assault on the easternmost hex of the town. The updated step losses were 25 for the besieging Americans, and 2 step losses for the Axis. Our fifth session (game turns 13-17) featured many fiercely contested close assaults & adjacent-hex fire fights, mostly in the vicinity Sened Station. The only US armor unit remaining was a single step of self-propelled mortars. The final step loss tally was 33 for the Americans, and 3 steps for the Axis. A combined total of EIGHT combat 7-die rolls were thrown in this session. There were 5 FOW-shortened turns of the 17 played. As there was no further possibility of even a minor US victory, by mutual agreement, the American side conceded at the start of game turn 77. We recommend this scenario for both SOLO & SHARED play, and we agreed that it merits a rating of 5. |
||||||||||||||
| 0 Comments |