
South Africa's War
| AP Series | Panzer Grenadier |
|---|---|
| Designer | Bennighof |
| Game Type | Expansion |
| Format | Spiral bound |
| Release Date | 2007-02 |
| Availability | Out of Print |
| Scenarios | 20 |
| Counters | 88 |
| Counter Type | Die-cut |
| Maps | 0 |

| Overall Rating, 87 votes |
|---|
|
3.17
|
| Expansion Rank: 91 of 114 |
| Popularity: Ownership & Activity | ||||
|---|---|---|---|---|
| Status | Owned by 22% | Played by 7% | AAR'd by 5% | Medaled by 1% |
| Rank | 22nd of 163 | 41st of 152 | 50th of 150 | 51st of 92 |
| Expansion Game Requirements & Playability | |
|---|---|
| 20/20 | South Africa's War |
| 18/20 | Desert Rats |
| 9/20 | Afrika Korps |
| 4/20 | Eastern Front |
| 2/20 | Road to Berlin |

| Total | |
|---|---|
| Side 1 | 27 |
| Draw | 10 |
| Side 2 | 48 |


|
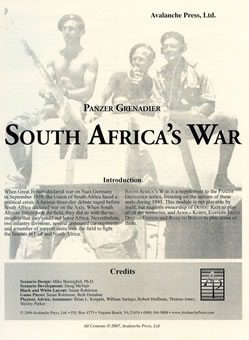
When Great Britain declared war on Nazi Germany in September 1939, the Union of South Africa faced a political crisis. A furious three-way debate raged before South Africa declared war on the Axis. When South African forces took the field, they did so with the restriction that they could not leave Africa. Nevertheless, two infantry divisions, several armored car regiments and a number of support units took the field to fight the fascists in East and North Africa. South Africa's War is a supplement to the Panzer Grenadier series, focusing on the actions of these units during 1941. |
|---|
| Scenario | Plays | AARs | Rating |
|---|---|---|---|
| 01. South African Armour | 7 | 2 | 2.9 |
| 02. Down in Jubaland | 3 | 0 | 2.7 |
| 03. Battle on the Equator | 4 | 1 | 3.5 |
| 04. Crusader: First Contact | 6 | 1 | 3.8 |
| 05. Irish Eyes | 13 | 5 | 2.8 |
| 06. Transvaal Scottish | 4 | 2 | 3.3 |
| 07. Rear Echelon | 2 | 0 | 3 |
| 08. Ons Is Helsems | 4 | 1 | 3.5 |
| 09. Sunday of the Dead | 3 | 0 | 2.7 |
| 10. Gialo Oasis | 3 | 1 | 3.3 |
| 11. Sit Jou Kop . . . | 3 | 1 | 3.3 |
| 12. Driven by Germans | 4 | 1 | 3.3 |
| 13. Set Out for Amusement | 2 | 0 | 3 |
| 14. Australia Will Be There | 3 | 2 | 4 |
| 15. Applying Ginger | 2 | 0 | 3 |
| 16. With the Utmost Vigour | 3 | 2 | 4.3 |
| 17. Night of Confusion | 6 | 2 | 2.7 |
| 18. Dingaan's Day | 5 | 2 | 3.6 |
| 19. Assault on Bardia | 4 | 2 | 2.5 |
| 20. Clayden's Ditch | 4 | 1 | 3 |
| Army |
|---|
|


| Army |
|---|
|


| Heer |
|---|
|


| Army |
|---|
|


| Regio Corpo di Truppe Coloniali |
|---|
|


| Regio Esercito |
|---|
|


| New Zealand Army |
|---|
|


| Army |
|---|
|


| AFV Rules Pertaining to this Game's Order of Battle |
|---|
|
| 16 Errata Items | |
|---|---|

|
Surrender Rule -- Certain units listed in the special rules of some scenarios are subject to elimination through the surrender rule. The surrender rule is triggered whenever an active, undemoralized enemy unit with direct fire values starts its activation adjacent to or in the same hex with one or more demoralized units that are subject to elimination through the surrender rule. At that time, the inactive player must roll two dice, and if the result is higher than the current morale of his highest-morale unit in the subject hex, ALL units and leaders in the hex (whether demoralized or not) immediately surrender and are eliminated. If the result is equal to or lower than the morale of the unit with the highest current morale in the subject hex, there is no surrender and the inactive units are unaffected. The active units that forced the surrender roll can take all normal actions during their activation, whether the enemy units surrendered or not. So, that means that a moving tank (or other moving unit) can't force enemy units to surrender, because a unit can only force enemy units to surrender at the beginning of its activation (before it moves or fires). (Shad
on 2010 Apr 29)
|
|
|
Maps for Fire In The Steppe can be used in place of the Eastern Front maps as they are the same except for colors. (metfan
on 2022 Mar 02)
|
| Scen 3 |
(Regarding pieces from Desert Rats) The Italian setup lists a 75mm Portee and a 77mm. There are no 75mm’s listed under Desert Rats’ Portee rules, and there are no 77mm units either (they exist only in Afrika Korps). If you don’t own AK, substitute a 47mm Portee and a regular 75mm, respectively. If you do own AK, use the units as the scenario indicates. (Shad
on 2010 Apr 29)
|
| Scen 5 |
The Italian Order of Battle includes Off-Board Artillery, but by Rule 9.1 "Target Spotting", Tank Leaders may not spot for bombardment. This is a problem. Two methods of "patching" present themselves: allow the Italian Tank Leaders to Spot for bombardment, or Pre-Register the Italian Off-Board Artillery Fire using the procedure in Beyond Normandy. (caryn
on 2011 Jul 26)
|
| Scen 16 |
Remove one South African LT COL and replace him with a COL so that there is a highest-ranking Allied leader for use with the Decapitation rule (6.72) (Shad
on 2010 Jul 18)
|
| Scen 16 |
Missing leaders for scenario #16: 6th New Zealand: 1 x MAJ, 1 x CAPT, 4 x LT 4th New Zealand: 1 x LT COL, 2 x CAPT, 5 x LT (joe_oppenheimer
on 2012 Jan 28)
|

|
All Bren carriers should have a movement value of 7. (Shad
on 2010 Dec 15)
|

|
Two British infantry have their full strengths printed on the back. They should both be "2-3" when reduced. (Shad
on 2010 Dec 15)
|

|
This is an armored car. (Shad
on 2010 Dec 15)
|

|
Ignore the direct fire values. (Shad
on 2010 Dec 15)
|

|
Two 105mms (ID#s 1204, 1205) have "16-31" fire values in black (direct fire), when they should be in white (indirect fire). (Shad
on 2010 Dec 15)
|

|
The reduced direct fire value of the Heer HMG became 5-5 starting with Fall of France. (plloyd1010
on 2015 Jul 31)
|

|
The Pz IVe appearing in the original Panzer Grenadier game had an Anti tank value of 4-7. As of Afrika Korps (2002), continuing onward through the 3rd and 4th edition games, the anti tank value has been 4-4. (plloyd1010
on 2016 Jul 25)
|

|
The morale and combat modifiers of German Sergeant #1614 should be "0", not "8". (Shad
on 2010 Dec 15)
|

|
All SPW 251s have an armor value of 0. (Shad
on 2010 Dec 15)
|

|
Four counters (ID#s: 1502 to 1506) have the incorrect NATO symbol (infantry in lieu of armor). (Shad
on 2010 Dec 15)
|
| Nations at War - Scenario Appearance Percentages | ||
|---|---|---|
| South Africa |
100%
|
South Africa |
| Britain |
80%
|
Britain |
| Italy |
65%
|
Italy |
| Germany |
60%
|
Germany |
| New Zealand |
20%
|
New Zealand |
| India |
10%
|
India |
| Australia |
5%
|
Australia |
| Battle Types - Scenario Appearance Percentages | ||
|---|---|---|
| Rural Assault |
70%
|
Rural Assault |
| Hill Control |
30%
|
Hill Control |
| Road Control |
25%
|
Road Control |
| Urban Assault |
20%
|
Urban Assault |
| Airfield Control |
10%
|
Airfield Control |
| Inflict Enemy Casualties |
10%
|
Inflict Enemy Casualties |
| Exit the Battle Area |
10%
|
Exit the Battle Area |
| Breakout |
5%
|
Breakout |
| Bridge Control |
5%
|
Bridge Control |
| Covering Action |
5%
|
Covering Action |
| Rescue |
5%
|
Rescue |
| Delaying Action |
5%
|
Delaying Action |
| River Crossing |
5%
|
River Crossing |
| Rear Guard |
5%
|
Rear Guard |
| Surprise Attack |
5%
|
Surprise Attack |
| Conditions - Scenario Appearance Percentages | ||
|---|---|---|
| Off-board Artillery |
85%
|
Off-board Artillery |
| Terrain Mods |
75%
|
Terrain Mods |
| Reinforcements |
35%
|
Reinforcements |
| Entrenchments |
25%
|
Entrenchments |
| Randomly-drawn Aircraft |
15%
|
Randomly-drawn Aircraft |
| Anti-tank Ditches |
15%
|
Anti-tank Ditches |
| Hidden Units |
5%
|
Hidden Units |
| Minefields |
5%
|
Minefields |