
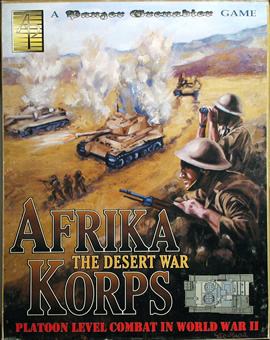
Afrika Korps: The Desert War
| AP Series | Panzer Grenadier |
|---|---|
| Designers | Bennighof, Knipple, de Vita |
| Game Type | Standalone |
| Format | Boxed |
| Release Date | 2002-07 |
| Availability | Out of Print |
| Scenarios | 50 |
| Counters | 737 |
| Counter Type | Die-cut |
| Maps | 3 |

| Overall Rating, 700 votes |
|---|
|
3.02
|
| Standalone Rank: 34 of 38 |
| Popularity: Ownership & Activity | ||||
|---|---|---|---|---|
| Status | Owned by 47% | Played by 30% | AAR'd by 26% | Medaled by 2% |
| Rank | 5th of 163 | 3rd of 152 | 3rd of 150 | 22nd of 92 |

| Total | |
|---|---|
| Side 1 | 255 |
| Draw | 172 |
| Side 2 | 226 |


|
Tens of thousands of gamers have enjoyed the Panzer Grenadier series. Now, the series turns to the theater most noted for tank battles: North Africa. Fifty scenarios cover the tremendous armored clashes of 1940 and 1941. Players take command of platoon-sized units representing German, British, Australian, and Italian infantry, tanks, & artillery. |
|---|

|
|
|---|
| Army |
|---|
|


| Army |
|---|
|


| Heer |
|---|
|


| Regio Esercito |
|---|
|


| AFV Rules Pertaining to this Game's Order of Battle |
|---|
|
| 56 Errata Items | |
|---|---|

|
Special Rule 4. Terrain. Salt Marsh: In the fourth sentence replace "Subtract two from..." with "Add two to..." (campsawyer
on 2010 Apr 29)
|
|
|
Special Rule 8. Bush Artillery: The second to last sentence should read "On a result of 11 the unit is removed from play." (campsawyer
on 2010 Apr 29)
|
|
|
Surrender Rule -- Certain units listed in the special rules of some scenarios are subject to elimination through the surrender rule. The surrender rule is triggered whenever an active, undemoralized enemy unit with direct fire values starts its activation adjacent to or in the same hex with one or more demoralized units that are subject to elimination through the surrender rule. At that time, the inactive player must roll two dice, and if the result is higher than the current morale of his highest-morale unit in the subject hex, ALL units and leaders in the hex (whether demoralized or not) immediately surrender and are eliminated. If the result is equal to or lower than the morale of the unit with the highest current morale in the subject hex, there is no surrender and the inactive units are unaffected. The active units that forced the surrender roll can take all normal actions during their activation, whether the enemy units surrendered or not. In practice, a moving tank (or other moving unit) can't force enemy units to surrender, because a unit can only force enemy units to surrender at the beginning of its activation (before it moves or fires). (campsawyer
on 2010 Apr 29)
|
|
|
Italian Bersagliari Infantry should have a reduced direct fire value of 3-3, same as they do in Desert Rats and Fronte Russo. (plloyd1010
on 2011 Jan 13)
|
|
|
The British Army needs the Bishop tank added to the OOB. This counter came with this game! (JayTownsend
on 2013 Apr 17)
|
|
|
Scen 03 There should be an AT Ditch Marker at 0835 (vice 0834 a misprint on the map) and there should probably be an AT Ditch Marker at 0929 to keep the AT Trench consistant. (Grognard Gunny
on 2023 Mar 14)
|
| Scen 2 |
Giarabub Garrison setup: in the third sentence replace "1610" with "1510." (campsawyer
on 2010 Apr 29)
|
| Scen 2 |
The Allied OOB indicates 4 x 25pdrs. There are only 3 in the counter-mix AND only 3 x Brens allocated for the scenario. The 4 shown is a typo and should be 3 x 25pdr's (vince hughes
on 2012 Mar 07)
|
| Scen 3 |
IT begins in 2416, not 2616. (campsawyer
on 2010 Apr 29)
|
| Scen 4 |
Victory conditions state "no more than 5 Italian entrenchments remain in play." This is defined as having at least one Italian combat unit in the entrenchment. Unoccupied entrenchments will not count toward this number. (campsawyer
on 2011 May 30)
|
| Scen 4 |
The Italian AT ditch stops one hex short of the southern map edge. I really don't know if this is intentional or not. It materially changes the scenario if it is filled in all the way or not. I played as written, but I suspect it is incorrect. (triangular_cube
on 2021 Nov 14)
|
| Scen 6 |
Other: In the last sentence replace "##13" with "##08." (campsawyer
on 2010 Apr 29)
|
| Scen 7 |
Setup calls for 5 Italian Capitani; there are only 4 in the counter set. Suggest adding a Maggiore to replace the missing Capitano - too bad he stands a good chance of this being a tombstone promotion...... (wleonard1
on 2013 Jun 20)
|
| Scen 8 |
German OOB includes 1 x Sdkfz 251. Replace with a 1 x SPW 251. (GeneSteeler
on 2010 Jun 28)
|
| Scen 8 |
German OOB has a total of 7 x LT. Replace 1 LT with a SGT. (AfKo only has 6 LTs) (GeneSteeler
on 2010 Jun 28)
|
| Scen 10 |
Hex references in this scenario are all over the place, even more than a single row/column shift that sometimes comes up in AFK. Best guess tells you to ignore the references and allow the units to enter via the nearby road/track but even that is just a guess. (triangular_cube
on 2021 Nov 20)
|
| Scen 12 |
In the Italian set up replace "3 x L3/35" with "2 x L3/35" and replace "7 x L3/35" with "3 x L3/35." (campsawyer
on 2010 Apr 29)
|
| Scen 13 |
Other: Replace "1822" with "1922". (campsawyer
on 2010 Apr 29)
|
| Scen 18 |
In the setup there are several Italian setup hexes that are over stacked. In all over stacked hexes select one unit to setup in any open adjacent hex. The hexes are 2013, 2213, 2113, 1312, 1412 (campsawyer
on 2011 May 22)
|
| Scen 20 |
The scenario instructions specify that there is an Australian ENG unit available to attempt to demolish the bridge across the wadi. None is indicated in the Allied order of battle at the start. Add one Australian ENG platoon to the Allied setup. (treadasaurusrex
on 2022 Jan 19)
|
| Scen 21 |
Replace "2603" with "2403" in the setup. (campsawyer
on 2010 Apr 29)
|
| Scen 22 |
Allied OBA should be "5 x 13". Scenario special rule applies to all 5 units of OBA. (campsawyer
on 2010 Apr 29)
|
| Scen 24 |
In the 8th Machinegun Battalion leader list replace "5 x LT, 1 x SGT" with "3 x LT, 3 x SGT". (campsawyer
on 2010 Apr 29)
|
| Scen 25 |
Other: Ignore instructions. (campsawyer
on 2010 Apr 29)
|
| Scen 25 |
Setup Instructions Error, Part One The instructions call for the placement of a line of north-south (##18) "no set up or entry" hexes, and further stipulate that units may not be "south" of this line of hexes. With it being a north-south line, they must have meant no setup or entry EAST of that line. (treadasaurusrex
on 2022 Jan 16)
|
| Scen 25 |
Setup Instructions Error, Part Two. The placement of a line of north-south (##18) "no set up or entry" hexes, cuts off 4 of the required Australian entrenchments that are on the line, or just east of it. (treadasaurusrex
on 2022 Jan 16)
|
| Scen 25 |
Setup Instructions Error, Part Three. The instructions call for the Australian side to place entrenchments in 2 hexes (2520 and 2624) that are OFF the north edge of the map board. Suggest that these two entrenchments should be placed in Hexes 2410 and 2415, instead. (treadasaurusrex
on 2022 Jan 16)
|
| Scen 32 |
Question rather than Declaration: Should the INF & HMG in this scenario (# 32) be BERS counters, not regular troops? Note the identification of the unit as V/8th Bersaglieri Battalion (p. 30). Also note, for example, Scenario 36 which identifies the III/8th Bersaglieri Battalion and does cite BERS/BERS MG units in the OOB. Likewise, Scenario 40 (also from the Ariete division). (Poor Yorek
on 2014 Jan 01)
|
| Scen 33 |
The Victory Conditions are in error. Ignore reference to S4. There is no 'S4' entrenchment hex. Therefore VC's referring to hex control should state S6,S7,S8 and S9 (vince hughes
on 2011 Mar 20)
|
| Scen 33 |
Entrenchment S10 should set up in 1826 and NOT 1827 (vince hughes
on 2011 Apr 03)
|
| Scen 33 |
Entrenchment S8 should set up in hex 1920 (vince hughes
on 2011 Apr 03)
|
| Scen 33 |
There are not enough Australian LT's and CAP counters in the leader mix. Therefore randomly draw the 'missing' leader counters from the British leader mix in the Afrika Korps box-set. (vince hughes
on 2011 Apr 03)
|
| Scen 38 |
In my printing of the Scenario Booklet the visibility is listed as 1830-1945 for full, 12-hex visibility. This is probably a typo which was meant to have 1830-1845 for 12-hex visibility. Note turn 1900 has 8-hex visibility; 1915 4-hex; and so forth. Visibility dropping beginning at 1900 is also consistent with Sc #32 which occurs only two days prior to Sc #38. (Poor Yorek
on 2014 Jan 03)
|
| Scen 41 |
Per Blackcloud6's research, "The Wadi Sidi Belgasem, where this action took place, is about 9 miles SE of Tobruk so it was on the northern portion of the eastern perimeter. The Aussies attacked out of the perimeter to take pressure off of Operation Brevity vicinity Sollum. So, the entrance for the Aussies in the scenario should be from the west at Hex 2415." (triangular_cube
on 2022 Feb 26)
|
| Scen 42 |
The hill marker should be placed in hex 1225 (not 1215). (rerathbun
on 2011 Aug 09)
|
| Scen 42 |
Both players are told to set up first, I believe the Australians should set up first as the defenders. (triangular_cube
on 2022 Feb 27)
|
| Scen 42 |
The stretch of Wire from 1830-834 should read 1830-1834 (triangular_cube
on 2022 Feb 27)
|
| Scen 46 |
Other: In the first sentence replace "Map 2" with "Map 3". (campsawyer
on 2010 Apr 29)
|
| Scen 46 |
Axis reinforcement times are desynced from their turn indicator by 1 hour. I used the turn number rather than the listed time. (triangular_cube
on 2022 Mar 01)
|
| Scen 47 |
In the map graphic the lower map should be Map 2 not 3. Wadi hexes are 2012 and 2212. (campsawyer
on 2010 Apr 29)
|
| Scen 48 |
This scenario requires that you either own two sets of counters as there are not enough L3/35 and TEN counters OR you substitute other tank types for the Italian L3/35 shortage and other Leader ranks for the TEN leader counter shortage to play this scenario. (JayTownsend
on 2016 Nov 21)
|
| Scen 48 |
10th Army most likely should start on MAP 3 instead of MAP 1, but this isnt included in the official errata for this module so I'm not sure. (triangular_cube
on 2022 Mar 02)
|
| Scen 49 |
There is only 4 Capitanos instead of 6 that the scenario calls for. (campsawyer
on 2011 May 14)
|

|
All Bren carriers should have a movement value of 7. (Shad
on 2010 Dec 15)
|

|
Two British infantry have their full strengths printed on the back. They should both be "2-3" when reduced. (Shad
on 2010 Dec 15)
|

|
This is an armored car. (Shad
on 2010 Dec 15)
|

|
Ignore the direct fire values. (Shad
on 2010 Dec 15)
|

|
Two 105mms (ID#s 1204, 1205) have "16-31" fire values in black (direct fire), when they should be in white (indirect fire). (Shad
on 2010 Dec 15)
|

|
The reduced direct fire value of the Heer HMG became 5-5 starting with Fall of France. (plloyd1010
on 2015 Jul 31)
|

|
The Pz IVe appearing in the original Panzer Grenadier game had an Anti tank value of 4-7. As of Afrika Korps (2002), continuing onward through the 3rd and 4th edition games, the anti tank value has been 4-4. (plloyd1010
on 2016 Jul 25)
|

|
Two German PzJr. 1 counters have their full strengths printed on the back, and reduced strengths on the front. (Shad
on 2010 Dec 15)
|

|
The morale and combat modifiers of German Sergeant #1614 should be "0", not "8". (Shad
on 2010 Dec 15)
|

|
All SPW 251s have an armor value of 0. (Shad
on 2010 Dec 15)
|

|
This leader should have a morale of "9" and a modifier of "0" instead of the other way around. (Shad
on 2010 Dec 15)
|

|
The L3/35 with ID# 1505 has the incorrect movement factor printed on it. The movement factor should be 7, not 8. (plloyd1010
on 2014 Nov 24)
|

|
Four counters (ID#s: 1502 to 1506) have the incorrect NATO symbol (infantry in lieu of armor). (Shad
on 2010 Dec 15)
|
| Nations at War - Scenario Appearance Percentages | ||
|---|---|---|
| Britain |
88%
|
Britain |
| Italy |
74%
|
Italy |
| Australia |
70%
|
Australia |
| Germany |
52%
|
Germany |
| Battle Types - Scenario Appearance Percentages | ||
|---|---|---|
| Rural Assault |
82%
|
Rural Assault |
| Inflict Enemy Casualties |
24%
|
Inflict Enemy Casualties |
| Exit the Battle Area |
22%
|
Exit the Battle Area |
| Surprise Attack |
12%
|
Surprise Attack |
| Patrol |
10%
|
Patrol |
| Rear Guard |
8%
|
Rear Guard |
| Meeting Engagement |
6%
|
Meeting Engagement |
| Delaying Action |
4%
|
Delaying Action |
| Road Control |
4%
|
Road Control |
| Covering Action |
2%
|
Covering Action |
| Ambush |
2%
|
Ambush |
| Airfield Control |
2%
|
Airfield Control |
| Bridge Control |
2%
|
Bridge Control |
| Conditions - Scenario Appearance Percentages | ||
|---|---|---|
| Terrain Mods |
82%
|
Terrain Mods |
| Entrenchments |
62%
|
Entrenchments |
| Off-board Artillery |
58%
|
Off-board Artillery |
| Reinforcements |
54%
|
Reinforcements |
| Anti-tank Ditches |
22%
|
Anti-tank Ditches |
| Anti-infantry Wire |
20%
|
Anti-infantry Wire |
| Minefields |
20%
|
Minefields |
| Randomly-drawn Aircraft |
18%
|
Randomly-drawn Aircraft |
| Severe Weather |
6%
|
Severe Weather |