
|
Weapons of Mass Destruction White Eagles #4 |
||
|---|---|---|
| (Defender) Poland | vs | Germany (Attacker) |
| Formations Involved | ||
|---|---|---|
| Germany |  |
2nd Gebirgs Division |
| Poland |  |
11th Infantry Division |

| Total | |
|---|---|
| Side 1 | 0 |
| Draw | 0 |
| Side 2 | 8 |


| Overall Rating, 8 votes |
|---|
|
3.38
|
| Scenario Rank: 500 of 913 |
| Parent Game | White Eagles |
|---|---|
| Historicity | Historical |
| Date | 1939-09-08 |
| Start Time | 15:30 |
| Turn Count | 20 |
| Visibility | Day |
| Counters | 54 |
| Net Morale | 1 |
| Net Initiative | 2 |
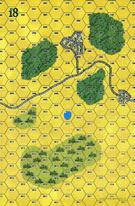
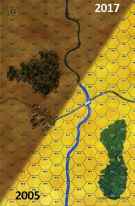
| Maps | 2: 18, 3 |
| Layout Dimensions | 56 x 43 cm 22 x 17 in |
| Play Bounty | 128 |
| AAR Bounty | 153 |
| Total Plays | 8 |
| Total AARs | 4 |
| Battle Types |
|---|
| Bridge Control |
| River Crossing |
| Road Control |
| Urban Assault |
| Conditions |
|---|
| Minefields |
| Off-board Artillery |
| Scenario Requirements & Playability | |
|---|---|
| Edelweiss: Expanded | Counters |
| Eastern Front | Maps + Counters |
| Road to Berlin | Maps |
| White Eagles | Base Game |
| Introduction |
|---|
|
On 3 September, a flight of German bombers dropped bombs containing sulfur mustard gas on a Warsaw suburb. Three years later the Third Reich claimed this had been accidental, and this is likely true. The Nazi's certainly had no qualms about mass murder of civilians, and if they'd intended to use chemical weapons they would without a doubt have plastered the Polish capital with them. The Poles retaliated in kind at Jaslo in Galicia, where the German 136th Mountain Regiment encountered sulfur mustard mines placed to defend a key bridge crossing. |
| Conclusion |
|---|
|
The action at Jaslo is the only confirmed instance of the intentional use of chemical weapons in the Second World War in Europe. Fourteen jägers suffered chemical burns and lung damage; the rest of the Tyrolean regiment stormed the bridge and drove off the Poles. Higher command did not take the reports seriously, but the division staff decided that the Poles intended to wage this war with use of poison gas and instructed the troops to use their masks and protective gear at the first suspicious sign. This slowed the advance considerably - exactly the reaction the weapons were intended to achieve. |

|
|
|---|
| Heer |
|---|
|


| Wojska Lądowe |
|---|
|


| 1 Errata Item | |
|---|---|

|
The morale and combat modifiers of German Sergeant #1614 should be "0", not "8". (Shad
on 2010 Dec 15)
|
| My God, they are using poison gas! |
|---|
|
I chose this scenario because it is relatively short (20 turns), and has some unique elements (mines, of which three are chemical -- thus the title of the scenario -- and German mountain troops). I’m playing solo, and will try to do a new AAR every 4 turns. Set-Up and StrategyPoles The Poles set up first, and given that most victory points will be decided by town control, they deploy the 8 INF and 2 HMG squads so as to make the Germans fight for every last hex. This may also help in that the Poles get VPs for eliminated and demoralized German units at scenario’s end; the Germans get VPs for eliminations only. There are 4 town hexes west of the river, and 6 east of the river. The Poles put most of the units west of the river, on the assumption that given the time constraints the Germans can’t afford to ignore them. They also put a dug-in unit on the bridge hex as it is worth 4 VPs for the Poles, 5 for the Germans. The 2 big guns are put in far eastern hexes of the town east of the river, and the 2 mortars are placed in woods west of the river in a spot that can support the defense of the western towns. The 10 minefields are placed on the bridge hex, in some of the eastern towns, and then on clear hexes so as to channel the Germans into the higher-MP woods or swamp hexes. The Poles have a so-so leader draw. Germans When I play solo, I try to have each side decide on a strategy, and then adhere to it within reason during the scenario. After reviewing the Polish set-up, the Germans decide on a somewhat risky strategy of bypassing the western towns, which are mainly in the north, and racing along the southern edge to cross the river and attack to the big eastern town. Not only is this town more lightly defended, it also contains the big guns, so if they are threatened, this should relieve some of the bombardments against the Germans forced to advance in the open. A smaller screening force will threaten the bridge and try to prevent the Poles from crossing from the west to reinforce their eastern comrades. Once the town is clear, the rest of the force will join to take the bridge and then, if time permits, some of the western towns. The Germans have higher morale (9 vs and better leaders, so this should allow them to survive despite being forced to advance in the open. Situation at end of Turn 4The Germans entered in the south and headed east. They uncovered a 1 value minefield, which a mountain engineer unit easily suppressed. The Poles reacted by sending 2 INF units from a western town to the east. In addition, the 2 mortar units in the woods moved south so as to set up some direct fire shots. As the German units came within spotting range of the Polish leader in the central town, the 2 75/97 guns opened upon, but only managed to disrupt a HMG unit which then rallied. Once the mortars openend fire, they revealed themselves and some German OBA responded and demoralized one of them. The Poles will watch and see how things develop before detaching any more units form the western towns. They are beginning to wonder, however, if the minefields would have been better used to guard the approaches to the bridge hex. So a quarter of the scenario is gone, and the Germans still have a ways to go, and a river to cross, before they can start picking up VPs. Guess we'll see if this was a smart ploy after all. Situation at end of Turn 8At 1630, a German general enters the command tent, studies the elaborate attack orders, and then asks, “What idiot came up with this plan? We need that bridge NOW!” So on turn 5, the Germans abandon the southern flanking sweep and march directly toward the bridge. The plan now is to capture the bridge ASAP, while sending a force to take the central town. They weather the continuing artillery and mortar fire, and do pretty well against the defensive fire that begins as they approach these two objectives. (note: one good thing about the mountain HMG units is that they move as fast as the INF, meaning they can be there when the first firing line forms up). A colonel with a combat rating of 2 forms a 3-hex fire group and opens up on the bridge, to no initial effect. A second fire group attacks the central town, but the Polish defenders also get through it intact. Meanwhile, defensive fire manages to disrupt and demoralize 2 German INF units. With the town’s defensive fire spent, the German moves 2 assault stacks (1 with an ENG) adjacent to the town for an attack next turn. Earlier, the Polish mortar units retreated north into the woods to lose their Spotted status and escape German OBA. While 1 continues to fire, the other manages to get back to good order. In addition, the 2 Polish INF units that moved out of the western town manage to reach the eastern town to bolster its defenses. So at the end of turn 8, things are starting to look worrisome for the Poles. Despite repeated bombardments, the German morale has held and they are in position to take 2 key objectives in a few turns. Situation at end of Turn 12Turn 9 saw the Germans press their attack on the central town and bridge. They advanced into the town, and after trading step losses, managed to rout the defenders and send them streaming toward the woods to the west. Meanwhile, large fire groups and OBA continiued to pound the bridge position, but the Poles put their 2 best leaders there and despite having 1 INF unit break and run for the town the remaining HMG kept its order. Finally, the Germans launched their assault on the bridge, using their other ENG unit, an INF unit and a 10-2-1 major. And blammo, the 3 value mine (turned into a 2 by the ENG) went off and it was indeed a chemical one, exacting a heavy toll. The major and ENG unit were demoralized, but the INF survived. Then the Poles counterattacked and managed to kill the major, triggering a catastrophic loss check which the German just barely passed. The Poles later called in artillery on the position, but there were no effects. Meanwhile, 2 German platoons continued to chase the retreating Polish mortar units in the northern woods, looking to bag some easy VPs. An initial German decision to press on with 2 stacks toward the western town was changed after the bridge fiasco; now the Germans will defend the central town and devote all remaining efforts to the east. The Poles in the western town look for a chance to counter-attack. Situation end of Turn 16What a change in fortunes. Following the disaster at the bridge, the gods have favored the Polish dice. On turn 13, the German decided it was folly to attempt to assault into the teeth of the chemical mines at the bridge. This meant he had to pull his units out of the hex to allow direct fire to clear the hex of defenders. The INF unit exited, but the remaining, demoralized ENG unit failed its morale checked and fled, losing 1 step in the process. The German then tried to blast the defenders out, but their morale held, After a turn of this, the German player (i.e., me) realized he could win the game simply by occupying all the hexes in the eastern town (6 hexes x 3 VPs = 18, plus 2 for the western town, makes 20). [Note, if the Germans lose, it's because they wasted too much time on the bridge, time that would have been better spent on the towns.] So the mountain troops cross the river and set up for assaults into the town. And here's where the Polish dice caught fire, disrupting and demoralizing troops and braving the enemy assaults. None of the assaults were able to clear, much less seriously hurt, the defenders, and in 1 hex the Germans are barely hanging on. The remaining German units near the bridge form up for a last push to the town, while the 2 demoralized units in the woods try to rally to avoid ceding VPs to the Poles. Time is running out, but the Polish defenders in the town are spread thin, and they have only l leader. If the German get a lucky multiple activation, they may be able to pull it off. The Poles meanwhile made good use of their defensive and mortar fire, and have moved some troops up to threaten the central town so as to at least pin the German defenders there. Situation at end of Turn 20 - German minor victoryIn the last 4 turns, the Germans were finally able to grind down the eastern town defenders, especially after they were able to build assault stacks of 3 INF units. At game's end, the Poles were still hanging onto 2 of the eastern town hexes (I originally assumed they kept control as original owner, even if contested in assault, but later learned that contested hexes give neither side control -- so the Poles got no VPs for those hexes). Not much happened elsewhere on the map. So the finally tally was: Poles: 5 German steps eliminated (5 VPs). 1 German unit demoralized at end (1 VP), 3 town hexes controlled (6 VPs), bridge controlled (4 VPs) = 16 VPs Germans: 10 Polish steps eliminated (10 VPs), 1 western town hex controlled (2 VPs), 3 eastern town hexes controlled (9 Ps) = 21 VPs. Result: German Minor Victory (3-6 more VPs than other side). A pretty fun scenario -- at various times I was sure one side of the other would win. Looking back, my Polish set up could have been better. Give the higher VPs for the eastern town, it should have had more units and leaders, plus some of the chemical minefields (I put 1 on the bridge, 2 in the western town). But I clearly made more mistakes playing the Germans, which makes me think they might favored. They likey would have won at a Major Victory with 1 more turns. The Germans wasted too much time trying to wipe out the bridge defenders, when there was a better payoff at the town. |
| 0 Comments |
| Mass Destruction | ||||||||||||||
|---|---|---|---|---|---|---|---|---|---|---|---|---|---|---|
IntroductionA classic infantry action. The Germans must secure a vital in the face of tenacious Polish resistance. The Poles have time and distance on their side, but the Germans have tough, hard-hitting Mountain troops and solid company-level artillery support. The Polish 75/97s can be dangerous, but spotting is problematic for the Poles. The PlansFor the Poles, the decision is how to hold the bridge and town hexes. The immobility of Polish forces makes a flexible defence infeasible, so the choice comes down to putting up resistance forward to delay the German assault on the bridge and town hexes in Board 3, using a light screen to detect and bring the Germans under fire early with the bulk of Polish forces holding the river line, or a concentrated defence of the river line. The Germans must decide how to move against the Poles, and what objectives the feel are the most important. Time is critical to the Germans, but they do not have so great a numerical superiority that they can afford to disregard casualties, either. And those Chemical mines are worrisome. The Polish PlanThe Polish player elects to use five of his mines to delay German capture of the northern Town (road hexes 0806 and 0805, town hexes 0804, 0803, and 0704) on Board 18, and then digs in an infantry platoon and an HMG platoon under a Porucznik (can anyone pronounce that?) on the road in Board 18 just ahead of the two woods (hex 0906). He then deploys four infantry platoons in holding the town hex at 1208, with the 37mm AT gun in the outskirts of the long woods on Board 3 (hex 1210). The bridge is defended by three infantry platoons to the West of the River, with the HMG on the bridge itself. The five mine counters left are deployed in a 3-counter field in front of the infantry holding the bridge (hexes 1107, 1108, and 1110), and two more mines on and immediately East of the bridge itself (hexes 0909 and 0809). The 75/97s and the 81mms are deployed in the Town on Board 3. The Polish player has compromised between a delaying action and a strong defence of the bridge, keeping all of his strength West of the river. He has created a series of roadblocks which should both slow down and wear down the German advance, while his bombardment strength is ideally sited to protect the main line of defence around Town hex 1208. The German PlanAlthough I obviously do not know the details above, the Polish plans is fairly clear from the size and distribution of his deployments. I see a classic application of Fire and Manoeuver for light infantry here. Once I mop up the inadequate roadblock at 0906 and move my Engineers through the northern Town hexes, I will advance to hold the Poles of the main defence line and the river line in place, while using the cover of the Woods to mask a powerful flanking movement. The German plan relies on the relatively slim margin of numerical superiority to pin the Poles in place until it is too late for them to react without collapsing. The elements forcing the main defence line must be strong enough to force it and threaten the river line, while the strength of the assault teams must be sufficient to capture Town hexes against Polish artillery batteries and single infantry platoons. Once again, German superiority in organsiation will be critical, with ample Leaders to execute Fire and Manoeuver once the main line of defence is cracked or broken. What HappenedThe German plan played out almost perfectly. The strong attacks of the German Mountain troops on the Polish main line at 1208 held Polish attention even though the movement of German troops into the Forst had begun well before that. By the time the Polish player recognised that the Germans could not only ford the river but take the town on its East bank in plenty of time, they were already threatened by powerful forces to their front. An attempt to disengage and recross the river brought disaster, as the high morale German Mountain troops simply risked the minefields to pursue the Poles and capture the bridge. The Poles spent three turns wavering between holding the bridge and reinforcing the Town, and so lost both. The Germans advanced directly on the roadblock at Hex 0906, and held it in place with Fires while Engineers neutralised the mines and rolled through the northern Road and Town hexes. These are very nearly free VPs. Once the town was cleared, the Engineers joined with other Mountain platoons to flank the Polish roadblock and eliminate it. To encircle and eradicate the roadblock at 1208 required most of the German strength, so the German player spent the extra Turns to achieve concentration and position reserves before launching simultaneous Assaults. Once the main line was forced, although the town hex remained untaken, the German player moved on. Two assault groups, each comprising engineer-Mountain platoon teams, battered their way through the long woods and moved upriver (Northwards). The rest of the Mountain platoons, their HMGs, and the 81mm mortars cleared up the road hexes and moved up towards the bridge to threaten and suppress by fires the Polish defences of the river line. The assault teams, initially two teams of one Engineer and two Mountain platoons each, concentrated at the edge of the long wood, where the Poles could not bring fires to bear on them, prior to fording the river. The Poles sent a pair of Porucznik (Poruczniki?) to "spot" the Germans in the woods for their 75/97s. Because of a mis-reading of the Rules, the Polish player insisted that the German units could not fire on the Leaders with Direct or Bombardment Fire. Annoying, but in the end, not fatal. The German player detached another three Mountain plantoons to move across the river at an intermediate crossing, incidentally chasing off the Poruczniki for a while. Once these troops began to cross, the main group also forded the river. With the river line compromised, the Poles attempted to pull their river line back from the West bank, but this failed in the face of strong German pressure and Polish uncertainty as to German objectives. By the time the Poles were sorted, the Germans were in the town and across the bridge. Two Polish infantry platoons wqere destroyed before they could reach the Town hexes, and the remaining Polish units fell quickly to the powerful assault teams. NoteThe Polish Player actually conceded once it became clear that his hesitation at the bridge had been fatal. ConclusionA good fight. Losses were fairly heavy on both sides, the Poles losing 18 Steps, the Germans 9 Steps. The Germans won an overwhelming victory, but the fight would have gone much differently if we had switched sides. |
||||||||||||||
| 0 Comments |
| Weapons of Mass Destruction – How can we stop the Krauts? Perhaps with a little bit of Mustard? | ||||||||||||
|---|---|---|---|---|---|---|---|---|---|---|---|---|
IntroductionSept 3, 1939. Germany is invading Poland. An accident in the Warsaw suburbs results in the German bombing with mustard gas. Sept 8, 1939. Enraged, the Polish respond at Jaslo in Galacia with the only intentional recorded use of Chemical warfare in World War Two. The German 136th Mountain Regiment encounters Sulfer Mustard Mines “guarding” the bridges. On the attack are elements of the German 2nd Mountain Division. Defending the bridge and Polish towns are elements of the 11th Infantry Division. The main objectives are simple: 1. Control the towns and bridge. 2. Eliminate the enemy. Note: Score will be denoted by (x-y), where x=number of German steps lost, y=number of Polish steps lost. With the afternoon sun glaring from the south, the Poles are embedded at their objectives. 1530 - 1545 The German attack begins from the west. They quickly advance up the road, and suffer only minor casualties (1-0) 1600 - 1645 The German Mountain forces close against the second small village. What is that smell in the air? SULFER-MUSTARD MINES! Those dirty… (2-0) The Germans begin their assault on the two western most villages and the score is evened. (3-3) 1700 - 1715 Direct Mortar and Artillery attacks eliminate one and half German Mountain Platoons! (6-3) Polish defenders in the two towns are assaulted by Germans. One Porucznik survives in the westmost village. The Polish forces in the woods are quickly overrun (6-9) Crime does not pay. 1730 - 1800 The German juggernaut moves east towards the bridge as the Polish are eliminated and their Kapitan captured in the second town. (6-12) The Polish HMG nest at the bridge claims some victims as the German forces charge, stopping just short of the minefields (8-12) 1815 - 1830 German engineers discover more chemical mines in front of the Polish HMG nest. Some more Germans are cut down, but soon the Polish HMG defenders are disrupted and demoralized! (11-12) The Germans begin to cross the river heading toward Jaslo. 1845 - 1915 The Polish HMG nest is overrun and the Polish troops are eliminated. (11-16) German forces on the exposed bridge are hit by Polish artillery (13-16) The bridge and both western villages are now captured. The German assault on Jaslo begins and one Polish mortar crew flees the town and is hit by German artillery while the second crew is captured (13-18) 1930 - One Hour to Go. The Polish Anti-Tank battery in the woods is eliminated. (13-19) The Battle for Jaslo continues. Only two Polish infantry platoons and 2 artillery batteries remain. 2000 – One Polish artillery battery is abandoned as the crews flee (12-20) 2015 - The Polish infantry platoon is reduced. It routs and is eliminated and the Polish Major is captured. (13-22) For the Polish, the Battle is Over AftermathThe Germans obtain an overwhelming major victory. Once again, the Polish are rolled by the Germans. I just seem unable to hold back the overwhelming German forces. So, I guess I’m getting the “historical” feeling of “How do I stop these Krauts?!” |
||||||||||||
| 0 Comments |
| Fun despite inbalance | ||||||||||||||
|---|---|---|---|---|---|---|---|---|---|---|---|---|---|---|
This scenario was played as a team event by my gaming group. I act as moderator and facilitator for each game, and I do not participate directly as a player. My listing of “winning” is based on the PG HQ site cannot support a neutral role in AARs. In this scenario the Poles set up on the defensive, to include minefields, some of them chemical in nature. Their mission is to prevent the Germans from advancing over the river and capturing the town. The Poles, as was typical historically, deployed in a forward defensive position. They establish a strong position in the town and wooded area in the center of the board, placing artillery back in the town east of the river. They use the mines to try and block the southern approach on the board. The Germans have no intent of using the south approach. Half the force enters in the central region and advances on the town, as the remainder enters to the north and attempts to flank the Polish position. The results are predictable. The Poles slow the center thrust, as their position is very strong. But there is insufficient force to deal with the flanking Germans, and these flankers start crumbling the Polish right. The Poles in the central town give way, and try to regroup to harass the eastward movement of the German flankers. The central German thrust cannot make headway against a line of Polish defenders supported by a porucznik with a morale modifier of 2. Inexplicably, the porucznik leaves his position, with more predictable results. The Polish position begins to disrupt, and the Germans charge in. Assaults rage through the woods, and the Germans quickly gain the upper hand. The survivors pull back to the bridge and town as quickly as possible. The smattering of Poles holding back the German flankers make for the second defensive line as well. The Germans are hot on the Polish heels, and the Germans face little problem seizing the bridge, crossing the river, and pounding the Poles before they can form a defensive position. The few remaining units fall back into town, and try to delay the inevitable. The Poles manage to hold on to a couple town hexes as the scenario closes, but the Polish casualties are through the roof. I unfortunately cannot find the score sheet for the scenario any more, but the Germans win by a huge margin. The Poles should have made their defensive line along the river in dug in positions, placing mines along the bridge approach and the riverside. Placing a spotter in the central town to direct arty fire against Germans could slow down their advance, while retaining the combat units to defend the high victory point hexes. As deployed, the mines were useless, and the Poles too easily outflanked. The withdrawal became a flight, and the Germans were able to capitalize on the chaos. I suspect the Germans are too strong, especially with the 9/8 morale, but it was still a fun scenario. |
||||||||||||||
| 0 Comments |