| Author |
thomaso827
|
| Method |
Solo |
| Victor |
United States |
| Play Date |
2015-10-16 |
| Language |
English |
| Scenario |
Saip024
|
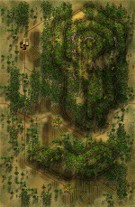
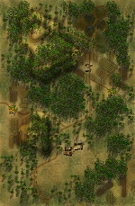
This scenario has 2 battalions of US Army troops searching out and destroying as many of the Japanese forces as possible in two hill maps. The two battalions each start on the south edge of one of the two boards, and outside of one being lead by the Colonel and the other being lead by the LTC, and the Colonel getting an extra mortar battery, they are pretty much the same. They must capture 2 or more of the 4 caves by the end of turn 30 without losing more troops than the Japanese. The I set up the Japanese guns and HMGs forward, on the west board on the forward end of the hill spine where they could observe and engage anything coming through the jungle hexes, and on the east board, at the forward edge of a central jungle mass. I placed 2 platoons of infantry to each side of the outposts, and the rest were placed further back nearer the caves. I placed 2 caves on each board, with the two on the west board on opposite sides of the hills, and on the east, one adjacent and on the hill next to the town, and the other to the north side of the northern hill mass, splitting them up and giving the Japanese infantry the opportunity to either engage the enemy forward or to fall back and defend the caves more closely. The western Army force moved along the western side of the board, skirting the openings that would allow the Japanese gun and HMG to engage them, and the eastern force moved along the border between the two boards, also skirting any opportunity for the Japanese to engage. The Japanese Mortars had been set up on a 60m hill top with a good view of the battlefield, and it fired first as an Army element stopped in an open ground hex, but caused no casualties. The Army troops were able to move a majority of their troops around the outposts, and the Japanese infantry chose to fall back and defend the caves. This left an Army mopping up team to hit both outposts and both were summarily destroyed with no losses. The Japanese casualties accumulated as Army forces put accurate fire on the defending infantry, and the first US casualties came via friendly fire when the single mortar platoon attached to the western force fired a short round, causing a step loss to an HMG platoon. Hence the title for this AAR today. The fight for the two western caves went fairly smoothly, and both caves were taken with just one more US step loss, while the Japanese didn't manage to be so lucky. In the east, the Colonel was having trouble making up his mind as to which cave to head towards, and while he was working on it, his Major and a Captain took their flame element and infantry and assisted in the taking of one of the western cave targets, rejoining the eastern force in time to surround the northernmost cave, while the Colonel and 2 LTs moved in around the cave nearer the town. Arty and mortars pinned the Japanese troops in the town while the Army moved in and assaulted the Japanese infantry who had moved into the cave. The US failed morale several times in that assault, and after casualties hit the 4 step mark for them, the US in the north held their positions surrounding the northern cave to see how the assault fared nearer the town. Good morale leaders were drawn for both sides, but the US had a marked advantage in numbers, and it told when on turn 25, the easternmost cave fell. The hex was too close for comfort to the Japanese in the town, so a small force garrisoned the cave entrance while the rest of the force moved to assault the town. Again, US morale waned and flowed but in the end, the last unit, an HMG platoon, died, leaving the Japanese LTC, a Captain and a Lieutenant standing, and the LTC and Captain managed to get away while the LT did a banzai charge at his attackers but fell to the overwhelming gunfire. 3 caves in US hands, and nearly every Japanese unit destroyed, the game ended on turn 29 because the chance of taking that last cave just didn't look like something to tempt fate with, having a very good chance of increasing US losses to a really good chance of not taking the cave in that last couple of turns. Great game.
|