
|
Hill 107 Parachutes Over Crete #1 |
||
|---|---|---|
| (Attacker) Germany | vs | New Zealand (Defender) |
| Formations Involved |
|---|

| Total | |
|---|---|
| Side 1 | 2 |
| Draw | 0 |
| Side 2 | 11 |


| Overall Rating, 11 votes |
|---|
|
2.91
|
| Scenario Rank: 768 of 913 |
| Parent Game | Parachutes Over Crete |
|---|---|
| Historicity | Historical |
| Date | 1941-05-20 |
| Start Time | 08:30 |
| Turn Count | 10 |
| Visibility | Day |
| Counters | 23 |
| Net Morale | 0 |
| Net Initiative | 2 |
| Maps | 1: 97 |
| Layout Dimensions | 43 x 28 cm 17 x 11 in |
| Play Bounty | 137 |
| AAR Bounty | 141 |
| Total Plays | 13 |
| Total AARs | 6 |
| Battle Types |
|---|
| Hill Control |
| Conditions |
|---|
| Off-board Artillery |
| Scenario Requirements & Playability | |
|---|---|
| Parachutes Over Crete | Base Game |
| Introduction |
|---|
|
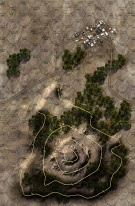
The 1st Air-Landing Assault Regiment's primary objective was the airfield just outside of Maleme, and Col. Eugen Meindl focused his brigade-sized formation's attention there. Hill 107 overlooked the airfield and were it not quickly secured, the airfield's New Zealand defenders could use it to keep the airfield under fire and prevent the landing of reinforcements and supplies. Despite its tactical importance, only a small force protected the hill. |
| Conclusion |
|---|
|
Meindl and his staff had enough gliders to land two companies; the rest of the regiment would land by parachute. Glider troops had a much better chance of attacking their objectives quickly, as they did not have to find their weapons first, and Meindl assigned them the most important tasks. He detailed one of the companies to attack the anti-aircraft batteries at the mouth of the Tavrontis River, and the other to take Hill 107. The strength of the New Zealand defense on Hill 107 surprised the Germans, and they could not push the Kiwis off the height. |

|
|
|---|
| Luftwaffe |
|---|
|


| New Zealand Army |
|---|
|


| 1 Errata Item | |
|---|---|

|
Reduce strength direct fire value be came 5-5 in Army at Dawn. (plloyd1010
on 2015 Jul 31)
|
| Close but no Cigar | ||||||||||||
|---|---|---|---|---|---|---|---|---|---|---|---|---|
As the Germans conducted a visual recon of the Obj Hill 107 they decided to maneuver their southern units to the NE in order to provide a more concentrated approach. The initial attack would be on the northern most dug-in position. The hill did not look overly strong defensively and they thought they had plenty of time to secure it. The first 1/2 hour was consumed maneuvering and building up a base of fire to to soften up the initial objective. The Kiwis decided to reinforce their hilltop position with the units positioned south of the hill. On turn three the Paras assaulted the first hex. This assault would take over three turns to resolve. The Kiwis added a rifle platoon and a HMG platoon to the fight. Resistance was stubborn. One German Platoon fled after losing a step. In the end the Paras took the position after about two-one half hours of fighting. The Kiwis lost two rifle platoons and the HMG but, all leaders fled to the next position on the hill. The Kiwis in the dug in position to the Southeast opened up on the Paras and disrupted everyone. This stalled any further advance as the Paras just couldn't reorganize in time to assault the last hex. Meanwhile, two Paras moved around the west side of the slope to engage the dug in position on the southwest hill top hex. This position must have been held by all the crack shots of the Kiwis for its opportunity fire really put a slam one of the maneuvering Para Plts. It took some time to get all in order for the platoons to assault the hex. They moved in, took the first fires like champs and demoralized all the Kiwis in the hex. And then, all hell broke loose. The Paras felt pretty cocky attacking in the next turn and that is when all hell broke loose. The demoralized Kiwis got off their first fire and demoralized every German unit in the assault hex. It was a very shocking development to say the least and with that all hopes of taking the hill in time vanished |
||||||||||||
| 0 Comments |
| Second Try |
|---|
|
This time the Paras wasted no time and went straight for the hill. The units on the North side of the hill went straight at the northern point and the units SE of the hill went straight for the dug-in position on the SE side of the hill. The thought process was the there was insufficient firepower on the hilltop to significantly impact on the assault. WRONG! On the first turn the Paras took one step loss and had two units demoralized. One of these did not recover to good order until turn 6! The other recovered to good order on turn three and couldn't get into the assault until turn 4. The first assault went into the northern Kiwis on turn 2 and it went well. However, on turn 1 the Kiwis south of the hill moved up on turn one and into the northern position on turn 2. This move resulted in an assault combat that lasted until the end of turn seven. By the time it was over, all Kiwis had been killed but the Paras had lost two rifle platoons themselves. It was not looking good for the Paras. And then a small miracle happened. The 81mm mortar was able to fire with significant affect on the Kiwi SW position demoralizing all in the hex. The Paras assaulted on turn eight and mopped up. Meanwhile the battle continued to rage for the SE Kiwi position with neither side gaining an advantage. On turn 9 the Paras mustered their remaining resources and reinforced their assault into the remaining Kiwi position with another rifle platoon. The HMG platoon spent turn 9 recovering to good order. The reinforced assault had some affect and softened up the Kiwis just enough for the HMG platoon to make an appearance on turn 10 that resulted the liquidation of the last Kiwi position. |
| 0 Comments |
| Parachutes Over Crete: scenario #1: Hill 107 | ||||||||||||
|---|---|---|---|---|---|---|---|---|---|---|---|---|
Parachutes Over Crete: scenario #1: Hill 107 I played my second scenario from Parachutes Over Crete today and it happened to be scenario #1, only because I am really busy today and needed a fast playing low unit and turn count. So I got my play in early this morning. Pretty straight forward, the Germans need to take control of all the New Zealand controlled 80-meter hill hexes. Both the Germans and the New Zealand forces start with two groups of combat units. The thing is the, the New Zealanders already control the high ground and some have already dug-in. The ten turn scenario turned into a bloody slugfest. The difference in the game was, twice the New Zealand forces rolled 12s on the dice in critical moments, once in an assault and once on adjacent direct-fire. The New Zealander forces still controlled the heights for the victory. The causalities were two New Zealand step and one leader and the Germans lost four steps and a leader in their quest to take the heights. |
||||||||||||
| 0 Comments |
| Not Enough German Firepower | ||||||||||||
|---|---|---|---|---|---|---|---|---|---|---|---|---|
A very small scenario at 23 counters and 10 turns. The Kiwis drew a pretty good leader mix: an 11-2-2 lieutenant and a 10-1-1 captain. Everything else was. rated 9 with modifiers. Their objective was simple. Hold onto the 80 m hill. Two out of three hexes were dug-in eligible. The one that was not eligible was broken ground. The Germans drew a mediocre leader drew. No leader rated above a 9, although they did get a 9-1-2 lieutenant. The Kiwi strategy was one of patience. Their force was very small, only five platoons and an HMG. They let the Germans come to them. The Germans had only five paratrooper platoons, a MG and a mortar with which to attack the fortified hill. Their objective was to capture the three 80 m hexes of Hill 107. To do this in 10 turns seemed a very daunting task, if not impossible. They knew they would have to aggressively assault the Kiwi positions due to the short length of the game. They made their first contact on turn three. Now on set up rule for the Germans plagued their attack plans. The force was divided into two groups; one north of the hill and the other on the east side of the hill. Unless they consolidated their positions, which would be quite taxing on their timetable, they found that charging straight forward was their oniy other option. They lost two steps in the northern group before they reached the Kiwi positrons on top of the hill. In addition, one leader was demoralized. Another platoon also suffered demoralization. But they still pressed forward, even with the half-platoons. These 3-3 half units still were part of the assault group against the northern 80 m hex. This attack was against a Kiwi position that was not dug-in, but had rocky terrain, making it almost as difficult to attack. The 11-2-2 lieutenant was part of this stack, swhich was completed by two infantry platoons and 8-0-1 major. The Germans assault on this hex featured the two half platoons, a full platoon and a 9-1-0 captain. A 9-0-1 lieutenant also was part of the attack here. But the dice did not favor the Germans. There were no good rolls. They needed at least some 2s or 12s, if not 3s or 11s that would have weakened the Kiwis. As a result, both assaults (on the northern and eastern hexes) just did not produce step losses . The Germans were successful In assaulting the Kiwi positions unmolested (After the initialA losses), but this is where the attacks stalled. After turn 4, The two major assaults, the northern att could not produce any decisive results. One move that helped the defenders!’9 on the 80m eastern hex: they restored this defense to full good order (2 inf. platoons). This occurred on turn 8, and was a blow to the Germans. It was obvious the Germans would not win the game, It was stopped in the eighth turn. Final tally of step losses: New Zealand 0, Germany 2. |
||||||||||||
| 0 Comments |
| Try as I might - The Kiwis Held that Darn Hill to the End | ||||||||||||||
|---|---|---|---|---|---|---|---|---|---|---|---|---|---|---|
I played the German commander in my first scenario from Parachutes Over Crete over 3-sessions with the determined Treadasauuus leading the defending New Zealand side. This turned into a loss for the German paratroopers that were unable to dislodge the Kiwis from Hill 107, overlooking the air field. This was a relatively quick battle, made quicker due to the poor quality of the Germans leaders I drew, compared with the decent Allied leaders that my doughty opponent drew. This turned into a very a bloody slugfest, as others have reported. By the end, the Kiwis only lost 2 steps, but the Germans lost 6 steps and their senior leader. This gamey scenario and unbalanced is okay for solitaire play. |
||||||||||||||
| 0 Comments |
| Introductory gamebit | ||||||||||||
|---|---|---|---|---|---|---|---|---|---|---|---|---|
Despite a sterling effort to dislodge the NZ forces from the hill top, it was for no result worth a darn. (It did run a bit close, however.) I suspect that this scenario was supposed to be a "break in" for newbies in the genre. |
||||||||||||
| 0 Comments |