
|
A Strategic Hill Little Saturn #1 |
||
|---|---|---|
| (Defender) Italy | vs | Soviet Union (Attacker) |
| Formations Involved | ||
|---|---|---|
| Italy |  |
37º Reggimento Fanteria "Ravenna" |
| Italy |  |
3ª Divisone Fanteria "Ravenna" |
| Soviet Union |  |
58th Guards Rifle Division |

| Total | |
|---|---|
| Side 1 | 0 |
| Draw | 4 |
| Side 2 | 0 |


| Overall Rating, 4 votes |
|---|
|
4
|
| Scenario Rank: --- of 913 |
| Parent Game | Little Saturn |
|---|---|
| Historicity | Historical |
| Date | 1942-08-20 |
| Start Time | 09:30 |
| Turn Count | 20 |
| Visibility | Day |
| Counters | 80 |
| Net Morale | 0 |
| Net Initiative | 1 |
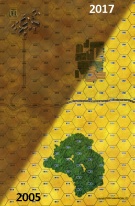
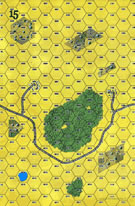
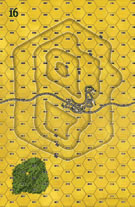
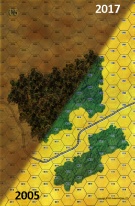
| Maps | 4: 1, 15, 16, 6 |
| Layout Dimensions | 86 x 56 cm 34 x 22 in |
| Play Bounty | 176 |
| AAR Bounty | 165 |
| Total Plays | 4 |
| Total AARs | 2 |
| Battle Types |
|---|
| Hill Control |
| Conditions |
|---|
| Off-board Artillery |
| Randomly-drawn Aircraft |
| Reinforcements |
| Terrain Mods |
| Scenario Requirements & Playability | |
|---|---|
| Eastern Front | Maps + Counters |
| Fronte Russo | Counters |
| Little Saturn | Base Game |
| Road to Berlin | Maps |
| Introduction |
|---|
|
The German 294th Infantry Division had battled along the Don River for the Werch Mamon salient during the final part of July. This salient measured approximately ten kilometers deep and six wide. Although the Soviets had not been completely repulsed, the Wehrmacht still seized a strategic height (Hill 220) that dominated the whole area. From this position, the Germans possessed an unobstructed view over a great length of the Don River. But the Soviets could not be expected to give up so easily, and throughout this period continued launching attacks for control of the vital Don bridgeheads. The Italian Ravenna Division reached the front in early August and was soon handed the defense of the salient. On August 20th, after a few days of quiet, the Soviets proved they were still determined to gain a solid foothold on the south bank of the river. Despite being on site for a few days, the Italians had not yet consolidated their defensive positions. |
| Conclusion |
|---|
|
During the early hours of the day the Ravenna Division repulsed three consecutive attacks with minor losses thanks to accurate and timely artillery fire. A fourth attack at 0930 earned more success, and the Italians started to fall back. At that point the regimental reserve rallied the hard-pressed 2nd Battalion. Their wheeling maneuver threatened to surround the whole attacking force, convincing the Soviets to withdraw in disorder. Hill 220 was heavily attacked again the two following days. Although the Italian lines held, losses were mounting and there were no available reserves with the exception of two Blackshirt brigades attached at the corps level, whose use had to be authorized by the army command. Ravenna's staff eventually decided it was too costly to keep defending Hill 220, so the occupied zone in the salient was shrunk. This decision would have fatal consequences four months later as the Italians were no longer able to spot and keep under fire the Soviet forces in the bridgehead. The Red Army would launch its main strike from exactly this area during Operation Little Saturn. |

|
|
|---|
| Regio Esercito |
|---|
|


| Army (RKKA) |
|---|
|


| 3 Errata Items | |
|---|---|
| Scen 1 |
All references to board 5 in the victory conditions should be board 15. (ricer
on 2011 Jun 19)
|

|
The reduced direct fire value in Kursk: Burning Tigers is 4-4. (plloyd1010
on 2015 Jul 31)
|

|
Kommissars never get morale or combat modifiers. Ignore misprints. (Shad
on 2010 Dec 15)
|
| Tombstone Hill | ||||||||||||
|---|---|---|---|---|---|---|---|---|---|---|---|---|
The Italians centered their defense on the two hilltops. The Russians advanced from the river and from the forest on the northwest side of the hill, with mortars in support in the center. The Soviets never really got to attack in the strength needed as they were disrupted/demoralized crossing the open ground in front of the hill. Low Soviet morale didn’t help recovery. The Soviets lacked the strength to take the initial Italian positions before Italian reinforcements arrived. Th resulting scrum lefts both sides on the hill, resulting in a draw. |
||||||||||||
| 0 Comments |
| Lucha sin cuartel por la cota 80 |
|---|
|
Este escenario tiene lugar el 20 de agosto de 1942, por lo tanto antes de que empiece propiamente la operación "Pequeño Saturno", pero no obstante es el prolegómeno de la lucha terrible que iba a entablarse pocos meses después a orillas del río Don. Ahora dos batallones italianos (uno de ellos entra en el campo de batalla como refuerzo mediado el combate) deben defender una colina de gran importancia estratégica junto al río Don. Los soviéticos atacan con fuerzas del ejército regular con efectivos equivalentes a dos batallones reforzados. Tanto italianos como soviéticos tienen el apoyo de morteros y artillería fuera del tablero (off-board). Todos los efectivos iniciales italianos (un batallón) despliegan en la colina al suroeste del campo de batalla, protegidos en pozos de tirador y en cuatro posiciones atrincheradas. Ambos bandos tienen una moral muy similar (7/6 y 7/5). Los soviéticos atacan desde el primer momento desde varios puntos, tras una cortina de artillería y fuego de morteros. Lamentablemente los morteros soviéticos no están bien enmascarados, por lo que inmediatamente atraen el fuego de la artillería y de los morteros italianos, que destruyen dos baterías. Este hecho va a tener una importancia decisiva, ya que restará significativamente fuego de apoyo a los atacantes. Pronto empiezan a producirse las primeras bajas y desmoralizaciones y el combate entra en una fase caótica. Los soviéticos se aprovechan de su superioridad numérica para desalojar a los italianos de varias posiciones y de dos de las cuatro trincheras, aunque para ello pagan un precio terrible. Cuando la situación empieza a ser desesperada para los italianos se produce la entrada del batallón de refuerzo, con lo que el combate se equilibra. La artillería soviética, más potente, hace estragos entre los recién llegados. En cierto momento los italianos pierden 13 "steps" de bajas, lo que impide que puedan ganar la batalla. Los soviéticos, en cambio, aún pueden ganar, siempre y cuando consigan desalojar completamente al enemigo del nivel 80 de la colina. Es en este momento cuando la lucha alcanza su momento álgido, con desesperados ataques de los soviéticos y no menos desesperados esfuerzos de los italianos por defender su última posición en el nivel 80: un hex atrincherado. Este hex es blanco de la artillería soviética y en algún momento todos sus ocupantes quedan desmoralizados, pero el comandante italiano consigue hacer llegar refuerzos y al final, in extremis, mantiene la posición en su poder. Empate. Partida emocionantísima, donde prácticamente hasta la última tirada de dados no se sabe el desenlace. Por emoción y diversión valoraría este escenario con un 5, pero por falta de realismo lo dejo en un 3. Digo por falta de realismo porque al final las bajas son tremendas y dudo que un comandante en su sano juicio se aventurara en la vida real a lanzar ataques tan desesperados y dejar prácticamente fuera de combate a sus fuerzas para conseguir un objetivo táctico limitado. |
| 0 Comments |