|
Kilay Ridge Leyte '44 #27 |
||
|---|---|---|
| (Attacker) Japan | vs | United States (Defender) |
| Formations Involved |
|---|

| Total | |
|---|---|
| Side 1 | 1 |
| Draw | 1 |
| Side 2 | 0 |
| Overall Rating, 3 votes |
|---|
|
3.33
|
| Scenario Rank: --- of 913 |
| Parent Game | Leyte '44 |
|---|---|
| Historicity | Historical |
| Date | 1944-11-28 |
| Start Time | 19:30 |
| Turn Count | 18 |
| Visibility | Night |
| Counters | 40 |
| Net Morale | 0 |
| Net Initiative | 1 |
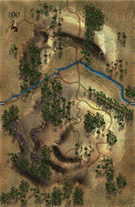
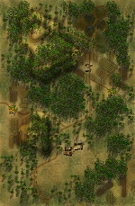
| Maps | 2: 100, 83 |
| Layout Dimensions | 56 x 43 cm 22 x 17 in |
| Play Bounty | 160 |
| AAR Bounty | 165 |
| Total Plays | 2 |
| Total AARs | 2 |
| Battle Types |
|---|
| Hill Control |
| Inflict Enemy Casualties |
| Road Control |
| Conditions |
|---|
| Off-board Artillery |
| Reinforcements |
| Smoke |
| Illumination |
| Scenario Requirements & Playability | |
|---|---|
| Leyte '44 | Base Game |
| Marianas 1944 | Maps |
| Saipan 1944 | Maps + Counters |
| Introduction |
|---|
|
Kilay Ridge stood to the south of Breakneck and Corkscrew Ridges, astride the road leading down the Ormoc Valley to the port of Ormoc itself. Repeated attacks against the ridge failed to dislodge the Japanese, who resorted to evening counter-attacks in hopes of catching the Americans while they were tired from the day’s fighting and seeking their dinner and sleep. |
| Conclusion |
|---|
|
A night of fierce close-quarters fighting including hand-to-hand struggles with bayonets found the Japanese in possession of about half of the ridge and the Americans clinging to the rest. American ammunition parties could not get through the Japanese ring of fire, but somehow the cooks bearing Thanksgiving dinner made it to the front lines, unaware of the Japanese assault. The Japanese clung to their gains for days, until the Americans applied large-scale reinforcements and a great deal of artillery fire to finally eject them. |
| 2 Errata Items | |
|---|---|
| Scen 27 |
The Japanese set up second. (rerathbun
on 2020 Dec 21)
|
| Scen 27 |
Under Victory Conditions, the third bullet should read "hill hexes are Japanese-controlled" (rerathbun
on 2020 Dec 21)
|
| Leyte 1944, Scenario Twenty-Seven: Kilay Ridge | ||||||||||||
|---|---|---|---|---|---|---|---|---|---|---|---|---|
Leyte 1944, Scenario Twenty-Seven: Kilay Ridge Interesting scenario, the Japanese are attacking at night with about a 3 to 1 advantage. I Japanese didn’t start out very well but recovered quickly and started assaulting hexes in American lines and kept feeding in new units when some would become disrupted or demoralized. They had to drag their 70mm gun unit down the trail with an infantry unit which took about five turns to get into position. The Americans get a small reinforcement group on turn five but instead of defending the road they came to the aid of fellow American units fighting it out in assaults and the Japanese have the advantage in this type of combat, especially when they have the numbers advantage. I thought the Japanese could get 1 or 2 of their victory objectives but they got all three for a Major Japanese Victory. Some good dice rolls helped and the American shouldn’t have tried to defend both the east-west road and the 60mm hill hexes at the same time, this spread them out too thin. Defending one of them might have given them a minor victory. Next time! Errata for this scenario: The Japanese setup second. Under the victory condition for the Japanese it should say all 60-meter hexes are Japanese controlled at the end of play not American. |
||||||||||||
| 0 Comments |
| Night Terrors | ||||||||||||||
|---|---|---|---|---|---|---|---|---|---|---|---|---|---|---|
This was a nasty, brutal, nocturnal struggle played over 2 face-to-face sessions with a very aggressive, face-to-face, rookie opponent leading the American side. We did not use the FOW rule, but did play with the illumination/smoke and the consolidation rule. The numerous Japanese troops attacked the substantially outnumbered US defenders at night. As others have reported, the Japanese began close assaults as soon they came close enough to bear on the American defensive positions. The Japanese were continually feeding in new units when the assaulting stacks become disrupted or demoralized. Both sides had poor leader draws, but the Japanese had a slight advantage in having more leaders with combat modifiers, hence allowing multi-hex fire fights and better-supported assaults. The American Commander received limited reinforcements on Turn 5 but instead of trying to defend the crucial road these units launched themselves into a series of mostly unsuccessful, counter attacks via close assault, or they reinforced their comrades in previously-existing assault hexes. The American Commander sagely did not try to defend both the east-west road and the ridgetop hexes, but instead focused on merely holding – or retaking – as many of the 60-meter hill hexes as possible. This effort was hampered by a number of seriously poor morale die rolls in the face of the majority of Japanese units remaining in relatively good order for the bulk of this play-through. In the end, neither side was able to fully achieve all of their victory conditions, resulting in a drawn battle. This scenario’s victory conditions are flawed: The Japanese conditions should specify that all 60-meter contour hexes must be Japanese-controlled by the end of the scenario. |
||||||||||||||
| 0 Comments |

 Leyt026


