
|
Delaying Tactics, Part One Kokoda Trail #13 |
||
|---|---|---|
| (Defender) Australia | vs | Japan (Attacker) |
| Formations Involved | ||
|---|---|---|
| Australia |  |
21st Infantry Brigade |
| Japan |  |
41st Infantry Regiment |

| Total | |
|---|---|
| Side 1 | 1 |
| Draw | 1 |
| Side 2 | 3 |


| Overall Rating, 5 votes |
|---|
|
3.6
|
| Scenario Rank: 333 of 913 |
| Parent Game | Kokoda Trail |
|---|---|
| Historicity | Historical |
| Date | 1942-09-02 |
| Start Time | 08:00 |
| Turn Count | 20 |
| Visibility | Day |
| Counters | 49 |
| Net Morale | 1 |
| Net Initiative | 1 |
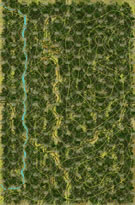
| Maps | 1: 35 |
| Layout Dimensions | 43 x 28 cm 17 x 11 in |
| Play Bounty | 135 |
| AAR Bounty | 153 |
| Total Plays | 5 |
| Total AARs | 4 |
| Battle Types |
|---|
| Delaying Action |
| Road Control |
| Urban Assault |
| Conditions |
|---|
| Terrain Mods |
| Scenario Requirements & Playability | |
|---|---|
| Afrika Korps | Counters |
| Guadalcanal | Counters |
| Kokoda Trail | Base Game |
| Introduction |
|---|
|
After Isurava, while Brigadier Potts tried to find a new defensive position and get more fresh troops up the trail from Port Moresby, Maj. Gen. Horii assigned the two newly-arrived battalions of 41st Regiment to lead the pursuit of the Australians and keep the pressure on. With supplies dwindling and events on Guadalcanal coming to a head, he needed this campaign decided soon. |
| Conclusion |
|---|
|
Though they kept the Japanese busy in several running battles through the Kokoda Gap, the Australians were unable to put any distance between them and the Japanese before reaching their next defensive line at Efogi. |

|
|
|---|
| Army |
|---|
|


| Imperial Japanese Army |
|---|
|


| Assaults Aplenty |
|---|
|
Aussies set up in village while Japanese advanced south en masse. Remainder of Aussies made their way north up the trail. Both sides formed lines near the village and intense fighting broke out. Half way through the game there were four assaults taking place and the game was very much in doubt. The Aussies were able to hold out until with only three turns to go, the Japanese broke through and advanced along the trail. The final score of 36-10 doesn't reflect how close this game was as the Japanese grabbed many of their points at the end when they advanced swiftly down the trail to gain control of trail hexes. A fun scenario that makes for a very close game. |
| 0 Comments |
| Delaying Slowly | ||||||||||||
|---|---|---|---|---|---|---|---|---|---|---|---|---|
Japanese enter from the north end of the map trying to take the village and trail as far as possible in 20 turns. Australians set up with 5 Infantry, 2 HMGs and 3 leaders on board in or around the village and another similar group enter from the south. The northern group of Australians held the village for 6 turns before falling back to avoid being surrounded, which gave the reinforcements time to get up the trail and fan out to extend a defensive line to either side of the trail. Both sides took turns exchanging casualties, but the Australians got the worst of it as they kept the Japanese from getting much past the middle of the board. The Japanese that did manage to flank the defenders got bogged down in assaults and didn't get into contact with the trail. Several Australians managed to maintain their strength to the last, even doing step losses and demoralizations to larger forces of Japanese infantry in assault, even after losing their leaders. In the end, Australia lost 12 steps and 2 leaders and Japan lost 7 steps and no leaders, but there were many units on the board in rough shape that would not be moving any time soon. With a couple of trail hexes contested in assault, the Australians controlled 9 to the Japanese control of 12 more, so a victory point total of 24 for Japan to 16 for Australia, leading to a minor Japanese victory. With a bit different results in several attacks, it could easily have gone the other way. |
||||||||||||
| 0 Comments |
| Delaying Tactics Work (sort of) for the Australians |
|---|
|
Japanese with superior force and morale are attacking from the north along a single trail. Australians must delay them. Sides get points for eliminating enemy steps and holding trail/village hexes. The Australians set up in the village near the north end of the board, and the Japanese approach in single file along the trail. The Japanese take a couple of disruptions from Opportunity Fire on the approach, then get stuck into assaults all along the Australian front. The Japanese get the better of the assaults, but it takes time to wear out the defenders. Almost three hours elapse before the Australians are forced out of the village, and they manage to retreat in pretty good order and continue to block the trail. Two reduced platoons left in the village perform magnificently, one holding out for an hour and the other for almost two. They kept several Japanese units from getting down the trail to take on the remaining Aussies. In the end, the Japanese hold the entire village, but not much beyond it. Australian casualties are heavier, but not enough to make a difference. Final score, Australians up by one for a draw. This was a good scenario. The Australians seemed to be on the edge of disaster for most of the game, but pulled out a draw at the end. This one may favor the Japanese somewhat. |
| 0 Comments |
| Surrounded | ||||||||||||||
|---|---|---|---|---|---|---|---|---|---|---|---|---|---|---|
On to the seventh battle of the Kokoda campaign. As I rate scenarios, the ratings will be based on the scenario as a stand alone scenario, not part of the campaign. I’m not sure if early scenarios benefit one side with the intent to gain a point lead, with later scenarios designed to close that gap, so I need to consider each as a stand alone. The Australians are trying to delay the advance of the Japanese troops. They start with half their forces on the map near the village, and the remainder enter from the south. The Japanese, who are numerically superior, but do not have the luxury of HMGs (Aussies get four), enter from the north. Victory is based on step losses and trail/village hexes controlled. My opponent starts his on map units in the village, and advancing down the trail will have me staring down the barrels of HMGs supported by two Inf. My opponent is very used to my Japanese strategy of move near en masse, rush the defenders with everything, suck up Australian direct fire, and then pounce in assault. This time I decide to completely change things up, confusing my opponent. I send my troops through the jungle and begin to move around both sides of the village and continue moving parallel to the trail, leaving a small force to the north to threaten any moves out of the village. In fact, by turn ten (out of 20) I have yet to move adjacent to an Australian. But his intent to hold the village and defend the trail is thinning out his defenses. Finally on turn 11 I decide he is thin enough just south of the village. I send four stacks adjacent to three stacks of troops he has just moved, and prepare for assault without taking fire. On turn 12 I get a miracle initiative roll, and have three activations before his first. I go in with three assaults. Long and short, one goes my way quickly, one goes my way gradually, and the third goes my way slowly. But they all go my way, and he loses several units in the assaults. By this time we are both stretched over the length of the board, I hold both ends of the trail, and I am slowly picking off trail hexes in a game of maneuver, assisted by the troops that win their assault hexes. He has plenty of HMGs, and I’ve learned to respect them. The remaining turns are spent mostly in maneuver, with him picking off a step of mine and vice versa during the moves. In the end, I pick up 16 trail or village hexes while inflicting 13 steps, while he keeps four hexes while inflicting three steps. A major Japanese victory. End score for the scenario, Japanese 29, Australians 7. Rated this scenario as a 3. Having a scenario where the Japanese used maneuver for the first half of the scenario without a shot being fired was pretty neat. But the Australians are significantly outnumbered, and can soon be spread thin. The village hexes are a great defensive position, but defending them might not be the best bet in the end. Slowly yielding them to maintain a defense line further south might prevent a Japanese end run. And that would drive the Japanese back to assault tactics, which can be messy against HMGs. But in the end I think the Australians might be playing for a draw in this scenario. If they give ground, the Japanese score points. If they don’t, they get flanked and the Japanese score points. Good scenario, and I enjoyed it, but perhaps a little balance issue. Campaign score: Japanese 221, Australians 43. |
||||||||||||||
| 0 Comments |