
|
Isurava, Day One Kokoda Trail #8 |
||
|---|---|---|
| (Defender) Australia | vs | Japan (Attacker) |
| Formations Involved | ||
|---|---|---|
| Australia |  |
2/14th Infantry Battalion |
| Australia |  |
39th "Hawthorn-Kew" Infantry Battalion |
| Australia |  |
53rd “West Sydney” Infantry Battalion |
| Japan |  |
144th Infantry Regiment |

| Total | |
|---|---|
| Side 1 | 0 |
| Draw | 1 |
| Side 2 | 5 |


| Overall Rating, 5 votes |
|---|
|
3.4
|
| Scenario Rank: 477 of 913 |
| Parent Game | Kokoda Trail |
|---|---|
| Historicity | Historical |
| Date | 1942-08-27 |
| Start Time | 08:00 |
| Turn Count | 24 |
| Visibility | Day |
| Counters | 79 |
| Net Morale | 2 |
| Net Initiative | 2 |
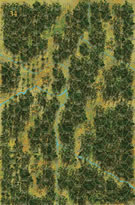
| Maps | 1: 34 |
| Layout Dimensions | 43 x 28 cm 17 x 11 in |
| Play Bounty | 144 |
| AAR Bounty | 159 |
| Total Plays | 6 |
| Total AARs | 3 |
| Battle Types |
|---|
| Ambush |
| Urban Assault |
| Conditions |
|---|
| Hidden Units |
| Terrain Mods |
| Scenario Requirements & Playability | |
|---|---|
| Afrika Korps | Counters |
| Guadalcanal | Counters |
| Kokoda Trail | Base Game |
| Introduction |
|---|
|
By the 27th of August (after several days of increasing pressure against Australian patrols), Maj. Gen. Tomitaro Horii was ready to kick off the renewed Japanese offensive. By now his South Seas Detachment had grown to include all three battalions of 141st Infantry Regiment, and two more battalions of 41st Infantry Regiment were only days away. The Australians had only two complete infantry battalions in the area: the battle-tested 39th and the green 53rd. The first company from the veteran 2/14th Battalion had arrived the night before, but the remaining companies of 2/14th and all of 2/16th were still strung-out along the Track. Unaware of the actual Japanese strength, the on-site commander Brigadier Potts decided to try and seize the initiative by sending 53rd Battalion up the eastern trail while using 39th and whatever parts of 2/14th arrived to hold the Japanese forces at Isurava. The 2/16th could take over the reserve role at Alola as they arrived during the next few days. |
| Conclusion |
|---|
|
Thirty-Ninth Infantry Battalion had used the two week lull to rebuild their ammunition stores and create firing lanes on the main approaches to Isurava village. It was enough to hold fast against the first probing attacks mounted by Maj. Gen. Horii. However, the green 53rd Battalion lost several of its officers in the first moments of contact and subsequently broke and scattered into the jungle. That gave Horii a perfect route to flank the Australians at Isurava, but he failed to take advantage of it. |
| Additional Notes |
|---|
|
All Allied units are Australian, but British INF and HMG pieces are used for the 21st Brigade to differentiate them from the lower-morale 39th and 53rd battalions. |

|
|
|---|
| Army |
|---|
|


| Imperial Japanese Army |
|---|
|


| Failed Fighting Withdrawal | ||||||||||||
|---|---|---|---|---|---|---|---|---|---|---|---|---|
This scenario has about a battalion of Japanese troops attacking 3 surviving groups, little over 2 companies, while those Australian troops try to hold 3 villages. The northernmost village has fire-lanes cut in the jungle hexes allowing British troops to fire through the jungle hexes out to 3 hexes. The other villages don't have this, so depend on firepower and morale to hold out. The fire lanes did little good as the fire from Israva's defenders failed to hit anything. Japanese came in from the north edge in 3 companies with the battalion command, mortars and reserve coming in down the middle with the central company. The western company worked it's way around to the Australian left and succeeded in getting past Isurava while the central company moved forward and started low firepower but accurate direct fire, pushing most of the Isurava force out and killing about half of it with several officers. The LTC commanding that force was the last leader to die, with several reduced platoons fleeing to finally be rallied by the higher morale leaders holding the southwestern village. The Japanese left got into position to attack the Australians in the east-central village next, and attacking village by village allowed the mortars to keep up effective fire without having to split their fire between multiple targets. The second village was held much longer, with the LTC and a sinlge step being pushed out on turn 21, where even the battalion commander and reserve became involved in the action and finally managed to eliminate the last members of that Australian force. Japanese troops managed to start engaging the southwestern village by turn 14, but got bogged down with the slightly higher morale troops there. With the mortars finally able to focus on the Australian defenders there, the outer defenses were being pushed back and the village was tied up in assault, but right to the last die rolls, the Australians there just wouldn't give up, keeping ownership of that last village in question to the bitter end. Japanese just didn't take the casualties the Australians did and with 33 points to 12 just for casualties, the Japanese didn't have any problem when adding the 15 points for captured villages to end in a Major Victory. Great game. |
||||||||||||
| 0 Comments |
| A valiant but doomed defense |
|---|
|
In this scenario the Australians are defending the six villages on the map (start with five, and one in no man’s land), while the Japanese must take villages. Points are awarded for villages controlled (3) and enemy steps inflicted (1). While the Japanese enter the map, the Australians immediately occupy Missima, the northern-most village on their right flank. The Japanese are getting in their own way trying to get on the map, and entry is slow. They divide, with a larger contingent going against Missima, and the smaller contingent going towards Isurava (northern-most on the left). The Japanese quickly assault Missima, and start out poorly. Australian troops line the trail most of the way back to Asigara, and the Japanese attempt to flank, and launch assaults up the length of the trail, sending a small force to try and get behind Isuarava. The Isurava force moves slow, fearing hidden Australians units. Eventually they spot the hidden units (and waste some firepower), but hesitate to rush Isurava due to firing lanes. Mortars perform poorly, but cause just enough disruption in combo with direct fire to allow the Japanese charge. While the Missima force holds well, a heavy exchange of casualties outside and in Isurava favors the Japanese, and on turn 18 they finally take the village. Australian reinforcements near the Rest House exact a heavy toll on the Japanese occupiers, blasting multiple steps and sowing discord over a couple turns until the Japanese can finally threaten their flanks and force a withdrawal to the Rest House. Missima falls on turn 19 (finally!), and the Japanese push on to Asigara. A wickedly successful assault on Asigara blows the defending Aussies away, and on turn 22 Asigara belongs to the Japanese. Exhaustion and low ammo causes the Japanese to halt their advance, and the Australians hunker down in the last three villages. Three villages to both sides, but due to Australian losses the final score is Japanese 38, Australians 19. I rated this a 3. The action was great, I enjoyed the scenario, and the geographical goals worked very nice. However, the 7/6 morale of most of the Australian troops is devastating. The Japanese just rolled through Australian troops, and stacked up a huge body count. From a pure geographical objective standpoint it is an excellent scenario, but the step count objective really slants this in favor of the Japanese. A strong 3, but I’d hate to be Australian in a head to head. |
| 0 Comments |
| Unbalanced Isurava |
|---|
|
The Australians are tasked with defending Isurava against a larger force of Japanese. They must also defend a parallel track to keep the Japanese from circling around their flank and surrounding them. Sides gain victory points for holding villages and destroying enemy steps. The Australians rolled poorly for most of the game (never above 4 on the Assault Combat Chart and usually in the middle of the Direct Fire table), but the real problem was the size of the Japanese force and their morale. The Japanese could assault almost with impunity, since they regularly got +3 columns due to morale, leaders and the Japanese infantry assault bonus. Any Japanese units not killed outright recovered quickly even if demoralized, which they rarely were. By halfway through the scenario, the Japanese had captured three of six villages and wiped out 25 Australian steps for the loss of four Japanese. I do plan to try this one again with different morale levels. The Australian 39th Infantry Battalion fought very well at Isurava, despite being exhausted from jungle living and continuous fighting. They held the Japanese the entire day with some help from the 2/14th. I'm going to try this with 8/8 morale for the 39th, and hope that that and better die rolling will give them a fighting chance. Why do I care enough to try this again? I just finished reading Those Ragged Bloody Heroes by Peter Brune and I really admire what the Australians accomplished in slowing and eventually stopping the Japanese in appalling conditions. My personal opinion is that the 39th's assigned 7/6 morale is an insult to those brave men. |
| 0 Comments |