
|
Escape from Oivi Kokoda Campaign #4 |
||
|---|---|---|
| (Defender) Australia | vs | Japan (Attacker) |
| Formations Involved | ||
|---|---|---|
| Australia |  |
39th "Hawthorn-Kew" Infantry Battalion |
| Australia |  |
Papuan Infantry Battalion |
| Japan |  |
144th Infantry Regiment |
| Japan |  |
15th Independent Engineer Regiment |

| Total | |
|---|---|
| Side 1 | 2 |
| Draw | 0 |
| Side 2 | 7 |


| Overall Rating, 10 votes |
|---|
|
3.4
|
| Scenario Rank: 490 of 913 |
| Parent Game | Kokoda Campaign |
|---|---|
| Historicity | Historical |
| Date | 1942-07-26 |
| Start Time | 18:00 |
| Turn Count | 8 |
| Visibility | Day |
| Counters | 20 |
| Net Morale | 2 |
| Net Initiative | 1 |
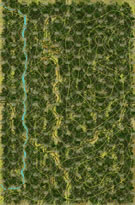
| Maps | 1: 35 |
| Layout Dimensions | 43 x 28 cm 17 x 11 in |
| Play Bounty | 136 |
| AAR Bounty | 159 |
| Total Plays | 9 |
| Total AARs | 3 |
| Battle Types |
|---|
| Exit the Battle Area |
| Rear Guard |
| Scenario Requirements & Playability | |
|---|---|
| Kokoda Campaign | Base Game |
| Introduction |
|---|
|
When the Yokoyama Advanced Detachment landed at Buna on 21 July 1942, the only Australian troops on the north side of the Owen Stanley Mountains were Company B of the 39th Infantry Battalion and scattered native troops of the Papuan Infantry Battalion. Col. Yokoyama quickly organized his own 15th Independent Engineer Regiment along with the 1st Battalion of 144th Regiment and began pushing toward his objective of Kokoda. The greatly outnumbered Australian forces elected to destroy supplies and facilities before withdrawing back into the hills toward Kokoda. As efforts began to airlift additional reinforcements into Kokoda airstrip on 26th July 1942, Lt. Col. Owen, commander of the 39th Infantry Battalion, sent the airlifted troops from Company D forward to join the retreating Company B. |
| Conclusion |
|---|
|
In a preview of the many engagements to come, the Japanese infiltrated past the tightly bunched Australian forces and completely surrounded them. Captain Sam Templeton, commander of B Company, was killed early in the engagement, but eventually most of the green Australians managed to escape through the Japanese lines. Lance Corporal Sanopa of the Papuan Infantry Battalion led most of the Australian forces down a steep defile to the stream below the village before circling around into the jungle and heading back to Kokoda. |

|
|
|---|
| Army |
|---|
|


| Imperial Japanese Army |
|---|
|


| The Great Race |
|---|
|
Reading the scenario setup, it quickly became obvious that controlling initiative was going to be the key to an Australian victory. Being outgunned and way behind in the race to the west map edge, they needed a head start. And they got it. The Australians won initiative and managed to get close to the all-important crossroads before the Japanese could bring units onto the board. The problem was that they couldn't get past the crossroads before opposition could arrive. The two squads coming in from the west managed to get into position for some covering fire and then escape once the other three wiggled through a hole in the Japanese defenses. Some epically bad fire table rolls (7 anyone?) only helped with the great escape and the Australian victory. |
| 0 Comments |
| Next time, bring a map |
|---|
|
An interesting scenario. The Aussies start with 3 units and 2 leaders in the front village. One of the leaders is a local Sergeant, who moves faster than normal, and he and units stacked with him treat jungle as heavy jungle. They also get 2 platoons that enter from the west edge. The Australian objective is to get troops off the west edge. Yes, you read that correctly. Those units can enter and leave right away to help the Australians...but there's a catch. The Japanese enter from the North, East and South, and if the Australians just bring those units on and retreat them, the troops in the village probably won't escape, and that will give the Japanese a victory. I sent 2 stacks of Japanese towards the village, and 1 stack each from the North and South. The Australians left one platoon as a rear guard in the village, while the other 2 went with the sergeant towards the west edge. It took the Japanese a few turns to clear the village, and most of the fighting was around the crossroads near the west edge. Here, Japanese luck went sour. The Australians got 1st fire in assault, and despite 9/8 morale, the Japanese broke and/or reduced in droves. The stack engaging the Australians who entered from the west lost its officer to Seppuku (well, desertion, and this is a Japanese force) which meant they couldn't assault the Australians to pin them in place. The stack with the sergeant, having the upper hand in the assault, disengaged, the the Japanese missed with their free shot. With the ability to treat jungle as light jungle, they dashed for the exit. All told, the Australians extracted most of their force as they had historically, and won it 9-2. this is a fast, small scenario and was a lot of fun. I can see it being played FtF in an hour or so. |
| 0 Comments |
| Getting off the board is harder than it looks |
|---|
|
A small Australian force needs to cross two-thirds of the board and exit to the west - in only eight turns. There is an even smaller reinforcement group which enters from the west edge. A slightly larger Japanese force enters from the player's choice of the north, east, and south edges of the board. Both sides race to a key trail intersection, and the Japanese arrive first. When the inevitable Japanese assaults start, the Australians make a key tactical error. Tempted by First Fire bonuses for Jungle hexes and higher elevations, teased by some early Japanese step losses, the Australians try to stay and win the assaults. That was probably the wrong choice - it would have been better to risk the free shot and leave the assault hex. The Japanese morale advantage is crucial, and no Australians units exit the board. Japan wins by 12 VP's to 2. One scenario note - the scenario starts at 1800, so I played it as a night scenario, even though the scenario does not specify night. Given that the board is overwhelmingly jungle, this may not make much difference. Overall, a quick play scenario offering a variety of tactical options for the Japanese player. For the Australians, breaking contact with the Japanese forces and exiting assault hexes, even at the cost of a free shot are the most imnportant things to remember |
| 0 Comments |