
|
Yongdok: The Second Battle Pusan Perimeter #31 |
||
|---|---|---|
| (Defender) North Korea | vs | South Korea (Attacker) |
| Formations Involved |
|---|

| Total | |
|---|---|
| Side 1 | 1 |
| Draw | 0 |
| Side 2 | 3 |


| Overall Rating, 3 votes |
|---|
|
4
|
| Scenario Rank: --- of 913 |
| Parent Game | Pusan Perimeter |
|---|---|
| Historicity | Historical |
| Date | 1950-07-21 |
| Start Time | 08:00 |
| Turn Count | 26 |
| Visibility | Day |
| Counters | 79 |
| Net Morale | 0 |
| Net Initiative | 1 |
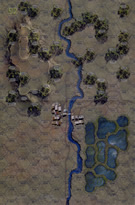
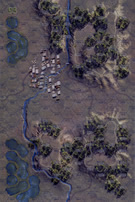
| Maps | 2: 92, 93 |
| Layout Dimensions | 86 x 28 cm 34 x 11 in |
| Play Bounty | 165 |
| AAR Bounty | 165 |
| Total Plays | 4 |
| Total AARs | 2 |
| Battle Types |
|---|
| Urban Assault |
| Conditions |
|---|
| Naval Bombardment |
| Off-board Artillery |
| Randomly-drawn Aircraft |
| Smoke |
| Scenario Requirements & Playability | |
|---|---|
| Pusan Perimeter | Base Game |
| Introduction |
|---|
|
While the American 24th Infantry Division was pushed down the western side of Korea, ROK troops fought furiously to hold the peninsula’s east coast. The small port of Yongdok formed a bottleneck on the road and railroad south to Pusan, and Gen. Walker of 8th Army determined that it must be re-taken held. The local ROK commander at first refused to take orders from an American general, only relenting on a direct order from his high command. The North Koreans had no tanks in this sector, and Walker committed a flotilla of British and American warships to provide the ROK with copious naval gunnery support. |
| Conclusion |
|---|
|
If the U.S. Army wasn’t ready for war in 1950, the U.S. Navy and the Royal Navy certainly were: the naval gunfire absolutely devastated the terrain and the North Koreans, with the cruiser Juneau alone killing at least 400 NKPA troops. The South Koreans took Yongdok during the day at the cost of enormous casualties, but lost the town again at night. North Korean efforts to move south from Yongdok evaporated in the face of the punishing offshore bombardments. |

|
|
|---|
| Chosŏn inmin'gun |
|---|
|


| Daehanminguk Yukgun |
|---|
|


| Deadicated NKPA Leadership | ||||||||||||
|---|---|---|---|---|---|---|---|---|---|---|---|---|
This scenario reverses the trend of US and ROK forces trying to hold or to delay NKPA advances. Here a ROK force of 16 infantry, 5 HMGs, 2 81mm mortars, a 75 and 105mm howitzer with trucks to transport get an additional 5x30 OBA from naval gunfire as well as possible air support each turn. The NKPA are holding the town of Yongdok with 12 infantry, 4 HMGs, 2 82mm mortars, 4 SMGs, 120mm mortar, a 45mm AT gun, 2 76.2 guns and a 122mm unit on board with an OBA of only 10. I placed 2 outposts for the NKPA on the south edges of the eastern and western hills on board 93, with the arty and heavy mortars in the north edge of town and the two 82mm mortars high on the 40m hill where they could spot for themselves as the ROK forces come into range. The ROK forces organized into one large group around the major and one small group around a captain. The large force moved forward to force the NKPA to open fire and give away their positions while the small force of 2 stacks with an infantry and HMG under the captain and 2 infantry under the LT skirted the rice paddies along the west edge of the board, taking some long range fire and innefective arty fire but moving to within 2 hexes of the town so they could call in the huge OBA. While the small force was working their way forward, the large force succeeded in drawing fire, but these forces are pretty fragile, with tne NKPA having morale of 7/6 to the ROK 7/5, so demoralized or disrupted troops would spend some time regrouping, which happened quickly to the large force, but overwhelming numbers and a few turns of arty and OBA helped get rid of the defenders fairly quickly. Once the scout element got into position to call OBA, the NKPA holding the west side of town became targets, with casualties and leader casualties climbing while occasionally disrupting one of the two spotter stacks but never getting rid of them. The NKPA in town shuffled troops and leaders to maintain the outer wall of defense, but after losing both majors and the colonel, the surviving NKPA troops had to withdraw from the eastern ramparts into the center of town. The spotters were finally able to move to where they could spot the NKPA 122mm guns and the OBA made quick work of them and their trucks, while counter battery took out the 2 82mm morters high on the hill. Time grew short but as I called it a game at the end of turn 19, the ROK army was in posession of 5 of the needed 6 town hexes, with troops ready to enter 2 more vacant hexes and assaults going on in 2 more, with plenty of ROK troops available to move into and replace demoralized and disrupted troops from the assaults, while the NKPA was down to 2 leaders and a growing number of single step survivors, with nothing left but the 10 factor OBA and nobody in a position to do any spotting for them. US air power made a great showing, and the B-29s made 2 appearances while F9Fs did most of the air support work. Just a few turns earlier, I was considering ending the game as a draw, but those last 2 turns made it more of a mopping up situation ahead, so I considered it a win for the ROK troops. Great game. |
||||||||||||
| 0 Comments |
| Korean War: Pusan Perimeter, scenario #31: Yongdok: The Second Battle & scenario #39: Yongdok Battle Continued | ||||||||||||
|---|---|---|---|---|---|---|---|---|---|---|---|---|
Korean War: Pusan Perimeter, scenario #31: Yongdok: The Second Battle & scenario #39: Yongdok Battle Continued I decided to combine these two scenarios into one AAR as they are the same battle and I just setup one after the other as they use the same maps and counters. It was a tale of two different stories or outcomes however. In scenario 31 the South Koreans decide to attack in three groups, the middle and north and south flanks. The North Koreans setup some advance units that can spot for their artillery and put their artillery in the far northeastern hill entrenched and out of harm’s way until the ROKs could close in and spot them. The rest of the NKPA pretty much defended the town in strength. I thought with all the off South Korean, American naval and air-support it might be an easy scenario but the ROKs poor morale of 7/5 and the heavy beating they took from the NKPA artillery and mortar fire gave them little opportunity to take any town hexes but only to lick their wounds. A clear North Korean victory in this scenario. In scenario 39 the outcome was much different and the weaken NKPA force were pushed out of town just barley in the end, as the American heavy naval fire devastated the NKPA forces this time because the ROKs had a better 8/6 morale and were able to close in, unlike the first scenario giving South Koreans a victory this time around. The NKPA had a chance to keep one town hex but the ROKs rolled well on the dice and had a few more turns in this scenario. It was clearly a tale of two stories. I could see why a large city/urban/Stalingrad game might be difficult to fight/play. |
||||||||||||
| 0 Comments |