
|
Evacuation by Sea Counter Attack #20 |
||
|---|---|---|
| (Attacker) North Korea | vs |
South Korea
(Defender)
United States (Defender) |
| Formations Involved |
|---|

| Total | |
|---|---|
| Side 1 | 0 |
| Draw | 0 |
| Side 2 | 3 |


| Overall Rating, 3 votes |
|---|
|
4.33
|
| Scenario Rank: --- of 913 |
| Parent Game | Counter Attack |
|---|---|
| Historicity | Historical |
| Date | 1950-08-16 |
| Start Time | 20:30 |
| Turn Count | 26 |
| Visibility | Night |
| Counters | 62 |
| Net Morale | 1 |
| Net Initiative | 2 |
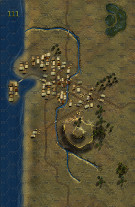
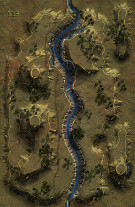
| Maps | 2: 111, 113 |
| Layout Dimensions | 56 x 43 cm 22 x 17 in |
| Play Bounty | 167 |
| AAR Bounty | 165 |
| Total Plays | 3 |
| Total AARs | 2 |
| Battle Types |
|---|
| Inflict Enemy Casualties |
| Rear Guard |
| Rescue |
| Beach Control |
| Conditions |
|---|
| Naval Bombardment |
| Off-board Artillery |
| Reinforcements |
| Smoke |
| Illumination |
| Scenario Requirements & Playability | |
|---|---|
| Counter Attack | Base Game |
| Introduction |
|---|
|
On the coast of the Sea of Japan just north of the Pusan Perimeter, the ROK 3rd “White Skull” Infantry Division, known as The Invincible for having never lost a battle, had been pressed into a narrow strip along the coast. The North Korean 5th Division, the former 163rd Division of the Chinese People’s Liberation Army, pressed the ROKs back against the sea while a U.S. Navy cruiser and three destroyers lent gunfire support. |
| Conclusion |
|---|
|
The ROK wounded had already left the beachhead, and during the night U.S. Navy LSTs took off over 9,000 troops plus 1,200 National Police and 1,000 laborers from the beaches, as well as all of the division’s weapons, equipment and ammunition. By the 19th The Invincible was back in the line alongside the Tiger Division and on the offensive. |

|
|
|---|
| Chosŏn inmin'gun |
|---|
|


| Daehanminguk Yukgun |
|---|
|


| Marine Corps |
|---|
|

| Navy |
|---|
|


| Korean Dunkirk | ||||||||||||
|---|---|---|---|---|---|---|---|---|---|---|---|---|
Initially, this is a difficult one to set up for the ROK, due to the NKPA being able to enter from both north and west. Given that the goal is evacuation, it seems best to start as far from those edges as possible while still avoiding overcrowding and still allowing a number of potential embarkation points. So ultimately is the setup; the ROK starts with a solid infantry line dug in behind the north-south minor river in the southeastern quadrant and extending into the city, then a secondary group dug in angling towards the shore just north of town. This way, distance and darkness can hopefully buy enough time for embarkation to start. The near-useless Bazooka team starts close to water’s edge, and the 75mm artillery piece, with it’s attendant truck, in a sheltered town hex. Sure enough, the NKPA enters in strength from the north edge, wholly on Board 111; 113 will see no action in this play-through. The first group takes 2 turns to get within spotting range of the northernmost dug-in ROK line, which blasts away to no effect, as the rest of the Communists continue to advance. Having closed to spotting range, one NKPA leader calls both OBA batteries down on one stack, demoralizing an INF. Later in Turn 2, the three LST units arrive, one north of the island in support of the ROK right flank (and in position to load them when possible), and the other two just south of it. The Marine lieutenant offloads upon landing. Last to arrive is the helo, which parks two hexes from some already-moved NKPA; its leader calls down the Navy OBA as two separate attacks, causing a step loss and some disruption. On the southern part of the field, a number of ROK units move to the shore and begin embarking. However, four NKPA groups have swung over to the west edge of the city and, as they close in on the limbering South Korean artillery, several previously dug in defenders shift into blocking position. This allows a couple of grim block-to-block assaults to launch in town; at the very least, the North Koreans hope to lock their foes in extended combat, denying them an opportunity to load into the transports. One combat goes bad for the NKPA almost immediately, with both combatants plus the leader demoralized, but they also have backup units adjacent for feeding into battle, which the ROK units do not. As the city combats grind on, an NKPA ATR (alter joined by a reduced infantry platoon) reach water’s edge and begin threatening the southern LST group; this develops into a cat-and-mouse game in which the LST’s (neither of which is entirely fully loaded) shift back and forth in the sea, avoiding DF attacks while awaiting opportunities to load up. These prove to be fleeting, especially when the dug-in positions to the north are placed under assault. They do manage to leak a couple of platoons to the third LST, and in the meantime the NKPA casualties increase, especially from the offshore Navy guns. At 2300 one of the LST’s finally exits, and soon thereafter the second one weighs anchor with a small passenger load. However, both remaining LST’s remain on board, still hoping for a breakaway by some of the ROK infantry locked in combat. The city fights begin to break down as the defenders, trying to take advantage of NKPA morale problems, attempt to egress north of town suffering losses in the process. (One of these assaults turns into a rolling fight, as the ROK exits twice but is then re-engaged each time.) One of the north flank combats in the “dug in” hexes also sees the escaping defenders take losses, but an attempt at pursuit by the NKPA is blasted by the offshore gunnery. The LST’s re-beach on the two northernmost beach hexes as the remaining ROK positions begin to break down. Fleeing units reach the sanctuary, but – despite the pursuing North Koreans being effectively harassed by the Navy guns – recovery takes long enough that a sizeable number of NKPA reach the immediate vicinity. Between 0115 and 0145 the LST’s reluctantly depart the scene, one having loaded an INF platoon (and receiving non-damaging fire from an adjacent SMG platoon before withdrawing) and the other unable to load a reduced HMG unit due to the HMG’s disrupted state. The helicopter continues to direct offshore fire for another couple of turns, until a near-miss with an 11-strength DF attack disrupts it; recovering, the chopper flies well inland and then out to the Helena. The left-behind HMG, accompanied by a 10-1-2 Captain, then strikes back at its pursuers, eliminating a reduced NKPA INF in Assault before being jumped in turn by three enemy units, remaining locked in combat with them at scenario’s end. The only other ROK units left on land are one INF platoon, still in its initial dug-in location, accompanied by the USMC Lieutenant who arrived with the LST’s. First, the losses in steps: NKPA: 10 INF, 2 HMG, 1 SMG. 1 Leader. ROK: 6 INF, 1 HMG, 4 Leaders. Then the rescue stats: ROK remaining on board: 1 HMG, 2 INF, 2 leaders. ROK evacuated: 8 INF, 4 HMG, 1 BAZ, 1 Truck, 1 75mm, 5 leaders including the LT COL. Final VP tally: NKPA 10, ROK 28. A major victory for the ROK, though they risked a much different outcome by keeping two partially-loaded LST’s in the area till near the end. They can be thankful for night, naval gunnery, and the H-5 spotter chopper. The NKPA might have been better off putting more effort into attacking the LST’s, though the non-embarked ROK troops gave them enough trouble as it was. |
||||||||||||
| 0 Comments |
| Korean War: Counter-Attack, scenario #20: Evacuation by Sea | ||||||||||||
|---|---|---|---|---|---|---|---|---|---|---|---|---|
Korean War: Counter-Attack, scenario #20: Evacuation by Sea First let me make a couple clarifications for this scenario. It is true the 3 LSTs in this scenario can load up 11 steps each plus an unlimited number of leaders but should only be able to load one unit or two steps a turn plus leaders, this not only works and makes sense but gives the NKPA a chance to win. Also, I gave the LSTs a 6 armor protection values. Lastly I highly recommend using the Optional Rule: Strategic Movement to allow the North Koreans a chance to close with the ROK units. This was I believe, the first time an Evacuation by Sea scenario was attempted but if you use the above mention clarifications, the NKPA has at least a chance to win the scenarios, without the above, the ROKs have it too easy. Ok, whatever your results are, it is still a fun play! I setup the ROK with a large bunch of units by the expected landing/evacuation beaches, waiting on the American LSTs and another group of block forces protecting the comrades with units on the city edges and bridges to slow any advancing North Korean units down. The North Koreans come on mostly from the north with just a couple units from the west but all using the Strategic Movement rules to close much faster and make a game out of this scenario. On turn two the American Naval LSTs arrive and beach and the H5 Helicopter dropping off a Marine Lieutenant with some forward blocking ROK units to spot for the naval off-board artillery, as only the Naval Helicopter and the Marine LT can spot for the off-board naval guns and to have them in two locations I thought I could cover the map better. After a couple of turns the North Korean units slammed into the blocking South Korean units as other ROK units slowly loaded on to the LSTs. The American spotting units setup both illumination and normal off-board navel bombardments slowing and damaging some NKPA units but not all. Assault combat started in the next couple of turns as well but the NKPA could not break through the initial lines in time but the LSTs had to pull away before they were assaulted with most of the ROK units but not all, as the ones who sacrificed themselves in assault combat could not disengage in time to get away, including the Marine LT, which the H5 had to abandon with the ROKs who didn’t make it out! With that said, the ROK lost 2 steps to combat and 6 steps left behind but the LSTs left with 24 steps counting the truck and a bunch of not counted leaders, while the NKPA lost 4 steps in fighting, giving the ROKs a 19 point victory, winning by 11 points or more for a Major Victory. Maybe to balance this scenario a bit more, have a random draw on when the LSTs show up from turns 2-8, with a mandatory arrival of turn 8. With that said, this was pretty fun to play. NKPA, ROK, Marines, Naval and helicopter, make this great to play at least once, if not more. Errata: • Scenario #20: Special Rule #2 should refer to LST units not LSV units. First let me make a couple clarifications for this scenario. It is true the 3 LSTs in this scenario can load up 11 steps each plus an unlimited number of leaders but should only be able to load one unit or two steps a turn plus leaders, this not only works and makes sense but gives the NKPA a chance to win. Also, I gave the LSTs a 6 armor protection values. Lastly I highly recommend using the Optional Rule: Strategic Movement to allow the North Koreans a chance to close with the ROK units. |
||||||||||||
| 0 Comments |