
|
The Sea Horse Jungle Fighting #19 |
||
|---|---|---|
| (Defender) Japan | vs | United States (Attacker) |
| Formations Involved | ||
|---|---|---|
| Japan |  |
124th Infantry Regiment |
| Japan |  |
228th Infantry Regiment |
| United States |  |
35th Infantry Regiment |

| Total | |
|---|---|
| Side 1 | 2 |
| Draw | 1 |
| Side 2 | 2 |


| Overall Rating, 4 votes |
|---|
|
2
|
| Scenario Rank: --- of 913 |
| Parent Game | Jungle Fighting |
|---|---|
| Historicity | Historical |
| Date | 1943-01-10 |
| Start Time | 15:30 |
| Turn Count | 20 |
| Visibility | Day |
| Counters | 30 |
| Net Morale | 1 |
| Net Initiative | 1 |
| Maps | 1: Guad-ME |
| Layout Dimensions | 84 x 55 cm 33 x 22 in |
| Play Bounty | 135 |
| AAR Bounty | 159 |
| Total Plays | 5 |
| Total AARs | 3 |
| Battle Types |
|---|
| Hill Control |
| Rural Assault |
| Conditions |
|---|
| Entrenchments |
| Off-board Artillery |
| Scenario Requirements & Playability | |
|---|---|
| Battle of the Bulge | Counters |
| Guadalcanal | Maps + Counters |
| Jungle Fighting | Base Game |
| Introduction |
|---|
|
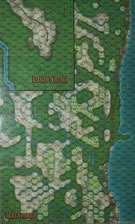
Another Japanese position in the foothills of Mount Austin was the two hills collectively called The Sea Horse by the Americans. Located midway between The Galloping Horse and GIFU positions, the Sea Horse controlled movement between the two and prevented free movement of American units. The Americans would need to eliminate the Japanese positions on it before they could advance to the west. The first day's objective would be the southernmost of the two hills. |
| Conclusion |
|---|
|
The approach march was more difficult than imagined and the 3rd Battalion's lead companies arrived late in the afternoon. Only enough daylight remained to secure the approach to the southernmost of the two hills and the soldiers closed up on the Japanese positions on Hill 43 and awaited dawn. |
| Additional Notes |
|---|
|
Elsenborn Ridge or Cassino '44 may be used for the U.S. units. |

|
|
|---|
| Imperial Japanese Army |
|---|
|


| Army |
|---|
|


| A Horse Better Left Unridden |
|---|
|
Still on my Japanese kick, I decided to do my small part in improving our play coverage by tackling this dinky scenario. The scenario seemed simple enough - Japanese are ensconced on a sandy ridge and the U.S. Army is sent in to uproot them. Sounds like a typical Pacific theater scenario. Well, it gets bizarre quick once you try to play the thing. First oddity: while the Japanese get a token 8 points of OBA (equivalent to one 81mm platoon), the Americans have 62 points of OBA in their back pocket. That's a respectable concentration of guns in any theater. In the Pacific this is so uncharacteristic that it makes one wonder if it's a typo. This massive firepower is never explained away as coming from offshore cruisers, for example, which would help one accept it. Checking The Seahorse II, its sister scenario taking place on the following day, one finds a similar OBA allotment so we must assume this was what was intended. All the better for the U.S. Army! Second oddity: Japanese starting hexes are 0221, 0322, and 0431. They may place one entrenchment. The U.S. Army needs to capture hex 0221 to win. Thus, the only sane location for that entrenchment is 0221. Why even give someone the option? Third oddity: American units enter the board at an irregular pace, appearing on the map's edge either in 0121 or 0122 -- in other words, dead adjacent to your Japanese entrenchment (these are clear hexes, amplifying the queerness of this entry). By now you've put 2 and 2 together and realized that the VC hex is adjacent to the U.S. entry hex, which means the entire 20 turn scenario takes place in a 3x3 hex box, ignoring the odd demoralized straggler who runs for his life. The flow of battle can now be summarized without having so much as begun:
As it happened, via a deadly cocktail of poor Japanese direct fire, brilliant Japanese OBA friendly-fire, and sharp U.S. shooting I was able to survive this version of Whack-a-mole and clear out the entrenchment with only 1 American steploss. (2 = Japanese victory). This is quite a bit more successful than the historical result, and I expect the sister scenario (which I shall play next) to be even more of a walk-over, seeing as how the Americans receive some hefty reinforcements while the Japanese struggle onward with their same puny garrison. This was a difficult scenario to rate. In terms of tactics, strategy, and action this is probably closer to a 1 than a 2, but I enjoyed the 60 minutes I put into it, so a 2 it gets.
|
| 0 Comments |
| New Tactics Required |
|---|
|
In this very, very small scenario a company of Japanese, well entrenched, on a ridge try to avoid dying entirely while taking a few GIs with them. Action is certain as the Americans have to enter the board in hexes adjacent to what is likely to be a heavily manned entrenchment. Key to this play is that it was done using the 4th Edition rules and especially the 4th Edition assault chart. Please note that plays under the 3rd Edition will swing heavily towards the Americans. The reason that I titled this "New Tactics Required" is that under the 4th Edition it is vitally important to prepare the target of your assaults with DF, bombardment and whatever else you might have that will degrade the defenders. This is due to two items. First, the low columns of the assault chart now can cause step losses. Both the 3 and 5 columns contain small likelihood chances to cause a step loss. The key here is that it is a small likelihood each time you fight but given the much lower chance of killing steps outright you may have to roll that battle a lot of times before it resolves. The second, item is that it "seems" far more likely to get a morale check result in the assaults meaning that a degraded defender has a much greater opportunity to progress on to demoralized and ultimate destruction. On the other hand, if you are Japanese and have a 9/8 morale you might be able to hang on for a real long time, as in this scenario where the Japanese caused well more than 2 step losses and at the end of the battle a single step remained in control of the entrenchment. I don't rate the scenario too highly primarily due to the American entrance requirement and I certainly would never suggest this one for anything but solo play, however if you want to understand the impact of the 4th Edition rules for an infantry fight you can't do better than this. |
| 0 Comments |
| Jungle Fighting #19 | ||||||||||||
|---|---|---|---|---|---|---|---|---|---|---|---|---|
This one is much like the last few scenarios of a very very tight play area and a small Japanese force being hit by a larger American force that pretty much has to go right at it while avoiding casualties. It does have a key difference in that the setup makes little sense. Japanese can place one entrenchment, which they will of course place on the VC hex. I guess the choice is okay but unecessary. However the Americans enter from behind the Japanese lines... somehow, and enter adjacent to the Japanese trench with no other options. They also enter staggered depending on die rolls, so they walk on, get shot to bits, have to run along the Japanese line to safe ground, regroup, and then take the hill after enough units have survived the gauntlet. Oh, and if they take 2 step losses, they lose.... The silly thing is the Japanese actually rolled garbage all game long and only got 1 step loss while the AMericans onboarded about once every 3 turns and immediately ran into the jungle to the east to gather strenghth and hit the Japanese hill with OBA. Once enough got on board, luckily alive, they took the hill from the softer rear and with some poor Japanese rolls on some morale checks took the trench in assault against a dem stack. Japan wins this broken scenario 9/10 but not today apparently. |
||||||||||||
| 0 Comments |