|
This scenario marks a milestone for me; while not the longest in terms of turns given but that I actually played through 115 of the 120 turns alloted before the battle was decided as a draw, which is a record for me. Whats more is that the battle actually gained in momentum and retained my interest until it's completion.
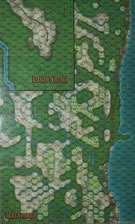
There are a lot of special rules in this one which restrict both the Japanese and Americans with movement; particularily the disorientation rule which applies to both sides in this one. The Japanese set-up divided in three groups spread out from each other; the SNLF troops hold the main line of defense around the Matanikau river where the Japanese VC hexes are located while a strong Army force is deployed further west and a ragtag mix Edson's Ridge survivors are spread out southeast. The SNLF units may not move individually until an American unit moves within 3 hexes of it while the Edson's Ridge units have to roll a 4-6/D6 each to move at all. The intial American force enters from the east but only one of the allowed entry hexes is non-jungle so just entering the map itself can be quite a task with the disorientation rule. It took about 2 hours/8 turns just to assemble the marine forces as a whole, more or less.
I decided that since there wasn't too much daylight to work with that the starting American force would avoid going head-on with the SNLF main lines but rather attempt to flank the southern portion of the lines while at the same time making easy prey out of the scattered and mostly reduced-strength Edson's Ridge survivors and also preventing them from flanking behind the marines. By 19:45, Day one/turn 21 night had set in both sides had the penalty of becoming disrupted once any unit moved so assaults were called off until the next morning. By this time the Japanese had suffered a few step losses while the Americans had lost none, giving the marines a further intiative advantage.
By daybreak, the second day, the marines had managed to set-up a few small firebases on the southern Japanese flank while Japanese Army units managed to link-up with the SNLF and extend their lines further down the river. This was after a lot of disorientation on both sidesmoving through unavoidable jungle hexes. A few INF units from the Edson's Ridge survivors, despite all their movement penalties and restrictions did manage to get behind the American lines and tie-up a few platoons before reinforcemants arrived at 07:30, Day two/turn 67. By this time the marines had suffered their first step loss which was amazing given the amount of turns that had already passed. Japanese losses were close to 10 steps lost by this time. The American reinforcements waste no time advancing head-on towards the main SNLF lines as planned while the other marines continue to keep the southern flank pinned down. Other than a few hills there was not much limiting terrain to provide cover for the frontal attack but a strong marine firing line is able to set up and dig-in. There are plenty of American leaders with combat modifiers so very efficient and deadly direct fire managed to keep the SNLF hammered down. The battle continued to rage with intensity and at 11:15/turn 83, the Americans take their second step loss. This means that after another 16 turns (15:15/turn 99) 6 American units have to be removed from play to evacuate the wounded per SSR#9. Meanwhile, Japanese losses continue to pile up sky high. At 16:15/turn 103, a sniper takes out the American Colonel, briefly raising Japanese spirits but this hardly effects the Americans at this point and the LT-COl quickly his place. Then, at 17:15/turn 107, the Americans reach one of their VCs after a total of 16 Japanses steps are eliminated. However, time is running out and in order to prevent a Japanese victory 4 occupied hexes have to be denied Japanese control. As deadly and efficient as the American direct fire is it is inevitable that assaults are going to have to be made. The Japanese lines have been pushed back but not quite enough. There are only 8 turns left before visibilty decreases back to just 1 hex again. The Japanese defenders look a mess and begrudgingly, SNLF and Army units are mixed together and sharing dugouts. I could only imagine the disgust of Naval units taking orders Army leaders and vice versa. The remaining Japanese line was a mottled mix of gold and blue counters.
At 19:30/turn 115, visibility had dropped to 4 hexes and there were still two VC hexes under Japanese control. The Americans were in a pickle. One more American step loss and the Japanese force a draw; one more turn and moving units automatically become disrupted due to nightime penalties so it's do or die time -the Americans have to assault the two hexes to contest Japnese control of them. And sure enough the first assault extracts the 5th american step loss and this mammoth of a battle ends in a draw. Time, or rather the Sun; the setting sun as opposed to the rising sun, ultimately favored the Japanese.
This scenario really surprised me as I enjoyed it all the way through, even the night turns. There were some times that I felt it deserved a "5" and even during the lulls it never dropped under a "3" so it gets a solid "4" rating from me. Given all the movement restrictions and other SSRs I believe that I managed both sides well but also believe that the Japanese VCs are a lot easier to achieve. The last 20 or so turns were full of intensity and an American victory was so close at times. No doubt the Japanese would of been broken with 5 turns left to go if night turns weren't going to become a factor again. It was that close. I don't think there is much that I would of changed with playing either side. It could of ended far earlier had I of been less cautious or lucky with the Amercans. You would think that the Japanese could of easily eliminated 5 American steps well before 115 turns had passed and there were times that I was tempted to charge out and counterattack with the Japanese in assaults but instead, by hook or crook kept their lines together. Chances are that I won't be revisiting this scenario anytime in the distant future as I have 3 more 100+ turn 'Guadalcanal' scenarios left to go. However, if you are grognard enough and have about a week to invest in one scenario (12-15 turns a day) I highly recommend a go at this one.
|