
|
Kokumbona II Guadalcanal #9 |
||
|---|---|---|
| (Defender) Japan | vs | United States (Attacker) |
| Formations Involved | ||
|---|---|---|
| Japan |  |
11th Construction Unit |
| Japan |  |
13th Construction Unit |
| Japan |  |
3rd Yokosuka Special Naval Landing Force |
| Japan |  |
5th Kure Special Naval Landing Force |
| United States |  |
5th Marine Regiment |
| United States |  |
Army |

| Total | |
|---|---|
| Side 1 | 2 |
| Draw | 3 |
| Side 2 | 5 |


| Overall Rating, 10 votes |
|---|
|
3.6
|
| Scenario Rank: 330 of 913 |
| Parent Game | Guadalcanal |
|---|---|
| Historicity | Historical |
| Date | 1942-08-27 |
| Start Time | 07:30 |
| Turn Count | 38 |
| Visibility | Day |
| Counters | 47 |
| Net Morale | 1 |
| Net Initiative | 3 |
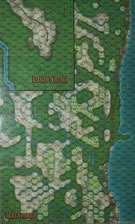
| Maps | 1: Guad-ME |
| Layout Dimensions | 84 x 55 cm 33 x 22 in |
| Play Bounty | 123 |
| AAR Bounty | 147 |
| Total Plays | 10 |
| Total AARs | 5 |
| Battle Types |
|---|
| Rural Assault |
| Conditions |
|---|
| Hidden Units |
| Scenario Requirements & Playability | |
|---|---|
| Guadalcanal | Base Game |
| Introduction |
|---|
|
Following the transfer of the 2nd Battalion, 5th Marines from Tulagi to Guadalcanal, the staff of the 1st Marine Division ordered a second raid on the Japanese base at Kokumbona. The 1st Battalion, 5th Marines departed the perimeter early on the 27th, landing west of Kokumbona at 0700. |
| Conclusion |
|---|
|
The Marines landed west of Kokumbona against no opposition and advanced east. The Japanese naval troops resisted fiercely and halted the American advance. The plan had been that the American battalion would march back to the Marine perimeter. This was clearly not possible and the battalion commander requested boats to bring them back to the perimeter. the battalion commander was immediately relieved and the regimental commander dispatched to take over the operation. By the time he arrived the day had ended and the fighting stopped. That night the Japanese withdrew. |

|
|
|---|
| Imperial Japanese Army |
|---|
|


| Imperial Japanese Navy |
|---|
|


| Marine Corps |
|---|
|


| Assault on the Village |
|---|
|
At first glance, this appears to be an easy scenario for the Marines. The Japanese defenders set up in the village and then along the river inland. The Marines set up along the coast to advance along the water to the village. The Marines advance slowly (1 hex per turn) to keep the force together until they make contact with the defenders. The Japanese stay put waiting to see where the Marines will make contact. The Marines continue along the coast, and make contact with the defenders in the village which are just Japanese SER troops. The defenders inflict no damage ont he advancing Marines. The next turn, the Marines assault the village and begin to inflict casualties on the defenders. However, the remaining Japanese defenders start to leave their positions and move around the Marines. Japanese SNLF forces advance and assault Marines on the right flank of the assaulting force. The battle quickly turns into several assault stacks as both forces try to wear each other down. The Marines eventually defeat the SER forces in the village and take this victory location. However, the Japanese inflict casualties on other Marine forces. The Japanese lose many steps and can not retake the village, but the Marines also lose more than five steps, so neither force can obtain victory, so the game ends in a draw. |
| 0 Comments |
| Blame it on the rain | ||||||||||||
|---|---|---|---|---|---|---|---|---|---|---|---|---|
This was a very tense battle for the marines as they not only had to battle the Japanese but also the weather. The battle began with one brief thunderstorm but it ended after a half hour and really didn't affect play at all. The marines advanced towards the village while the defenders managed to get most of their units dug-in. Most of the hidden Japanese units are discovered before they pose any serious problems. Small arms fire is exchanged and both sides begin to take losses but the Japanese are mostly only losing their service personnel which were only deemed expendable speedbumps in the first place. An early American assault gains some ground but soon Japanese opportunity fire from AA guns wipes out a whole platoon of marine HMG units on the advance and are down 3 steps. A crucial decision has to be made; if the Americans continue to move to take the village then they cannot lose any more steps OR, if they conduct a fighting withdrawl and attempt to evacuate they can afford one more step loss as they have already inflicted over 7 Japanese step losses -those are the only options available to secure a victory. The marines decide they will call for the boats and slip away back into the jungle and attempt to get all their forces onto the beaches in time to move them out. Right before the boats arrive at 11:45/turn 18, another thunderstorm begins and before all the units can make it to the shore. Meanwhile, the SNLF are on the hunt and manage to spray some direct fire down on a few platoons which fail their morale checks and get stuck behind in the jungle. Next the elite SNLF units assault that hex and push American losses up too high to gain any sort of a victory. Now the marines have to cancel their withdrawl and turn back to try to take the village again in order to get a draw. Meanwhile the thunderstorm rages on and complicates things further, especially with American recovery attempts. In fact the thunderstorm ends up lasting for a total of 2 1/2 hours (10 turns!). Once the thunderstorm ended at 14:15/turn 28, the marines desperately attempt to get in closer to take the village but they get bogged down with stubborn resistance, even with the few remaining SER units. Some units decide to brave opportunity fire to get adjacent to the village again and Japanese AA guns again manage to wipe out another whole platoon of HMGs in one hail of bullets. Time is running out and seems hopeless but the marines do make one very brave assault at the last moment and succeed in clearing another jungle hex and have the village in their sight. Other marine units moved up on the beach but the village is defended by the best SNLF units and their Naval Commander which fire away leaving the units on the beach in very poor shape and incapable of returning fire or mounting an assault. Then time is up and the SNLF still have the village in their control securing a Japanese victory. This was a very good scenario and believe it is well balanced. If the one thunderstorm hadn't occured when it did and especially of lasted as long as it did then the outcome would of likely been a draw. Once American units failed morale checks they really got stuck with the recovery modifier and there weren't enough American leaders with morale modifiers to make much of a difference by then. I would be very interested in trying this one without using the random events especially in a shared match to see if I could do better as the Americans. But I like random events for solo play and damn if the weather didn't favor the Japs! I could almost imagine Tokyo Rose taunting with her remark about "... the jungle is where we live and you die..." One mistake I made with the Americans was actually evacuating a few units once the boats arrived fully aware that I wouldn't be able to evacuate the whole American force. Those extra platoons may have helped turn the tide in the end if they were still available as things did start to look up for the marines on the last few turns but just a little too late. High marks for this one and it's replay value. |
||||||||||||
| 0 Comments |
| Haven't we been here before? | ||||||||||||
|---|---|---|---|---|---|---|---|---|---|---|---|---|
Battle Report: US Marines of the 2nd Battalion, 5th Regiment landed on the north shore of Guadalcanal on August 27th, 1942, to conduct a second attack on the Japanese base at Kokumbona, which had been reinforced by troops from the 3rd Yokosuka and 5th Kure Special Naval Landing Force and “seabees” from the 11th and 13th Construction Units. The Marines moved east along the coast trail with a second force moving in the jungle to the south. By 0815, a firefight had begun in the jungle southwest of the village, with three platoons led by Captain Kelsey reaching a ridge on the Japanese left flank around 0900. At that same time, the Marine units on the coastal trail had pushed the Japanese Construction troops back into the village. Return combined fire from the Japanese village troops caused the Marine units to retreat back west along the coastal trail. The heavy fire from both sides resulted in units becoming confused and misinterpreting orders, which caused a temporary pause while both sides regrouped. Shortly after 1100 hours, Kelsey’s group turned the left flank and took out a Japanese HMG platoon that had been causing quite a bit of havoc. By noon, the Americans had eliminated the Japanese gun platoons that were in the jungle southwest of the village, opening an advance route for the Marines using the protection of jungle cover. At 1400 hours, American forces moved east along the coast road, but were repelled again by strong Japanese resistance from the village. After over three hours of continuous fighting on the south perimeter of Kokumbona, US forces entered the village. However, a mix of replenished units and original construction troops continued to hold ground southeast of the village until 1515. After they fell, a reconstituted group from the construction forces moved west along the coast road toward the village, but they were intercepted and defeated before reaching it. Their banzai charges between 1600-1630 resulted in US casualties, but all the Japanese forces were eliminated with the Commander choosing seppuku rather than surrender. The Marines recognized that control of Guadalcanal would involve a long, hard fight based on the resilience of the construction and SNLF forces in this skirmish. Analysis: This 38-turn scenario was played using 4th edition rules and using the rules for “village” terrain from The Kokoda Campaign. This latter step was taken since the town terrain rules didn’t seem appropriate for a small jungle coast village. Victory conditions require the Japanese to eliminate at least five American steps and keep the US from controlling Kokumbona village, with US victory being village control with a loss of no more than 3 steps; any other result is a draw. The US strategy involved creation of two fronts by splitting their forces, with one force moving south to approach the village from the south or east, while another moved directly east along the coastal trail. This was implemented via a tactical approach to wear down the Japanese forces prior to direct assault, since the jungle cover favored the Japanese units with first fire in those situations. With time on their side, the Americans can whittle away the Japanese resistance. Japanese strategy was to protect the village at all costs while inflicting maximum casualties on the advancing Americans. This involved use of jungle cover with its advantage of first fire in assaults and stacking maximum firepower to thwart US advance toward Kokumbona. In this playthrough, the Japanese forces held their ground remarkably well in the jungle assaults but didn’t inflict any casualties until late in the scenario. However, only a single US step was lost in contrast to total elimination of the Japanese forces (23 steps), and the US controlled the village for a victory. |
||||||||||||
| 0 Comments |
| Smashing victory | ||||||||||||
|---|---|---|---|---|---|---|---|---|---|---|---|---|
The Marine battalion in this battle executed a flawless assault, capturing Kokumbona in 3 hours with no losses. The Japanese survivors, less than a platoon of service troops, straggled into the jungle. The Marines advanced against a strong position of Japanese SNLF and service troops deployed in depth in the jungle to the west of Kokumbona. Supported by infantry guns, AA and AT guns, it looked like a pretty tough nut to crack. Our heroic Lt. Col. advanced in two strong columns, his force he led into the jungle while his second in command advanced up the beach track. Initial gains in the jungle were halted as the Marines pulled back to regroup and rally some shaken troops, giving the Japanese time to organize a series of Banzai charges. Meanwhile along the shore, the Major was relying on sheer volume of fire to grind away at the Japanese, but this was slow going. He decided to launch a series of audacious assaults, first crushing the forward Japanese positions, then outflanking the second line along the shore. Back in the jungle, the Lt. Col. stood firm against a series of tough human wave attacks, but he kept his troops organized and launching local counterattacks. Two hours into the battle, the Marine line delivered a series of stinging blows to the Japanese, with the Japanese in the jungle (primarily SNLF) reeling back in disorder and the Japanese along the shore trail (primarily service forces) crushed by the Major's spirited counterattack. In the final hour of the battle, the Lt. Col. pushed deeper into the jungle, driving the Japanese remnants before him. The Major led a bold frontal assault against the SNLF platoon in Kokumbona. He formed up a company and took the position by storm. All in all this was a victory that could not have gone any better for the Marines, or worse for the Japanese. |
||||||||||||
| 0 Comments |
| Kokumbona II - Back to Paris Island |
|---|
|
This one looked like it was going to be a USMC walk over but they ended up losing in a big way. The Japanese set up strong in and around the village with just 2 reduced service platoons hidden out forward. The 1st 2 marine activations blundered into these ambushers. Things went downhill from there. The inability to combine fire in the jungle is a huge handicap. The marines set up a fire base on the coast, 3 hexes from Kokumbona, 2 HMG & a MAR and they blasted away at the objective for 20 turn with only 1 X result and few MC's that the SNLFs easily passed. The rest of the marines formed a line at the creek and traded blows with the enemy MLR. There was some give and take but it was mostly a 7-fest, lots of 'no effects'. The marines were VERY reluctant to assault the japanese. A random event produced a new USMC leader, A 9-2-1 LT but he was very quickly removed by compound demoralization. Another random event caused a thunderstorm that lasted the rest of the game. Vis' dropped to 2 and it added a column to every shot! A 3rd random event decapitated the marines by a japanese sniper. A Cap' took over right away and called for the boats. The evac' went smooth despite some jap' pressure, the last USMC HMG platoon was pulled off at 13:15. Loses were US:6, Japan:7 |
| 0 Comments |