
 BkHo005

|
First Incursion Black Mountain #1 |
||
|---|---|---|
| (Attacker) Montenegro | vs | Austro-Hungarian Empire (Defender) |
| Formations Involved | ||
|---|---|---|
| Austro-Hungarian Empire |  |
2nd Mountain Brigade |
| Montenegro |  |
Plevlje Division |

|


| Overall Rating, 9 votes |
|---|
|
2.89
|
| Scenario Rank: 928 of 1093 |
| Parent Game | Black Mountain |
|---|---|
| Historicity | Historical |
| Date | 1914-08-06 |
| Start Time | 07:00 |
| Turn Count | 18 |
| Visibility | Day |
| Counters | 22 |
| Net Morale | 1 |
| Net Initiative | 1 |
| Maps | 1: 96 |
| Layout Dimensions | 43 x 28 cm 17 x 11 in |
| Play Bounty | 148 |
| AAR Bounty | 146 |
| Total Plays | 8 |
| Total AARs | 5 |
| Battle Types |
|---|
| Hill Control |
| Inflict Enemy Casualties |
| Conditions |
|---|
| Terrain Mods |
| Scenario Requirements & Playability | |
|---|---|
| Black Mountain | Base Game |
| Introduction |
|---|
|
Montenegro mobilized quickly, perhaps the only benefit of a very small country with a poorly-equipped army. Meanwhile, the Dual Monarchy’s civilian and military leadership did not cancel their July vacations and only began to prepare for war a month after the terrorist murders of Archduke Franz Ferdinand and his wife. That pause allowed the Montenegrins to strike first, invading Austro-Hungarian territory as the Serbs urged a march on Sarajevo. |
| Conclusion |
|---|
|
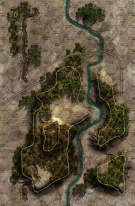
Skirmishes between the Austrian Grenzjäger and mountain troops along the frontier and the invading Montenegrins began immediately after the small kingdom declared war on the Dual Monarchy. Through sheer mass the invaders drove the border forces off Kozara Ridge, and then dug in to await the Austrian response. That wasn’t long in coming. |

|
|
|---|
| Imperial and Royal Army |
|---|
|


| Royal Montenegrin Army |
|---|
|


| Swarming like bees | ||||||||||||
|---|---|---|---|---|---|---|---|---|---|---|---|---|
System-Binary has the better troops, with double the firepower, better range and movement, but more than twice their number attacking, with more than double the number of leaders to motivate them, and numbers get the best of quality in today's game. Austrian jaegers got to the target hilltop first, but it didn't take long for the Montenegrans to surround them and cut them up picemeal. Austrian crew first blood, but after an exchange of step losses, Austria lost the first leader, followed closely by Monenegro, but then things changed. By the end of turn 11, 1 surviving Austrian leader and 1 surviving Jaeger step were heading for the east and safety while the Montenegro infantry celebrated on the hilltop on Board 96. Short scenario, small order of battle, a good first game for this scenario book. |
||||||||||||
| 0 Comments |
| See-saw on the Mountain | ||||||||||||
|---|---|---|---|---|---|---|---|---|---|---|---|---|
This is a straight forward infantry slugfest. The Austrian-Hungarian Jaegers got to the hilltop first as the cumbersome Montenegro infantry slogged up the hill. The first Montenegrin achieved a toehold on the north side of the hill but the rest of the assault was ran off by withering fire from the jaegers. Some Montenegrin infantry hunkered down next to the hilltop and exchanged fire which managed to break some of the jaegers. By late morning the Montenegrins rallied some of their forces and a second attack penetrated the Jaeger line and took most of the hill. However the Montenegrin casualties were too high and thus only one of the three objectives, capturing four hilltop hexes was achieved. This one started out to be a dice rolling contest but ended up being exciting in the end as the Montenegrins almost achieved their second objective. |
||||||||||||
| 0 Comments |
| Decent Start | ||||||||||||
|---|---|---|---|---|---|---|---|---|---|---|---|---|
This is the first scenario within the Black Mountain module, featuring the Montenegrin forces against the Austrians. The Austrians have 4 Jaeger companies and the Montenegrin’s have 10 infantry companies and one MG unit. Fairly simple, one single map, and only 18 turns long. The Austrians won a major victory, mainly by capitalizing on the amazing firepower of the Jaegers, each company being a 6 vs. the Montenegrin 3 rated infantry. The Montenegrin’s rolled 7s and 8s, the Austrians rolled 11s and 2s. Nothing special, just a good short scenario, but probably worth only one or two plays. |
||||||||||||
| 0 Comments |
| Good Solo Intro Scenario | ||||||||||||
|---|---|---|---|---|---|---|---|---|---|---|---|---|
My goal is to describe who might enjoy the Black Mountain scenarios as I play through. This is a tiny scenario. Best played solitaire because I did not see many options for either sides on turns 1 through 3. Turns 4 to 6 are more interesting but once contact is made, the scenario almost play itself. Montenegro won a minor victory in my play. Playing time: About 2 hours. Balance: Both sides have a chance to win but scenarios of that size are very dependent on early combat results. Solitaire: Decisions are straightforward. It plays quickly so maybe a good option when one wants to roll some dice. Opposed: No, not enough decision. |
||||||||||||
| 0 Comments |
| Gaming Misery on a Mapboard | ||||||||||||||
|---|---|---|---|---|---|---|---|---|---|---|---|---|---|---|
This is arguably the worst scenario that I have ever tried to play with a live opponent. If I could rate this dog with less than a ONE, I would. The game system is ill-conceived and clumsy to learn and use. There should be a rifle/machine gun crossfire rule. Close assaults are inevitably, lengthy die rolling contests and far too unpredictable. There should be a new set of CRT charts that do not rely on the usual APL bell curve. The Infantry Attacks 2nd edition rules are a disorganized mess, the scenario is playable but miserable in action and not much fun. It has the now-characteristic Austrian side bias that is readily apparent. A rewrite would greatly improve the scenario's balance and victory conditions. All in all, this is a good example to avoid . . . |
||||||||||||||
| 1 Comment |