
|
Ras ed Dekhla Big Red One #46 |
||
|---|---|---|
| (Defender) Germany | vs | United States (Attacker) |
| Formations Involved | ||
|---|---|---|
| Germany |  |
10th Panzer Division |
| Germany |  |
69th Panzer Grenadier Regiment |
| United States |  |
16th "Semper Paratus"" Infantry Regiment |
| United States |  |
18th "Vanguards" Infantry Regiment |
| United States |  |
1st "Big Red One" Infantry Division |

|


| Overall Rating, 3 votes |
|---|
|
4.33
|
| Scenario Rank: --- of 961 |
| Parent Game | Big Red One |
|---|---|
| Historicity | Historical |
| Date | 1943-03-29 |
| Start Time | 12:00 |
| Turn Count | 18 |
| Visibility | Day |
| Counters | 80 |
| Net Morale | 0 |
| Net Initiative | 2 |
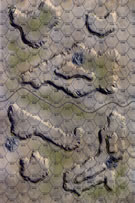
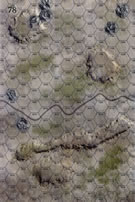
| Maps | 2: 77, 78 |
| Layout Dimensions | 86 x 28 cm 34 x 11 in |
| Play Bounty | 173 |
| AAR Bounty | 167 |
| Total Plays | 2 |
| Total AARs | 1 |
| Battle Types |
|---|
| Exit the Battle Area |
| Hill Control |
| Inflict Enemy Casualties |
| Conditions |
|---|
| Off-board Artillery |
| Scenario Requirements & Playability | |
|---|---|
| An Army at Dawn | Maps + Counters |
| Big Red One | Base Game |
| Introduction |
|---|
|
Scenario Forty-Six The 26th Infantry Regiment's effort to secure Ras ed Dekhla had been repulsed, but the Americans had secured a small toehold on the Djebel el Mcheltat. Patton, now pressured by Harold Alexander at 18th Army Group as well as British First Army, told Allen at 1st Infantry Division to continue the frontal assault on the heights. The division commander hoped that his 18th Infantry advanci9ng on the left flank of the 16th Infantry would help in this effort. |
| Conclusion |
|---|
|
The Americans had a better day as they drove the defenders from Ras ed Dekhla. In addition, a portion of 18th Infantry Regiment entered the fray on Djebel el Mcheltat, helping to push the defenders eastward. The armor that should have been ready to exploit the infantry's success did not reach their assembly areas as scheduled, enraging the corps commander and drawing yet more "concern" from higher levels. |

|
|
|---|
| AFV Rules Pertaining to this Scenario's Order of Battle |
|---|
|
| Heer |
|---|
|


| Army |
|---|
|


| 2 Errata Items | |
|---|---|

|
The reduced direct fire value of the Heer HMG became 5-5 starting with Fall of France. (plloyd1010
on 2015 Jul 31)
|

|
The morale and combat modifiers of German Sergeant #1614 should be "0", not "8". (Shad
on 2010 Dec 15)
|
| Push the Jerries off Ras ed Dekhla & Move East – NOT! | ||||||||||||||
|---|---|---|---|---|---|---|---|---|---|---|---|---|---|---|
This was an exciting, 5-session play-through with the determined & undaunted, Col. Sonichu, ably leading defending elements of the German 69th Panzer Grenadier Regiment of the 10th Panzer Division. I led attacking elements of the US 1st Infantry Division, in the hilly terrain of Tunisia. Remarkably, both sides drew exceptional sets of combat leaders. Alas, no tanks for the T-Rex in this one. We used the FOW, smoke/illum, excess initiative, consolidation, hidden units (Germans) and strategic movement optional rules, along with the following 2 house rules: 1) Road Movement for Mechanized & Foot Units - All FOOT & MECHANIZED units may move on roads at the rate of 1/2 Movement Point (MP) per road hex, just like MOTORIZED units, and 2) Standardized Movement for Mechanized Units - All mechanized units may move through clear hexes at a movement cost of only 1 movement point (MP) per hex, instead of 1 1/2. Add one to this cost if moving up, across, or down slopes hexes. The initial session (game turns 1-4) the US movement to contact in three separate pincers – from the north, west and southwest. Receiving considerable opfire and accurate German artillery strikes, the American side took 4 step losses and a reduction in their initiative going up the western & northern 20-meter slopes of Ras ed Dekhla. GI losses would have been far higher but for effective smokescreens placed by their supporting mortar platoons. The steadfast German defenders lost only a single step of their 81mm mortars on the big hill. Our second session (game turns 5-7) was an exceptional one for the defending Wehrmacht force, and it prove decisive given the difficult American victory conditions. Stubborn resistance continued atop the Ras ed Dekhla, and was enhanced by Landser counter attacks and a series of excellent morale recoveries. In the east, 10th Panzer troopers moved inexorably to the west and began bypassing the block force of American units to their north. The revised step losses were now: 7 for the Germans, and 8 for the scrambling American attackers. Both sides suffered declines in their initiative this session. The costly, third session (game turns 8-10) may have included a turn of fate & momentum for the surging American side when 4 of the five 40-meter hexes atop Ras ed Dekhla were liberated by the slowly-advancing GIs, who took advantage of some lucky initiative die rolls and consolidated their ragged lines. The wily German Commander leading a strung out relieving column of Landser infantry made great progress as they moved steadily west, effectively deploying smoke screens, on the south map edge. This was a bloody session with 10 German step losses, and 2 more for the Americans. Again, each side suffered initiative level declines. Our fourth session (game turns 11-14) featured very heavy fighting as the remaining German position atop Ras ed Dekhla maintained its tenuous foothold in the face of multiple adjacent-hex firefights. Excellent Axis maneuver brought relief to the Jerry defenders as a wave of counter-attacking Landsers spilled over the lower slopes of the hill mass. Elsewhere on the battle map, German units were forced to scuttle to the east by deteriorating morale and FOW-shortened game turns. These moves generally succeeded under an umbrella of covering fire provided by the 10th Panzer’s well-positioned mortars and HMGs. Only 2 of the 3 American objectives remain attainable at this point, since the possibility of the Big Red One advancing 10 units off the east edge of the battle map is no longer feasible. The fifth & final session (game turns 15-18) ended in – a very-hard fought –German Minor victory. Amazingly, the Jerry relief column was just strong enough to contest a final hex on the top of Ras ed Dekhla, and hence, they had a good order unit in the right place to ensure that the struggling Americans were unable to achieve more than a single one of their 3 objectives! Final step losses were: 26 for the German defenders and 14 for the Big Red One. This exciting & relatively-balanced, infantry fight requiring many critical decisions and gets a rating of 5, and a recommendation for both SHARED and SOLO play. |
||||||||||||||
| 0 Comments |